– 23 –
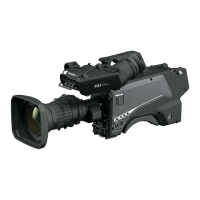
Chapter 2 Description of Parts — Upper side
Upper side
1
2
1
5 6 7
4
8
9
3
1 Viewnder front/back positioning lever
To adjust the front/back position of the viewnder, loosen this lever and slide the viewnder forwards or backwards to adjust the viewnder to a
position that enables easy viewing. After adjusting the viewnder, turn the lever towards <LOCK> to lock the position.
2 Viewnder left-right positioning ring
To adjust the left/right position of the viewnder, loosen this lever and slide the viewnder to the left or right to adjust the viewnder to a position that
enables easy viewing. Tighten the lever to clamp the viewnder in place after adjusting.
3 Light shoe
Used to mount a video light, etc.
4 Microphone holder holes
Used to mount a microphone holder.
5 <PTT> switch
Used to switch the intercom microphone on/off. The function can be changed in [MAIN MENU] [SWITCH MODE] [USER SWITCH] [GRIP
PTT].
6 <RET> switch
Used to switch to the return A signal. The function can be changed in [MAIN MENU] [SWITCH MODE] [USER SWITCH] [GRIP RET].
7 Accessory mounting hole
Used to attach accessories. This hole is used only for the purpose of attaching accessories.
Mounting hole size
- 1/4-20 UNC (screw length 13 mm or shorter)
8 Lock release button
Used to release the lock of the V-groove.
9 V-groove
Used to attach the rear viewnder.
 Loading...