11
L
60mm
Penutup Pengawal Kelajuan /
Regulator Cover /
Ἁᮥᾊᵸ
Buka /
Remove /
ዞᛞ
Skru Kayu /
Wood Screw /
࿋⅛ᨃ
Tapak /
Base /
ኣᢳ
Tapak /
Base /
ኣᢳ
Ke Suis Pengawal Kelajuan /
To Regulator Switch /
ჵἉᮥᾊ᪈⋘
Lubang /
Hole /
ྴ
Lubang /
Hole /
ྴ
Wayar Hidup /
Live Wire /
࿔ị
Palam Dinding /
Wall Plug /
ᾑႺᥐᖜ
Dari Bekalan Kuasa /
Fuse Power Supply /
᱓ᭃ⁶ᨃ
Tapak /
Base /
ኣᢳ
Terminal /
Terminal /
ᴺ
Wayar Hidup / Live Wire /
࿔ị
Ke Suis Pengawal Kelajuan /
To Regulator Switch /
ჵἉᮥᾊ᪈⋘
Lubang /
Hole /
ྴ
Bahagian Unjuran pada Tapak /
Protruding Part on Base /
ኣᢳፇᒷᢳྟ
Pandangan Atas /
Top View /
ᣍᩄ
Tapak /
Base /
ኣᢳ
Penutup Pengawal
Kelajuan /
Regulator Cover /
Ἁᮥᾊᵸ
Tutup /
Close /
⋘ᢾ
Penutup Pengawal Kelajuan /
Regulator Cover /
Ἁᮥᾊᵸ
Skru /
Screw /
⅛ᨃ
Penutup Pengawal
Kelajuan /
Regulator Cover /
Ἁᮥᾊᵸ
Pemeriksaan Selepas Pemasangan / Check Point After Installation /
Ⴒᯮᐋፇᔏ↰ᑍ
Tandakan / Check /
ᑍ
1.
Pastikan Skru Sengkuap Atas dipasang dengan betul.
Ensure the Upper Canopy is securely fi xed.
Ẫམ᮳ᵸླྀ∯ᵏණ
G)
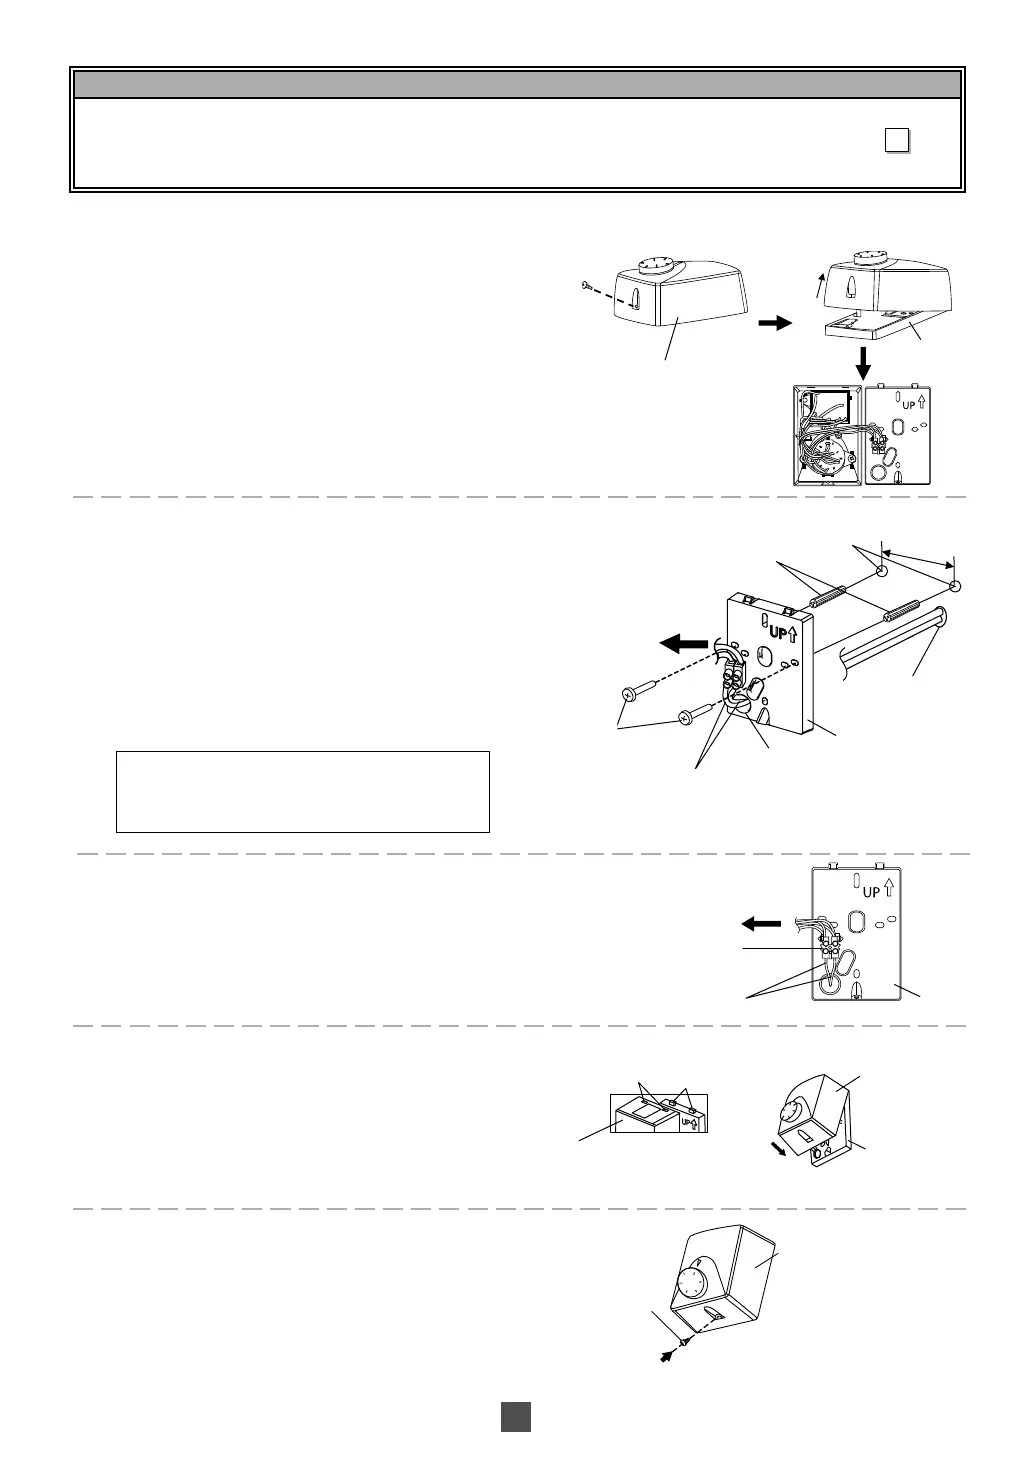
Bagaimana Memasang Pengawal Kelajuan / How To Install The Regulator /
ႫᄌႲᯮἉᮥᾊ
1
Keluarkan skru daripada penutup Pengawal Kelajuan.
Buka Penutup Pengawal Kelajuan dengan mengangkat
Penutup Pengawal Kelajuan ke atas daripada Tapak.
Remove the screw from the Regulator Cover. Remove the
Regulator Cover by lifting up the Regulator Cover from the
Base.
ᝫἉᮥᾊᵸዞᛞ⅛ᨃණᝫኣᢳᥒᚼἉᮥᾊᵸዞᛞἉ
ᮥᾊᵸණ
2
Pasangkan tapak Pengawal Kelajuan ke dinding
seperti yang ditunjukkan.
Fix the Regulator base to the wall as shown.
ႫዂၘႲᯮἉᮥᾊኣᢳჵᾑණ
Tarik wayar hidup keluar melalui lubang pada tapak.
Insert the live wire from the wall through the hole at the
base.
ᝈ࿔ịᝫᾑᢥᰮኣᢳፇྴᥐཋණ
Pastikan skru kayu yang digunakan bersaiz M4+18L.
Make sure the wood screw size used is M4+18L.
Ẫዂሢ၊ፇ࿋⅛ᨃྷᐸ!
M4+18L
ණ
Palam dinding tidak diperlukan bagi dinding kayu.
The wall plugs are not needed for wooden wall.
࿋ྂሢ၊ᾑႺᥐᖜණ
Perhatian : Skru Kayu dan Palam Dinding tidak disediakan bersama
Kipas Siling.
Note : The Wood Screws and the Wall Plugs are not provided with
the Ceiling Fan.
ᣘᩅදႌᖱྂᎋ࿋⅛ᨃྭᾑႺᥐᖜණ
3
Wayar hidup mesti disambung kepada Terminal dan diketatkan
secukupnya seperti yang ditunjukkan.
The live wire must be connected to the Terminal and be tightened
fi rmly as shown.
࿔ịီ᪠Ⴋዂၘᢧឍჵᴺሖᡄᵏණ
4
Untuk menutup Pengawal Kelajuan, masukkan
dua lubang yang terdapat di bahagian atas
Penutup Pengawal Kelajuan kepada kedua-dua
bahagian yang terdapat pada bahagian Tapak.
To close the Regulator, insert the two holes on top
of the Regulator Cover to the two protruding parts
at the Base.
ᝈἉᮥᾊᣍᢳፇስᔷྴᥐཋኣᢳፇስᔷᒷᢳྟ
⋘ᢾἉᮥᾊණ
5
Pasangkan dan ketatkan semula Skru Penutup Pengawal Kelajuan.
Fix and tighten back Regulator Cover by Screw.
ሢ၊⅛ᨃ∯ᵏἉᮥᾊᵸණ
F-M15A0_BMENCS.indd 11F-M15A0_BMENCS.indd 11 1/27/2015 8:53:45 AM1/27/2015 8:53:45 AM