6
VQT4Y53 (ENG)
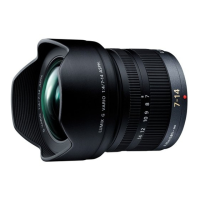
6 [O.I.S.] switch
When the lens is attached to the camera the
stabilizer function is set to activate if the [O.I.S.]
switch is set to [ON].
≥ We recommend setting the [O.I.S.] switch to [OFF]
when using a tripod.
≥ The stabilizer function may not be effective in the
following cases.
– When there is a lot of jitter.
– When the zoom magnification is high.
– When using the digital zoom.
– When taking pictures while following a moving subject.
– When the shutter speed becomes slower to take
pictures indoors or in dark places.
Note
≥ When flash recording with a close subject, the
light of the flash will be blocked by the lens and
part of the picture may be dark. Check the
distance from the subject when recording.
≥
If you zoom after focusing, focusing errors may occur.
After zooming, please perform the focusing again.
Attaching/Detaching the Lens
≥ Refer also to the camera’s
owner’s manual for attaching
and detaching the lens.
≥ Check that the camera is turned
off.
≥ Remove the lens rear cap from the lens.
∫ Attaching the Lens
Align the lens fitting
marks A on the
camera body and the
lens and then rotate
the lens in the
direction of the arrow
until it clicks.
• Do not press the lens release button B when
you attach a lens.
• Do not try to attach the lens when holding it at an
angle to the camera body as the lens mount may
get scratched.
• Check that the lens is attached correctly.
• Be sure to remove the lens cap when recording.
VQT4Y53_ENG_SPA.book 6 ページ 2013年4月2日 火曜日 午後12時14分
 Loading...