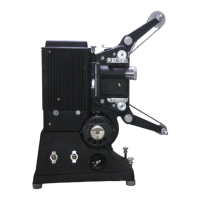
The Eumig Mark 8 is a dual-format film projector designed for silent film projection of both Standard 8, Super 8, and Single 8 mm films. It is a versatile device suitable for enthusiasts and collectors of vintage film equipment, offering features for both projection and maintenance.
Function Description:
The primary function of the Eumig Mark 8 is to project silent films in various 8mm formats. It is equipped with an AUSTROVAR 1.4/15-25 mm projection lens and a 12V/100W halogen lamp (562 U 240) for illumination. The projector supports automatic film threading, provided the film is not strongly buckled or bent, and a sturdy leader strip is spliced to the beginning. It offers various projection modes, including forward, reverse, and still picture projection, allowing for flexible viewing experiences. The device also includes features for adjusting projection height and running speed.
Important Technical Specifications:
- Film Formats: Standard 8, Super 8, Single 8 mm films.
- Projection Lens: AUSTROVAR 1.4/15-25 mm.
- Lamp: 12V/100W halogen lamp, type 562 U 240.
- Running Speeds:
- 18 frames per second (knob 6 pushed down).
- 24 frames per second (knob 6 pushed up).
- Interchangeable Parts for Standard 8 Projection (dark grey):
- 2 Sprocket Drums (706 U 141).
- 1 Film Guide (706 U 136).
- 1 Film pressure plate (706 U 106).
- Interchangeable Parts for Super 8 Projection (light grey):
- 2 Sprocket Drums (706 U 140).
- 1 Film Guide (706 U 135).
- 1 Film pressure plate (706 U 107).
- 1 Reel Adapter (706 T 335).
- Included Accessories:
- 1 Supply Cable with Plug.
- 1 Special Take-Up Reel (596 U 121).
- 1 Instruction Booklet.
- 1 Guarantee Card.
- Available as Accessory (film reels):
- 400 ft capacity for Standard film (596 F 017).
- 400 ft capacity for Super film (596 F 020).
Usage Features:
Before Use:
- Compatibility Check: Ensure the electric supply's voltage and frequency match the projector's specifications.
- Voltage Adjustment: If necessary, adjust the voltage by removing the back cover, pulling out the red plug on the transformer, and replacing it in the appropriate socket.
- Frequency Adjustment (special models only): Pull out the blue plug and replace it, then adjust the lever at the top right to display the required frequency horizontally.
- Back Cover Replacement: After adjustments, replace the back cover.
Adaption for Standard 8 Projection:
- Release the pressure guides of the feed and take-up sprockets.
- Remove the light grey sprocket drums.
- Insert the dark grey sprocket drums, ensuring they click into position.
- Close the pressure guides.
- Pull the lens forward slightly.
- Turn the knurled knob until the red dot is in the top position.
- Push the light grey film pressure plate towards the lens and remove it.
- Push the light grey film guide towards the lens, remove it, and replace it with the dark grey film guide. Push it in until it stops, then push left until the guide pins click.
- Replace the dark grey film pressure plate.
- Remove the light grey reel adapter from the front reel support and secure it in the projector lid.
- Note: For Super 8 projection, the dark grey parts must be exchanged for the light grey parts, and knob 3 must be turned so the red dot is in the TOP position.
Projection:
- Splice a sturdy leader strip to the film. Make a straight cut through the front end of the film (through a perforation hole for Super 8, between two for Standard 8).
- Connect the projector to the mains (the pilot lamp will turn on).
- Swing out the reel supports.
- Place the full reel on the front reel support, with perforations facing you.
- Place the special take-up reel on the rear reel support, ensuring it's firmly fastened and the film length indication marks face you.
- Note: Wrongly spooled films must be rewound twice to correct.
Height Adjustment:
- Raise the projector by the front end of the carrying handle to the desired projection height.
- Rotate knob 1 left to slide out the support foot, and right to fasten it.
Still Picture Projection:
- Turn the central switch to "still picture." A heat filter protects the film, resulting in slightly less brilliant images.
- If the shutter covers the gate, turn knob 2. Turning this knob with fingers will advance frames as still pictures.
Reverse Projection:
- Set the central switch to "Reverse Projection." The film will play in reverse. Adjust the frame line if necessary.
Film Loop Adjustment:
- If faulty splicing or damaged sprocket holes shorten the film loop (indicated by louder running noise), raise pin 4 and then press key 5 to restore the normal film loop.
Adjustment of Running Speed:
- With the projector connected and the central switch in "0" setting:
- Push knob 6 down for 18 frames per second.
- Push knob 6 up for 24 frames per second.
Rewinding:
- Lead the projected film directly from the special take-up reel to the front reel and fasten it.
- Set the central switch to "Rewind" (without light).
When Projection is Completed:
- Set the central switch to "0."
- Disconnect the projector from the mains.
- Put film guide arms in the vertical position.
- Remove reels.
- Swing in the reel supports.
Removal of a Partially Projected Film:
- Set the central switch to "0" and pull the lens forward.
- Pull out the film pressure plate.
- Release the pressure guides of the feed and take-up sprockets.
- Carefully release the film from its entire channel (remove lamp housing if necessary).
- Re-insert the film pressure plate.
- The film can then be rewound normally.
Maintenance Features:
Replacing the Projection Lamp (with mains plug disconnected):
- Lift off the cover of the lamp housing.
- Turn down the protective plate.
- Pull out the cooled-off projection lamp in an upward direction.
- Insert the new lamp.
- Important: Never touch the projection lamp with bare fingers. Fingerprints will burn into the quartz lamp, diminishing light output. If touched, immediately clean the lamp with a clean cloth moistened with alcohol.
Centring the Projection Lamp:
- Direct the projector towards the screen, turn the central switch to "projection with lamp," and focus the frame-line sharp.
The Eumig Mark 8 is a robust and user-friendly projector, designed to provide a reliable and enjoyable film viewing experience for 8mm film formats, with clear instructions for setup, operation, and essential maintenance.