9GB/IE/NI/CY/MT
5. Clean the tank cover (7) and the surroundings.
6. Check the fuel tank (8) and fuel lines for leaks.
7. Move at least three meters away from the refuelling
area before starting the engine.
11. Starting up
NOTE: Some noise pollution from this device is unavoid-
able. Postpone noisy work to approved and designat-
ed times. If necessary, adhere to rest periods and limit
the duration of work to the bare minimum. For your
personal protection and the protection of nearby per
-
sons, wear suitable hearing protection.
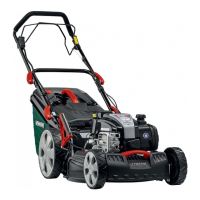
11.1 Blade stop device
Before each use, you must check the blade stop device. Start the
engine as described in 12.2.
1. Release the engine brake lever (2). The engine switches
off and the blade (21) is braked.
2. The blade (21) must stop within 7 seconds.
11.2 Setting the cutting height (Fig. 10)
m Attention!
Adjust the cutting height only when
the engine is switched off and the plug boot has
been pulled.
• In dense, tall grass, set the highest cutting level and mow more
slowly. A high cutting height should be selected for the first
cut of the season. Adjust the cutting height so that the device
is not overloaded.
• Set the cutting height depending on the actual length of
the lawn.
• Carry out several passes so that a maximum of 4 cm of
lawn is removed at a time.
• The correct cutting height for
- ornamental grass is about 30 - 45 mm
- utility turf about 40 - 65 mm.
The cutting height is adjusted via the cutting height adjustment
lever (16). Different cutting heights can be set.
1. Pull the cutting height adjustment lever (16) outwards.
2. Move the cutting height adjustment lever (16) to the de-
sired position.
3. Release the cutting height adjustment lever (16) again. It
locks into the desired position.
11.3 Preparing the area to be mowed
1. Before mowing, carefully examine the area.
2. Remove stones, sticks, bones, wires, toys and other objects
that may be ejected by the device.
3. Ensure that no other people are present on the surface to
be mowed.
12. Operation
Working instructions
• Only cut with sharp, flawless mowing blades (21) so that the
blades of grass do not fray and the lawn does not turn yellow.
• To achieve a clean cut, guide the lawnmower in the straight-
est possible paths. These strips should always overlap by a
few centimetres so that no patches remain.
• Keep the underside of the lawnmower housing clean and
be sure to remove grass debris. Deposits make the start-
ing process more difficult, impair cutting quality and grass
discharge.
• On slopes, the cutting path should be made perpendicular
to the slope. It is possible to prevent the lawnmower from
slipping by lifting it upwards at an angle.
12.1 Mowing with the grass collection basket (18)
m Attention! Do not operate the device without the grass
collection basket (18) fully attached.
m Attention! Danger of injury!
Only remove or attach the grass collection basket (18) when
the engine is switched off and the blade (21) is stationary.
12.1.1 Inserting the grass collection basket (18)
(Fig. 11)
1. Lift the rear discharge flap (17).
2. Hold the grass collection basket (18) by the carrying
handle.
3. Hang the grass collection basket (18) in the grass collec-
tion basket suspension provided at the rear of the device.
4. Put down the rear discharge flap (17), it holds the grass
collection basket (18) in position.
12.1.2 Level indicator (18a) on the grass
collection basket (18) (Fig. 12)
The air flow generated by the blade (21) lifts the level indica-
tor (18a). When the grass collection basket (18) is full, the air
flow stops. If the air flow is too low, the level indicator (18a)
closes. This is a note to empty the grass collection basket (18).
The unrestricted function of the level indicator (18a) is only as-
sured with optimum air flow. External influences such as wet,
dense or high grass, low cutting levels, dirt or similar can affect
the air flow and the function of the level indicator (18a).
• Flap open: Grass collection basket (18) is being filled
• Flap closed: Grass collection basket (18) is full
12.1.3 Emptying the grass collection basket (18)
(Fig. 11)
m WARNING
Before removing the grass collection basket (18),
switch off the engine (see 12.3) and wait for the
blade (21) to stop.
m Attention! Danger of injury!
Remove the grass collection basket (18) only when the engine
is switched off and the blade (21) is stationary.
As soon as grass cuttings are left lying behind on the ground
during mowing, the grass collection basket (18) must be emp-
tied.
1. To remove the grass collection basket (18), lift the rear
discharge flap (17) (Fig. 11).
2. Take out the grass collection basket (18) by the carry-
ing handle. In accordance with the safety regulations,
the discharge flap (17) closes when the grass collection
basket (18) is unhooked and closes the rear ejection
opening.

 Loading...