■ 8
│
GB
│
CY PLPRS 1.5 B3
Handling and operation
In this chapter you will receive important infor-
mation for the handling and operation of the
appliance.
Heat up the wax melter tip
♦ Press and hold the activation button ON /
OFF
to heat up the wax melter tip .
The red LED
will remain lit as long as you
hold down the activation button ON /
OFF
.
Application example
Preparation (Fig. A)
♦ Clean the damaged area with the spatula
and remove all loose parts. Press the edges
of the damaged area round.
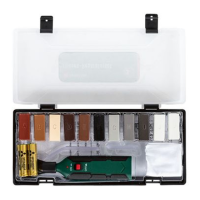
Colour selection (Fig. B)
♦ Select the matching colour tone.
Ensure that several colour tones, from light to
dark, are always used. With real wood, it is
recommended to additionally work with trans-
parent (K), so as to achieve a sense of depth.
Melting and filling (Figs. C + D)
♦ Press and hold the activation button ON /
OFF
to heat up the wax melter tip .
The appliance reaches operating temperature
after about 15 seconds.
♦ Now melt small portions of the hard wax and
place them into the damaged area, until it is
slightly overfilled. Start with the light colour
tones and progress step by step to the dark
colour tones.
NOTICE
► At pressure points it is often sufficient if you
use only the transparent hard wax (K).
Filling (Fig. E)
♦ For vertical surfaces it is recommended to mix
the colour tone beforehand, collect it on the
spatula
and then fill the damaged area.
When working on curved areas the scraper
with curvature
should be used to fill hard
wax into the damaged area.
CAUTION
► The wax melter tip
gets very hot! When
mixing the colour, use a work surface made
of a suitable heat-resistant material, such as
ceramic.
 Loading...