EasyManua.ls Logo

Parkside POF 1200 D3 User Manual

Parkside POF 1200 D3
47 pages
To Next Page IconTo Next Page
Page #1 background imageLoading...
Page #1 background image
ROUTER POF 1200 D3
ROUTER
Translation of the original instructions
ΚΆΘΕΤΗ ΦΡΕΖΆ
Μετάφραση των αυθεντικών οδηγιών λειτουργίας
OBERFRÄSE
Originalbetriebsanleitung
IAN 322471_1901

Table of Contents

Question and Answer IconNeed help?

Do you have a question about the Parkside POF 1200 D3 and is the answer not in the manual?
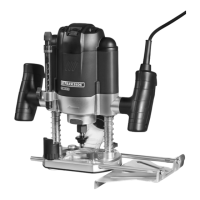
Parkside POF 1200 D3 Specifications

General IconGeneral
Power1200 W
Collet size6 mm
Weight2.5 kg
Depth adjustmentYes
Cable length2 m

Summary

Introduction to the Router

Intended Use of the Router

Appliance is designed for milling grooves, edges, profiles and oblong holes in wood, plastic and lightweight materials.

Router Features Overview

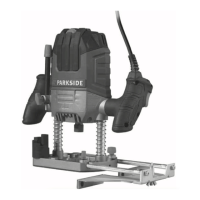
Details product components and accessories, referencing figures A, B, D, and F.

Package Contents

Lists all items included in the delivery of the router.

Technical Specifications

General Power Tool Safety Warnings

1. Work Area Safety

Keep work area clean and well lit. Cluttered or dark areas invite accidents.

2. Electrical Safety

3. Personal Safety

4. Power Tool Use and Care

5. Service and Maintenance

Safety Instructions for Routers

Handle Appliance Safely

Hold appliance using insulated handle surfaces. Contact with live wire may cause electric shock.

Supplementary Notes

Original Accessories and Auxiliary Equipment

Before Use: Milling Cutter Set

Milling Cutter Set and Areas of Use

Details original accessories included for profiling and linking, listing cutter types and sizes.

Inserting a Milling Tool

Changing the Collet Chuck

Fitting the Rip Fence

Setting Up the Router

Switching On and Off

Procedure for turning the router on and off using the safety lock-out and ON/OFF switch.

Preselecting Rotation Speed

Instructions on setting the required speed using the adjusting wheel for speed preselection.

Setting the Milling Depth

Steps to set initial milling depth by locking the clamping lever and adjusting the depth stop.

Re-adjusting Milling Depth

Procedure to readjust milling depth using the dial and clamping lever after initial setup.

Setting Milling Depth with Step Stop

Using the step stop for greater milling depths in several stages with less chip removal.

Milling Direction and Operation

Fitting and Using the Copy Sleeve

Milling with the Rip Fence

Milling with a Compass

Maintenance and Cleaning

Disposal Guidelines

Kompernass Handels GmbH Warranty

Warranty Conditions

Details warranty period, proof of purchase requirements, and conditions for repair or replacement.

Warranty Period and Statutory Claims

Explains warranty duration, reporting defects, and repair costs after warranty expiry.

Scope of the Warranty

Defines what is covered (material/production faults) and what is excluded (wear, misuse, consumables).

Warranty Claim Procedure

Service Contact Information

Importer Information

Translation of Original Conformity Declaration

Related product manuals