UNIT DESCRIPTION AND OPERATION
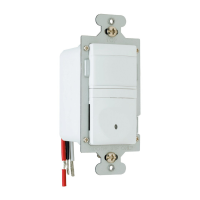
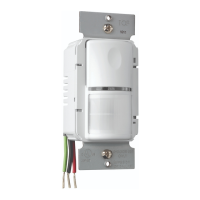
TheWSP‑250WallSwitchOccupancySensorsturnlightingorfanloadsonand
offbasedonoccupancyandambientlightlevel.Theyaredesignedtoreplacea
standardlightswitch.TheWSP‑250operateswith120or277VAClinevoltage.
Thesensorusespassiveinfraredtechnologytosensehumanmotion,and
definesitasoccupancy.AgreenLEDonthesensorblinksuponoccupancyand
thenresets.Itwillblinkagainwhenitdetectsmotionafterthe2‑secondreset.
Thesensorturnsontheloadautomaticallywhenitdetectsoccupancy.Oncethe
spaceisvacantandthetimedelayelapses,itturnsofftheloadautomatically.
Ifadequateambientlightisalreadypresentinthearea,thesensorwillhold
offtheloaditcontrols.Whenthelightdropsbelowafieldselectableleveland
thesensordetectsoccupancy,thesensorturnsontheload.Onceturnedon,
theloadremainsonuntilthespaceisvacantorthelightlevelrisesabovethe
setpointandthetimedelayexpires.
Manual Operation: TheoccupantcanpresstheON/OFFbuttontoturntheload
onandoff.Whentheloadisturnedofforonmanually,itstaysofforonaslong
asthesensordetectsmotion.Afternomotionisdetectedforthelengthofthe
timedelay,thesensorgoesbacktoautomaticoperation.Iftheloadwason,it
turnsoff.Thenexttimethesensordetectsoccupancyandtheambientlightis
lowerthanthesetlevel,thesensorautomaticallyturnsontheload.
Walk-test feature:
WhentheTimeDelaytrimpot
isinthefullycounterclockwise
position,thesensorhasa30
secondtimedelayandtheLight
Levelfunctionisdisabled.This
allowsyoutoquicklycheckthe
sensorcoveragearea.
Override function:
Intheeventofunitfailureor
ifitisnecessarytoleavethe
loadon,removetheOverride
Jumperplug.Thisdisablesall
automaticonandofffunctions
andtheloadcanonlybe
operatedusingtheON/OFF
button.
COVERAGE PATTERNS
TheWSP‑250detectsmotioninareasupto900sq.ft.andupto35feetfrom
thesensor.Ideally,thesensorisdesignedforsmallamountsofmotionin
spacesupto300sq.ft.TheFresnellensonthesensorisamultiplesegment
viewinglenswithafieldofviewof180°.
Thesensormusthavea
clearviewofthepeoplein
thespaceinordertodetect
occupancy.Obstructions,
suchasfurnitureblocking
thesensor’slens,may
preventoccupancy
detection.
Masking the lens
Opaqueadhesivetapeissuppliedsothat
sectionsofthesensor’sviewcanbemasked.
Thisallowsyoutoeliminatecoveragein
unwantedareas.
Sincemaskingremovesbandsofcoverage,
remembertotakethisintoaccountwhen
troubleshootingcoverageproblems.
1. Connecttheexistingwiresinthewallboxtothesensorflyingleads.
(SeeWiringDirectionsatright).
• Donotallowbarewiretoshowbelowconnector.
• Thegroundwiremustbetightly grounded fortheunittooperate
properly.
2. Attachthesensortothewallbymountingitinthewallboxwiththetwo
mountingscrewsprovided.
3. Turnonpoweratthecircuitbreaker.
There is an initial warm-up period after installation.Itmaytakeuptoa
minutebeforetheloadturnsonduetoasensorwarm‑upperiodduring
initialpower‑up(thisoccursduringinstallationonly).Theloadturnsonafter
thewarm‑upperiodendsifthesensordetectsmotion.
Rapid successive pressing of the ON/OFF button causes a delay in function.
Asinglepressofthebuttoncausesanimmediateresponse.Ifthebutton
ispressedagainwithin2seconds,theswitchignoresit.Waitatleasttwo
secondsbetweenbuttonpresses.
4. TestthesensorusingtheprocedureintheSensorAdjustmentssection.
5. Replacewallswitchcoverplate.
CAUTION
Turn the power off at the circuit breaker before installing the sensor.
INSTALLATION
Cover plate
WSP-250
Wall Switch
Wall
Junction Box
 Loading...