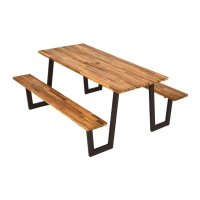
This document describes the assembly and features of the PATIOJOY Wood Picnic Table with Benches, model HW66265. It serves as an instruction booklet containing important safety information and detailed steps for construction.
Function Description:
The PATIOJOY Wood Picnic Table with Benches is a piece of outdoor furniture designed for dining and seating. It features a central table surface and two integrated benches, providing a complete seating solution for outdoor spaces such as patios, gardens, or parks. The table includes a parasol hole, allowing for the addition of an umbrella to provide shade. The construction is primarily wood, supported by steel legs, ensuring stability and durability for outdoor use.
Important Technical Specifications:
Part List:
- Wood Components:
- (1) Big slat support: 2 units
- (2) Small slat support: 2 units
- (3) Middle slat support: 1 unit
- (4) Side top: 2 units
- (5) Middle top: 1 unit
- (6) Bench seat: 2 units
- (7) Seat apron: 2 units
- Steel Components:
- (8) Left steel legs: 2 units
- (9) Right steel legs: 2 units
- (10) Corner support: 4 units
- Accessories:
- (11) Parasol hole cap: 1 unit
Hardware List:
- Screws:
- (A) M4X20 mm Screw: 82 units
- (B) M5X50mm Screw: 8 units
- (C) M5X60mm Screw: 6 units
- (F) M6X25mm Screw: 28 units
- Bolts/Dowels:
- (D) M6X60mm Bolt: 8 units
- (E) M6X10mm Iron dowel: 8 units
- Tools:
- (G) Allen key: 2 units
- (H) M6X35mm Tool: 1 unit
Usage Features:
The picnic table is designed for ease of assembly and practical outdoor use.
- Assembly Process: The manual provides a step-by-step guide for assembly, starting with attaching the slat supports to the table and bench tops, followed by securing the steel legs and corner supports. The process is broken down into 8 distinct steps, with clear diagrams and hardware callouts for each stage.
- Step 1 (Table Top Assembly): Involves attaching the big, small, and middle slat supports ((1), (2), (3)) to the side and middle tops ((4), (5)) using M4X20 mm screws (A). This step requires 33 (A) screws for the side tops and 16 (A) screws for the middle top.
- Step 2 (Leg Attachment to Table): Focuses on attaching the left and right steel legs ((8), (9)) to the table frame using M6X25mm screws (F). This step requires 4 (F) screws per leg set, totaling 4 sets.
- Step 3 (Corner Support Installation): Involves securing the corner supports (10) to the table structure using M6X60mm bolts (D) and M6X10mm iron dowels (E). The M6X35mm tool (H) is used for this process. This step requires 4 sets of (D), (E), and (H).
- Step 4 (Bench Leg Attachment): Similar to Step 2, this step involves attaching the steel legs to the bench frames using M5X50mm screws (B). This step requires 4 (B) screws per bench leg set, totaling 4 sets.
- Step 5 (Bench Seat Assembly): Attaches the bench seats (6) to the seat aprons (7) using M5X60mm screws (C). This step requires 2 sets of (C) screws, with 3 (C) screws per set.
- Step 6 (Final Table and Bench Assembly): This crucial step involves integrating the assembled table and bench components. It details how to connect the table top to the leg structures and the bench seats to their respective leg structures. This step uses M6X60mm bolts (D), M6X10mm iron dowels (E), M6X35mm tool (H), and M6X25mm screws (F). It involves 4 sets of (D), (E), (H) for one part of the connection and 4 sets of (F) for another.
- Step 7 (Parasol Cap Installation): Places the parasol hole cap (11) into the designated hole in the middle of the table.
- Step 8 (Finished): Indicates the completion of the assembly.
- Stability and Safety: The instructions emphasize placing the product on a flat, steady, and stable surface. Small parts and packaging materials should be kept away from babies and children to prevent choking hazards.
- Portability: The design suggests that the product should ideally be assembled near its intended use location to avoid unnecessary movement once assembled, implying a sturdy but potentially heavy structure.
- Parasol Compatibility: The inclusion of a parasol hole and cap allows users to easily add an umbrella for sun protection, enhancing its functionality for outdoor use.
Maintenance Features:
The manual provides important guidelines for handling returns and damage claims, which indirectly relate to product maintenance and longevity.
- Return/Damage Claim Instructions:
- Do NOT discard the box/original packaging: Essential for returns, as items must be returned in their original packaging.
- Take a photo of the box markings: Required for part replacement to help identify the product number and ensure correct parts are sent.
- Take a photo of the damaged part (if applicable): Always required for filing a claim and expediting replacement or refund processes. Users are advised to keep the box even if it is damaged.
- Send an email with the images requested: Claims should be submitted via email from the marketplace of purchase, including attached images and a description of the claim.
These instructions highlight the importance of proper documentation for any issues, which can contribute to the long-term satisfaction and usability of the product by facilitating repairs or replacements. While direct maintenance steps like cleaning or weatherproofing are not explicitly detailed, the emphasis on careful handling and proper assembly (as indicated by the "Before You Start" section) suggests that adherence to these guidelines will contribute to the product's durability. The use of wood and steel components implies a need for typical outdoor furniture maintenance, such as occasional cleaning and protection from extreme weather, though these specific steps are not included in this document.