© Pritchard Patent Product Co. Ltd,
Beer, Devon, EX12 3NA, England
01043 02.08
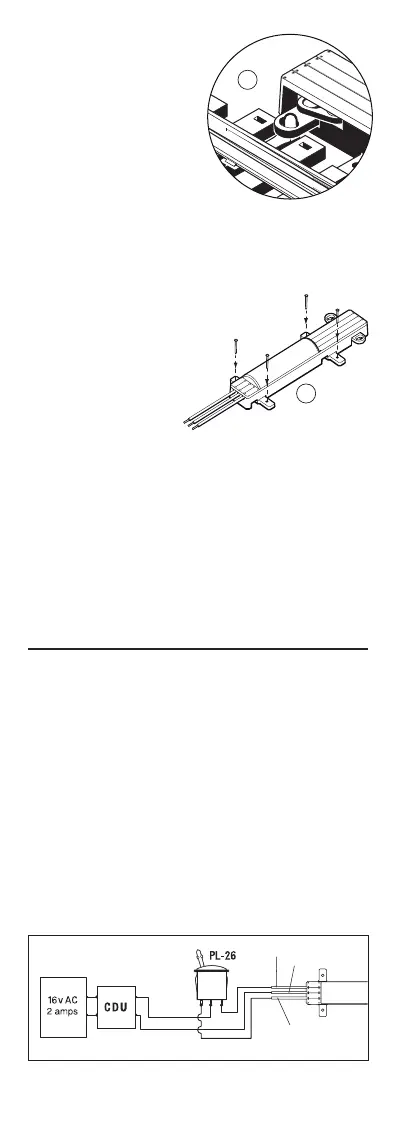
WIRING. The Turnout Motor is for low voltage use only. 16v AC at 2 amps is
recommended. The Motor should be energised only momentarily. Never allow
the current to remain on. Use PECO Lever Switch PL-26 or Probe and Studs
PL-17 & PL-18. The motor will work more efficiently with a capacitor discharge
unit (CDU) PL-35, (only one unit per layout needed).
CÂBLAGE. Le moteur d’aiguille est prévu uniquement pour les tensions
faibles. Nous conseillons 16v CA à 2A. Il faut que le moteur ne soit que sous
tension momentanément. Utiliser l’interrupteur PECO PL-26 ou la sonde et les
goujons PL-17 & PL-18. Le moteur marchera à plus de rendement avec une
unité de décharge à condensateur (CDU) PL-35 (une unité par reseau exigée).
ELEKTRISCHEN ANSCHLUß. Der Weichenmotor ist Niederspannung bis 16
Volt 2A vergesehen. Der Weichenmotor sollte nur kurzzeitig eingeschaltet sein,
verwenden Sie den PECO Schalter PL-26 oder Sonde und Kontakte PL-17 &
PL-18. Eine Kondensator-Entlastungseinheit (CDU) PL-35 kann zur Sicherheit
ergänzend eingebaut werden.
CABLEADO. El motor de desvío solamente se puede usar a bajo voltaje. Se
recomienda 16v AC (2A). El motor debería ser estimulado eléctricamente solo
momentáneamente. Use el interruptor de palanca PECO PL-26 o PL-17 y PL18.
Se puede añadir una unidad de descarga del condensador
(CDU) PL-35.
Fixing
4. Fix the motor into position by
pinning through the holes
provided or by gluing with an impact
adhesive, ensuring again that the Tiebar still moves freely. To work efficiently
the point motor and turnout need to be firmly fixed together.
4.Fixer le moteur au moyen des quatre goupilles ou on peut coller la unité
avec un adhésive d’impact. Assurer encore que la barre de raccordement peut
bouger librement. Afin qu’ils marchent avec efficience, il faut que le moteur et
l’aiguille se sont fixés ensemble fermements.
4. Befestigen Sie den Antrieb durch Schrauben, Nädeln, oder ausreichend
Kontakt-Klebstoff auf der Anlagengrundplatte. Wichtig: Stellschwelle mußte
noch freilich sich bewegen. Zum richtig funktionieren, Weiche und Antrieb fest
zusammen befestigt sein mussen.
4
.
Fije el motor en posición uniéndolo por los pins a través de los agujeros o
encolándolo con un adhesivo de impacto, asegurándose una vez más que el
espadín todavía se mueve libremente. Para trabajar eficientemente el punto
motor y el desvío necesitan ser firmemente fijados juntos.
4
3.With the drive link hooked over the
peg of the Tiebar, ensure the Tiebar and
Drive link move freely and equally from side
to side.
3. Dès que le lien de commande est agrafé par-dessus
la cheville, assurer que la barre de raccordement et le lien peuvent bouger
librement et avec égalité d’un côté à l’autre.
3. Nachprüfen Sie daß beim Schaltern des Antriebs die Verbindung und
Stellschwelle ohne Behinderung bis in die Endlagen bewegen kann.
3
.
Con la unidad de enlace colocada en el espadín, asegurarse que el espadín
y la unidad de enlace se mueven libre y por igual
de un lado al otro.
3
Fitting to other Peco turnouts:
Montage aux autres
aiguillages Peco:
Verwendung bei anderen
Peco Weichen
Montaje en otros desvíos Peco:
 Loading...