- 14 -
ALL REQUIREMENTS COVERED IN
ASTM F833 STANDARD AND LATEST
REVISIONS.
COMPONENTS OF THE ITEM
Check the contents of the packaging and if
you have any complaints please contact the
Assistance Service.
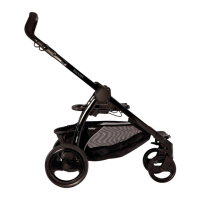
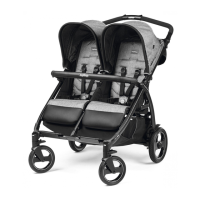
_ The Book For Two pushchair features: a basket, 2
rear wheels, 2 front wheels, handlebar, front bar,
hood, rear wheel crosspiece
The images referring to the textile details
may differ from the collection purchased.
INSTRUCTIONS
1 OPENING: Before opening the frame, remove
(without using blades) any die-cut cardboard.
WARNING:
_ DO NOT PULL OR FORCE THE FASTENER
BEYOND ITS LIMIT.
_ DO NOT USE THE FASTENER AS A CARRY
HANDLE OR TO CARRY WEIGHTS.
DO NOT HANG BAGS OR OTHER
ACCESSORIES TO THIS FEATURE.
Press down the side fastener, hold the upper
section of the handle and rotate it towards
you until the frame is fully opened (fig_a).
Open frame (fig_b).
The frame is properly opened when the
attachment on the base clicks into place, as
shown.
2 FITTING THE WHEELS: Slot the uprights into
the rear wheel crosspiece (fig_a), ensuring
that it is facing the right way, then push the
rear wheels on and make sure that they click
into place (fig_b). To mount the front wheels,
fit them into the uprights until they lock into
place (fig_c).
3 ATTACHING THE MAIN HANDLE: if the handle
tube faces upwards, align it with the stroller
(Fig_a).
Fasten the handle to the frame as shown in
the figure (Fig_b).
To complete the operation, press the two
side buttons on the handle (Fig_c) to ensure
the handle pushes in all the way, until it clicks
into place (Fig_d).
4 FITTING THE BASKET: if lowered, lift the
basket tube to the horizontal position. Press
the silver buttons under the metal basket
tube located at the back of the stroller (fig_a)
and remove the metal tube (fig_b). Thread
the tube through the fabric loop on the
back of the basket, making sure that the two
silver buttons are facing downward (fig_c).
Re-attach the tube to the housings (fig_d).
5 IMPORTANT! Fasten the three lower basket
loops to the three grey buttons on the rear
bar (fig_a)
Secure the two upper basket vinyl eyelets to
the two grey buttons on either side of the
metal tube housing.
Note that the loops open (fig_b). Fasten the
two Velcro straps to the sides of the frame
(fig_c).
WARNING! If this operation is not completed
properly, the basket will not support any
weight.
Fix the front flaps of the basket onto the
frame’s grey buttons (fig_d) and slip the
central slot onto the frame’s hook (fig_e).
6 HOOD: to apply the hoods, place the
attachments in their seats (matching left and
right) until they click.
7 Fasten the Velcro strip on the rear of the
backrest (fig_a), secure the central rubber
band (fig_b) and the side rubber band (fig_c).
8 Button laterally (fig_e) and centrally (fig_f)
the two buttons to the frame.
9 SWIVEL WHEELS Lower the lever to release
the front wheels (swivel position) (fig_a). Lift
the lever to fix the front wheels (fig_b). The
rear wheels are fixed.
10 Press the lever down to apply the brake and
lock the frame. Do the opposite to release the
brake (fig_a)
ADJUSTABLE HANDLEBAR: To adjust the
height of the handlebar, press both of the
side buttons at the same time (fig_b) and
swing it into the desired position (fig_c), then
release the buttons.
11 FOOTREST: before adjusting the foot rest,
ensure its cover is accurately fitted; if it isn’t,
fit it accordingly. To lower the footrest push
the two levers downwards and then push
the footrest downwards (fig_a); to raise the
footrest lift it upwards (fig_b).
12 FRONT BAR: to remove the front bar, pull it
out to the second position (fig_a) and remove
(fig_b).
Open-close front bar: remove it from one side
and rotate (fig_c).
13 HOOD: The hood comes with a loop for
hanging your child's favorite toy (fig_a) and a
see-through window for observing your child
(fig_b), which can be lifted and fastened. You
can detach the Velcro, roll up the back of the
hood and fasten it at the top with the rubber
band to allow greater ventilation during use
with the backrest down (fig_c). The hood
may be pulled forward into several positions
(fig_d).
14 ADJUSTING THE BACKREST: to lower the
backrest press the clip (fig_a) and the
backrest will move down to the desired
position (fig_b).
To raise the backrest, press the clip and lift
the backrest to the desired height.
15 FIVE POINT SAFETY HARNESS: To fasten it,
push the two waist strap buckles (with the
shoulder straps attached – arrow_a) into
 Loading...