VEHICLE FEATURES AND
INSTRUCTIONS FOR USE
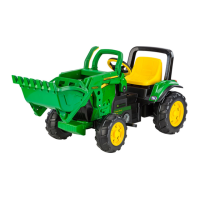
27 •ACCELERATOR PEDAL/ELECTRIC
BRAKE: when the foot is lifted from the
accelerator pedal, the electric brake
automatically stops the tractor.
28 •To dump the front scoop, lower the lever.
29 •To lower the entire front loader, push the
handlebar forward.
BATTERY REPLACEMENT
WARNING:
WARNING: BATTERY CHARGING
AND ANY OTHER OPERATION
ON THE ELECTRICAL SYSTEM
MUST BE CARRIED OUT BY
ADULTS ONLY. THE BATTERY
CAN ALSO BE CHARGED
WITHOUT REMOVING IT FROM
THE VEHICLE.
30 •Unscrew the hood.
31 •Pull the hood towards you while lifting and
turning it to remove (see figure).
32 •Loosen the 2 screws that hold the battery
in place.
33 •Disconnect the 2 plugs and remove the
battery supplied with the vehicle.
34 •Insert a new battery and connect the two
plugs.
35 •Screw the battery clamp into place again,
turning it upside down as shown in the
figure. Close the hood as described above
and fasten with the screw.
BATTERY RECHARGE
PLEASE NOTE: THE PICTURES OF THE
BATTERIES ARE FOR ILLUSTRATIVE
PURPOSES ONLY. YOUR BATTERY MAY BE
DIFFERENT FROM THE MODEL SHOWN.
THIS DOES NOT AFFECT THE
REPLACEMENT AND CHARGING
PROCEDURES DESCRIBED.
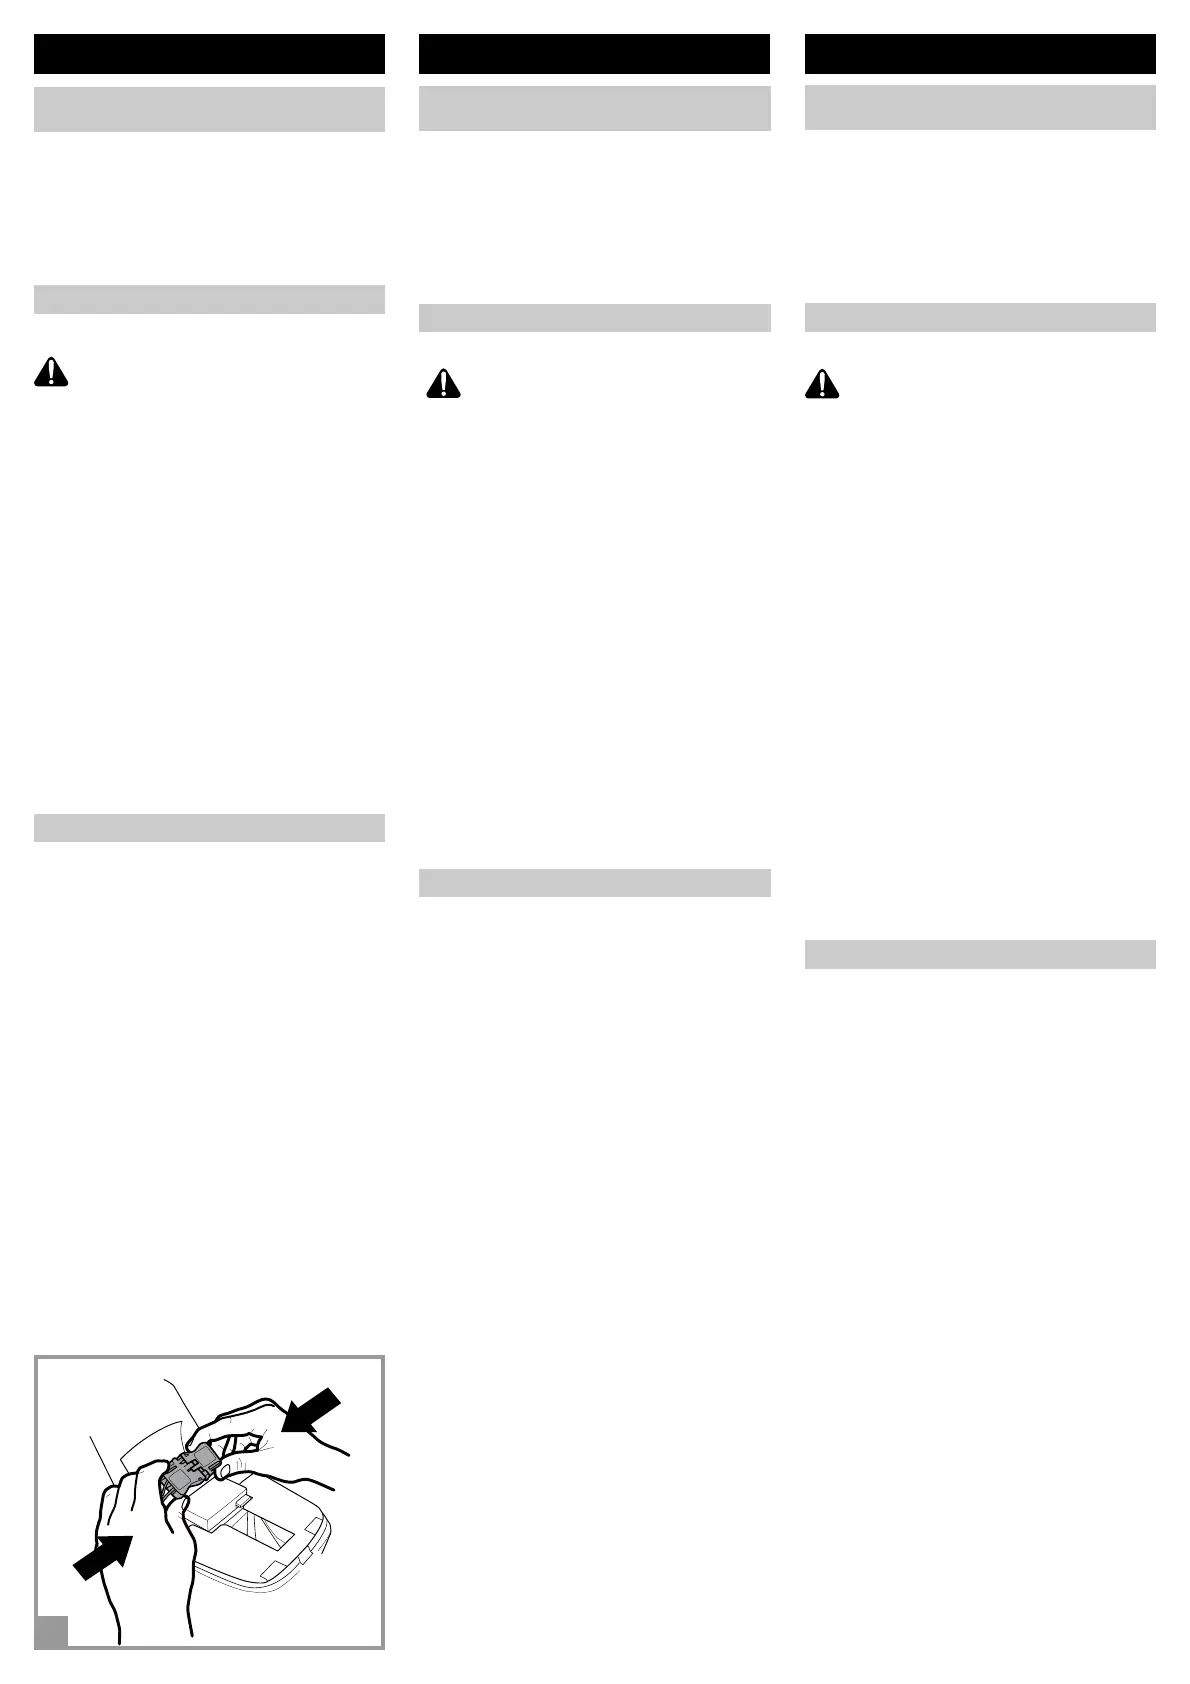
36 •Unplug vehicle wiring terminal A from
battery terminal B, by pressing terminals
on side and pulling apart.
37 •Plug the battery charger terminal to a wall
outlet following the instructions enclosed.
Connect the plug B to the battery charger
plug C.
38 •Once the charge is completed unplug
recharger from wall outlet. Unplug
recharger cord terminal C from battery
terminal B.
39 •Plug battery terminal A into vehicle wiring
terminal B. Close hood.
ENGLISH
FRANÇAIS ESPAÑOL
CARACTERISTIQUES ET MODE
D’EMPLOI DU VEHICULE
27 •PEDALE D’ACCELERATEUR/FREIN
ELECTRIQUE: en soulevant le pied de la
pédale, le frein entre automatiquement en
fonction.
28 •Pour faire basculer la pelle, abaisser le
levier de commande.
29 •Pour abaisser tout le bras de la benne,
pousser la poignée vers l’avant.
REMPLACEMENT DE LA BATTERIE
ATTENTION:
LE CHARGEMENT DE LA
BATTERIE ET TOUTE
INTERVENTION SUR LE CIRCUIT
ELECTRIQUE DOIVENT ETRE
EFFECTUES EXCLUSIVEMENT PAR
UN ADULTE. LA BATTERIE PEUT
ETRE RECHARGEE SANS DEVOIR
LA RETIRER DU JOUET.
30 •Dévisser le capot.
31 •Tirer le capot vers soi, en le soulevant par
un mouvement de rotation (voir la figure),
puis l’enlever.
32 •Dévisser les 2 vis du cache batterie.
33 •Débrancher les deux fiches et enlever la
batterie.
34 •Insérer la batterie de rechange et
connecter les 2 fiches.
35 •Revisser le cache batterie en le retournant,
comme sur la figure. Refermer le capot en
suivant les instructions données plus haut
et le fixer avec la vis.
RECHARGE DE LA BATTERIE
ATTENTION: LES DESSINS DES BATTERIES
SONT DONNÉS À TITRE PUREMENT
INDICATIF. LA BATTERIE EN VOTRE
POSSESSION POURRAIT DIFFÉRER DU
MODÈLE REPRÉSENTÉ. LES SÉQUENCES DE
REMPLACEMENT ET DE CHARGE
REPRÉSENTÉES RESTENT NÉANMOINS
VALABLES.
36 •Débrancher la fiche A de la fiche B en
appuyant sur les côtés.
37 •Insérer la fiche du chargeur de la batterie
dans une prise de courant en suivant les
instructions jointes. Brancher la fiche B et
la fiche C du chargeur de la batterie.
38 •Uen fois la charge terminée, débrancher le
chargeur de batterie C de la prise
domestique en premier lieu et ensuite de
la fiche de la batterie B.
39 •Insérer à fond jusqu'au déclic la fiche A
dans la fiche B. Une fois toutes les
opérations terminées, veiller à bien
refermer le capot.
CARACTERÍSTICAS Y USO DEL
VEHÍCULO
27 •PEDAL ACELERADOR/FRENO
ELÉCTRICO: al levantar el pie del pedal, el
freno entra en funcionamiento
automáticamente.
28 •Para volcar la pala, bajar la palanca de
mando.
29 •Para bajar todo el brazo del cucharón,
empujar hacia adelante el mango.
SUSTITUCIÓN DE LA BATERÍA
ATENCIÓN:
LA OPERACIÓN DE RECARGA DE
LA BATERÍA ASÍ COMO
CUALQUIER INTERVENCIÓN
ELÉCTRICA, DEBEN SER
REALIZADAS ÚNICAMENTE POR
PERSONAS ADULTAS. LA BATERÍA
TAMBIÉN SE PUEDE RECARGAR
SIN QUITARLA DEL JUGUETE.
SÓLO PARA EL BRASIL: TENSIÓN DEL
CARGADOR: 127V - 60 HZ.
OBSERVACIÓN: NO UTILIZAR EL
CARGADOR DE LA BATERÍA CON
UNA TENSIÓN DE 220V.
30 •Destornillar el capó.
31 •Tirar hacia sí el capó, levantándolo al
mismo tiempo con un movimiento
rotatorio (véase la figura) y sacarlo.
32 •Quitar los 2 tornillos del sujeta-batería.
33 •Desconectar las 2 clavijas y sacar la batería
que se entrega con el vehículo.
34 •Meter la batería sustitutiva conectando las
2 clavijas.
35 •Volver a atornillar el sujeta-batería dando
la vuelta como indica la figura. Cerrar el
capó como se ha descrito con anterioridad
y sujetar con el tornillo.
RECARGA DE LA BATERÍA
ATENCIÓN: LAS BATERÍAS DE LOS
DIBUJOS SON MODELOS APROXIMADOS.
ES POSIBLE QUE SU BATERÍA SEA DISTINTA
DE LA REPRESENTADA EN LOS DIBUJOS.
ESTO NO AFECTA A LAS SECUENCIAS DE
SUSTITUCIÓN Y DE CARGA QUE SE
ILUSTRAN.
36 •Desconectar la clavija-instalación A de la
clavija-bateria B, pulsando de lado.
37 •Introducir la clavija del cargador de
baterías en una toma doméstica siguiendo
las instrucciones incluidas. Conectar el
enchufe B con el enchufe del cargador de
baterías C.
38 •Una vez finalizada la carga desconectar el
cargador C de la toma de corriente y
después desconectar la clavija C de la
clavija B.
39 •Introducir a fondo hasta el “clic” la clavija
A e la clavija B. Finalizada la operación
recuerde siempre cerrar el capó.
39
A
B
 Loading...