- 19 -
- unfasten the hood and the apron if fastened;
31• Release the base by pressing the button located at
the rear of the chassis (fig_a), both on the right and
left bars. Lift the backrest upwards from the base with
both hands.
Press the two buttons on the chassis seat with both
hands and lift the entire base upwards (fig_b).
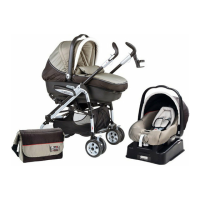
PLIKO 3 COMPACT + XL Carrycot:
To attach the carrycot to the chassis you must:
- block the PLIKO P3 COMPACT
- lift the Ganciomatic clasps in the frame
- remove the bumper bar (step 22)
If you have a P3 Compact or On Track model, insert
the tops into the chassis armrests.
32• Turn the two levers on the back of the chassis
outwards (fig_a)
- raise the footrest to its highest position;
- hold the Navetta by its handlebar;
33• place the Navetta on the Ganciomatic hooks on the
stroller, keeping the head of the bassinet unit on the
opposite side from the stroller handlebars;
- press down with both hands on the sides of the
Navetta, until it clicks into place (fig_a);
- to remove the Navetta from the chassis and for more
information, please refer to the instruction manual.
PLIKO P3 COMPACT + Primo Viaggio Tri-Fix:
To attach the car seat to the chassis you must:
- block the chassis
- lift the Ganciomatic clasps in the frame
- put the car seat in face-mum position and push it
downwards until it clicks (fig_b)
- Do not remove the bumper bar from the pushchair
when you attach the car seat (please read step 21 for
information on how to put on the bumper bar)
-
Remove the car seat according to the car seat’s instructions
When the child is older you can transform the
chassis into a PUSHCHAIR:
34• ASSEMBLY: to convert the Pliko P3 chassis version
into a stroller, check that the two levers are lowered
(fig_a). Position the backrest with the cover on the
chassis seat (fig_b).
35• To attach the backrest to the chassis (fig_a) insert
the two ends, pressing the two buttons, into the
chassis seat, as shown in figure 1, until they click
into position, as shown in figure 2. To attach the
back adjustment bar to the chassis (fig_b), rotate the
attachment upwards (figure 2, as shown by the arrow)
and position it behind the rear upright.
• Push the two fasteners down until they click into
position in the seats in the rear uprights (fig_c).
Put the lining back on, doing the opposite of what is
described in points 28 and 29.
36•
If, in the PUSHCHAIR mode, you wish to attach the
XL CARRYCOT or PRIMO VIAGGIO TRI FIX using the
Ganciomatic system, lower the backrest of the pushchair
before doing anything else. As shown in step 30.
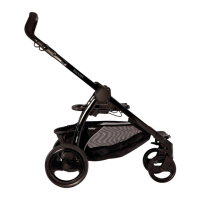
SERIAL NUMBERS
37• Behind the PLIKO P3 COMPACT backrest information
relating to product name, date of manufacture and
serial number of the product are provided. This
information is required for any complaints.
ACCESSORIES
38• RAIN CANOPY: can be fastened to the hood (fig_a).
MOSQUITO NETTING: can be fastened to the hood (fig_b).
39• BAG: diaper-changing bag with pad for changing baby’s
diaper. Attaches to the stroller (fig_a).
TRAVEL BAG: practical duffle bag for transporting the
stroller by plane (fig_b).
UMBRELLA: practical umbrella to match (fig_c).
CLEANING AND MAINTENANCE
PRODUCT MAINTENANCE: protect from the weather:
water, rain, or snow; prolonged and continuous exposure
to bright sunlight may give rise to colour changes of
various different materials; store this product in a dry place.
The maintenance have to be regularly.
CLEANING THE CHASSIS: periodically clean all plastic parts
with a damp cloth. Do not use solvent or similar cleaning
products; keep all metal parts dry to prevent rusting; keep
moving parts clean (adjustment mechanisms, locking
mechanisms, wheels, ...) and free of dust and sand and, if
necessary, lubricate with light machine oil.
CLEANING THE RAIN CANOPY: wash with a sponge and
soapy water; do not use detergents.
CLEANING FABRIC PARTS: brush fabric parts to remove
dust and wash by hand at a maximum temperature of
30°C; do not wring; do not use chlorine bleach, do not
iron; do not dry clean; do not apply solvent-based stain
removers and do not dry in a tumble dryer.
PEG-PÉREGO S.p.A.
Peg-Pérego S.p.A. is an ISO 9001 certified
company. This certification is a guarantee for
customers and consumers of the
transparency and trustworthiness of the
company's procedures and working
methods. Peg Pérego can make changes at
any time to the models described in this publication for
technical or commercial reasons. Peg Pérego is at the
disposal of its customers and consumers to ensure that all
their demands and queries are fully satisfied. It is a key part
of our policy to ensure we are always aware of our
customers' views and requirements. We would therefore be
very grateful if, after using a Peg Pérego product, you take
the time to fill in our CUSTOMER SATISFACTION
QUESTIONNAIRE, making a note of any comments or
suggestions you might have. You can find the questionnaire
on the Peg Pérego website: www.pegperego.com
PEG-PÉREGO AFTER-SALES SERVICE
If any parts of the item get lost or damaged, only use genuine
Peg Pérego spare parts. For any repairs, replacements,
information on the products and sales of genuine spare parts
and accessories, contact the Peg Pérego Assistance Service
and state the serial number of the product, if present.
tel. 0039/039/60.88.213
fax 0039/039/33.09.992
e-mail assistenza@pegperego.it
website www.pegperego.com

 Loading...