EasyManua.ls Logo

Pelican HeadsUp Lite 2600 - User Manual

Pelican HeadsUp Lite 2600
5 pages
Print Icon
To Next Page IconTo Next Page
Loading...
PELICAN
TM
FOCUS ADJUSTMENT
To focus shine the light on a light colored
background, approximately 10 feet away
and turn lens all the way onto the threads
until lens bottoms out. Back off lens slowly
until focus occurs.
HEADLAMP POSITIONING
A stretchable band is provided for
mounting around your head. The light
can be rotated up and down through 170˚
CAUTION:
If light is not to be used for some time,
remove batteries to prevent possible
leakage and corrosion.
PRODUCT SPECIFICATIONS:
Lamp Type: High (0.75 amp)
Low (0.50 amp)
Battery Type: E91 1.5V Alkaline
AA-cell (4)
WARNING – Explosion Hazard - Batteries
must only be changed in non-hazardous
locations.
WARNING Explosion Hazard -
Substitution of components may impair
suitability for use in hazardous locations.
HeadsUp
Lite
TM
2600
BATTERY INSTRUCTIONS
1. Remove the left cap (light pointing away
from you) by turning counter-clockwise
exposing the battery compartment.
2. Remove used batteries and replace with
fresh batteries (as shown on polarity
sticker located on inside of body).
3. Place cap with side slot over locking
projections in body. Screw down
clockwise until cap is snug with body.
ON/OFF
To turn on the HeadsUp Lite
TM
(light pointing away from you) turn the right
side cap towards you. To turn off, turn the
cap away from you.
LAMP REPLACEMENT .75 / .50
AMP (spare lamp included)
1. Remove lens and reflector housing
by turning counter-clockwise.
2. Remove the lamp by pulling straight
up out of lamp socket.
3. Install fresh lamp by pushing into
socket until fully seated.
4. Replace lens housing squarely on
threads and turn clockwise while
pressing on the lens housing slightly.
NOTE: A spare lamp is located next to the lamp
socket, the lamp is .50 amps when a dimmer light
is required, or maybe used as backup.
REPLACEMENT PARTS
CAT# DESCRIPTION
2601 3 pc. O-ring set
2604LM Low Intensity 0.5 amp lamp
2605LM High Intensity 0.75 amp lamp
2606 Rubber Head Strap
2607 Cloth Head Strap
CAUTION:
READ THIS NOTICE BEFORE USE.
Observe battery polarity labels on inside of
this light. DO NOT deviate from the correct
label polarity. DO NOT MIX BRANDS.
DO NOT MIX old and new batteries.
Always replace all batteries with new
alkaline batteries.
FAILURE TO COMPLY WITH
ABOVE WARNING COULD CAUSE
SERIOUS INJURY.
WARRANTY RETURN POLICY
Send all items for repair or replacement directly to
Pelican Products Customer Service Department
(postage paid). Please call for a return authorization
number. Per our guarantee, Pelican Products will
replace or repair any broken or defective products.
Upon receipt of goods, Pelican Products will notify
you of any handling and return postage charges.
If your local retailer does not stock the above
accessory parts, you may order them directly from
Pelican Products. Send check or money order in
U.S. dollars, or order by phone using MasterCard
or VISA (ask for Customer Service). SORRY, NO
C.O.D.’s. Subject to sales tax. Allow 2-3 weeks
delivery time. Pelican Products pays postage and
handling charges.
HeadsUp Lite
TM
INSTRUCCIONES DE FUNCIONAMIENTO
NO. DE CAT. 2600
INSTALACIÓN DE LAS PILAS
1. Retire la tapa izquierda (con el extremo
de la bombilla apuntando en la dirección
opuesta a usted) girándola en sentido
contrario de las agujas del reloj para
abrir el compartimiento de las pilas.
2. Retire las pilas usadas y coloque las
pilas nuevas conforme a la polaridad
indicada en la calcomanía que se
encuentra dentro del cuerpo de la
linterna.
3. Vuelva a colocar la tapa de manera que
la ranura lateral quede sobre las
proyecciones asegurantes en la
linterna. Atorníllela en el sentido de las
agujas del reloj hasta que la tapa esté
apretada a la linterna.
ENCENDIDO / APAGADO
Para encender la linterna HeadsUp Lite
TM
(con el extremo de la bombilla apuntando
en la dirección opuesta a usted), gire la
tapa derecha hacia usted. Para apagarla,
gire la tapa en la dirección opuesta a usted.
COLOCACIÓN DE LA LINTERNA
PARA LA CABEZA
La linterna incluye una banda elástica para
colocarla en la cabeza. La luz se puede
mover 170º.
¡ADVERTENCIA! PELIGRO DE
ESTÁTICA -
limpie solamente con un paño húmedo
PRECAUCIÓN:
Si no se va a usar la linterna por algún
tiempo, retire las pilas para evitar la posibili-
dad que ocurra una fuga y corrosión.
ESPECIFICACIONES DEL
PRODUCTO
Tipo de bombilla: High (0.75 amp)
Low (0.50 amp)
Tipo de pila: E91 1.5 V Alcalina
tipo AA (4)
Advertencia - Peligro de explosión -
Las baterías sólo deben sustituirse o
cargarse en zonas no peligrosas
Advertencia - Peligro de explosión -
La sustitución de componentes puede
afectar a la idoneidad de su uso en zonas
potencialmente explosivas.
REEMPLAZO DE LA BOMBILLA
.75 / .50 amp
(incluye bombilla de repuesto)
1. Retire el bastidor de la lente y el
reflector girándolo en sentido
contrario de las agujas del reloj.
2. Retire la bombilla levantándola
en forma recta del encastre.
3. Instale una bombilla nueva
empujándola hacia el encastre hasta
que quede bien fija.
4. Vuelva a colocar el bastidor de la lente
sobre la rosca y gire en el sentido de
las agujas del reloj al mismo tiempo
que ejerce un poco de presión sobre
el mismo.
NOTA: Junto al encastre de la bombilla se
encuentra una bombilla de repuesto;
esta bombilla es de .50 amp para usarse
cuando se requiere una luz más opaca o
se puede usar si la otra se funde.
AJUSTE DEL ENFOQUE
Para enfocar el brillo apunte el haz de
luz hacia una superficie de color claro,
aproximadamente a 3 metros de dis-
tancia. Gire la lente en la dirección que
la enrosque hasta que la lente llegue al
fondo. Vuelva a girar lentamente en la
dirección contraria hasta que se comience
a enfocar.
Includes Adjustable Cloth Strap
and Rubber Strap
Batteries Included
23215 Early Ave. • Torrance, CA 90505 USA
Tel (310) 326-4700 • FAX (310) 326-3311
www.pelican.com
23215 Early Ave. • Torrance, CA 90505 USA
Tel (310) 326-4700 • FAX (310) 326-3311
www.pelican.com
PELICAN
TM
CANADA
10221-184 St. • Edmonton, Alberta T5S 2J4
Tel (780) 481-6076 • FAX (780) 481-9586
PELI
TM
PRODUCTS, S.L.U.
c/ Casp, 33-B Pral. • 08010 • Barcelona, Spain
Tel (+34) 93.467.4999 • FAX (+34) 93.487.7393
www.peli.com
All trademarks are registered and/or unregistered
trademarks of Pelican Products, Inc., its subsidiaries and/or affiliates.
2603-311-000 5-0758 Rev B
© 2010 Pelican Products SP/10
Question and Answer IconNeed help?

Do you have a question about the Pelican HeadsUp Lite 2600 and is the answer not in the manual?

Summary

Battery and Operation Instructions

Battery Instructions

Instructions for removing the left cap, replacing batteries with correct polarity, and securing the cap.

On;Off Operation

Details on how to turn the HeadsUp Lite™ headlamp on and off by rotating the right side cap.

Lamp Replacement Procedure

Steps for replacing the lamp, including removing the housing, old lamp, and installing a new one.

Headlamp Usage and Specifications

Focus Adjustment Guide

Instructions on how to focus the light by adjusting the lens on the threads.

Headlamp Positioning

Information on using the stretchable band and rotating the light head up or down.

Product Specifications

Details on lamp type (0.75 amp, 0.50 amp) and battery type (AA-cell).

Safety and Warranty Information

Important Safety Notice

Critical warning to read before use regarding battery polarity, mixing brands, and mixing old/new batteries.

Warranty Return Policy

Procedure for returning items for repair or replacement, including contact and ordering information.

Overview

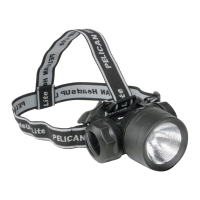
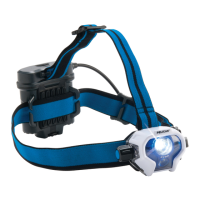
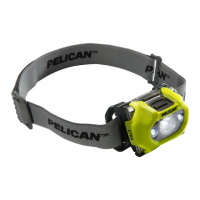
The Pelican HeadsUp Lite™ 2600 is a versatile headlamp designed for hands-free illumination, suitable for a variety of activities where focused light is needed. This headlamp comes equipped with both an adjustable cloth strap and a rubber strap, offering flexibility in how it can be worn and secured, whether directly on the head or over a helmet. The inclusion of batteries means it's ready for use right out of the box.

Function Description

At its core, the HeadsUp Lite™ 2600 provides a portable light source that can be directed wherever the user looks, thanks to its head-mounted design. The primary function is to cast light onto a desired area, freeing the user's hands for other tasks. It features a lamp system that can operate at two different intensity levels, allowing the user to choose between a brighter, more powerful beam (high intensity) or a dimmer, more energy-efficient light (low intensity) depending on the specific requirements of their environment or task. This dual-intensity capability enhances its adaptability, making it useful for close-up work where less light is needed, or for broader illumination in darker settings. The headlamp's design also incorporates a focusing mechanism, enabling the user to adjust the beam from a wide floodlight to a more concentrated spot, further tailoring the light output to their needs. This adjustability is crucial for tasks ranging from navigating trails in the dark to performing detailed inspections.

Usage Features

Operating the HeadsUp Lite™ 2600 is designed to be straightforward and intuitive. To power the device on or off, the user simply turns the right side cap. Turning the cap towards the user activates the light, while turning it away deactivates it. This simple twist mechanism ensures quick and easy control over the illumination.

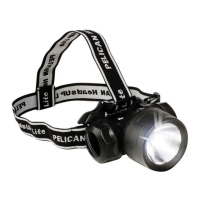
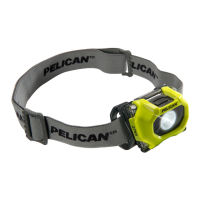
One of the key usage features is the headlamp's positioning flexibility. The light assembly is mounted on a pivot that allows it to be rotated up and down through a wide arc of 170 degrees. This extensive range of motion ensures that the user can precisely aim the light beam, whether they need to illuminate something directly in front of them, above, or below, without having to adjust their head position excessively. This feature is particularly beneficial when working in confined spaces or when needing to switch focus between different heights.

The headlamp also offers a focus adjustment capability. To achieve the desired focus, the user shines the light onto a light-colored background, ideally about 10 feet away. The lens can then be turned all the way onto its threads until it bottoms out, and then slowly backed off until the optimal focus is achieved. This allows for fine-tuning the beam, from a broad area light to a tight, concentrated spot, depending on the task at hand. This feature is invaluable for tasks requiring either wide-area visibility or pinpoint illumination.

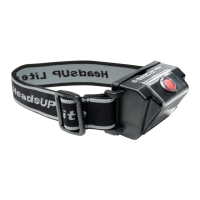
The choice of straps further enhances the headlamp's usability. The adjustable cloth strap provides comfort for extended wear directly on the head, while the rubber strap offers a more secure fit, especially when worn over helmets or in environments where a firmer grip is necessary. This adaptability ensures the headlamp remains stable and comfortable regardless of the activity.

Maintenance Features

Maintaining the HeadsUp Lite™ 2600 involves a few simple procedures to ensure its longevity and optimal performance. Battery replacement is a routine maintenance task. To access the battery compartment, the user removes the left cap by turning it counter-clockwise. Once open, used batteries can be removed and replaced with fresh ones, paying close attention to the polarity sticker located inside the body to ensure correct orientation. After replacing the batteries, the cap is re-secured by aligning its side slot over the locking projections in the body and screwing it down clockwise until it is snug. It is important to always replace all batteries with new alkaline batteries and to avoid mixing brands or old and new batteries to prevent potential issues.

Lamp replacement is another maintenance aspect. The headlamp includes a spare lamp, which can be either a .75 amp (high intensity) or a .50 amp (low intensity) lamp, offering flexibility for different lighting needs or as a backup. To replace the lamp, the lens and reflector housing are removed by turning them counter-clockwise. The old lamp is then pulled straight up out of its socket. A fresh lamp is installed by pushing it into the socket until it is fully seated. Finally, the lens housing is replaced squarely on its threads and turned clockwise while applying slight pressure. A spare .50 amp lamp is conveniently located next to the main lamp socket, serving as a dimmer option or a readily available backup.

To ensure the headlamp remains in good working order, especially during periods of non-use, it is recommended to remove the batteries. This simple step helps prevent potential battery leakage and corrosion, which can damage the internal components of the device over time. This preventative measure is crucial for preserving the headlamp's functionality and extending its lifespan.

The design of the HeadsUp Lite™ 2600 emphasizes user-friendliness in both its operation and maintenance, ensuring that users can easily manage its power source and light components, thereby maximizing its utility and durability.

Pelican HeadsUp Lite 2600 Specifications

General IconGeneral
Lumens260
Battery Type3 AAA batteries
Water ResistanceIPX4
Runtimeup to 50 hours
Light ModesHigh, Low
MaterialPolycarbonate

Related product manuals