COLORCASCADE
®
Color Pool and Spa Light Installation and User’s Guide COLORCASCADE
®
Color Pool and Spa Light Installation and User’s Guide
8
1. Install the ColorCascade light niche in the pool or spa floor as shown in Figure 2.
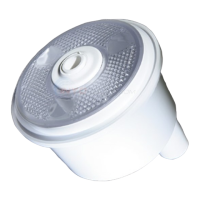
2. Snap on the gunite cover over the top of the niche (shown above). This will
protect the light cavity of the niche during installation. Note: If a gunite cover is
not available, use masking tape to protect niche cavity from plaster operation.
Note: Prepare the end of the ColorCascade light
power cable and install to the 12 VAC output wires
of an approved transformer (if you are using longer
runs of cables or multiple lights per transformer, it is
recommended to use the 13 VAC or even the 14 VAC
Note: For pressure testing the water line,
use an expandable plug (see Figure 1),
plug not included.
Figure 1
WATER LEVEL
NICHE
4.1”
6.2”
Water Depth
2” to 10”
PLASTER
1” PVC
Electrical
Conduit
Figure 2
“
GUNITE
1-1/2 Schedule 40 PVC
GUNITE
• TheColorCascadeLightshouldbelocatedatleast2-1/2feetfromanywallsor
other ColorCascade lights (bubblers).
• TheColorCascadelightshouldbeinstalledinwaterdepthsbetween2”and10“.
• TheColorCascadelightisdesignedtobeinstalledushwiththepoolnish.
• TheColorCascadelightnicheisdesignedfor1-1/2”PVCpipeforthewater
supply and 1” conduit for the light cable.
Determine a location for the ColorCascade
®
Light
Figure 3
 Loading...