EVERPURE
®
PRO-Reverse Osmosis Water Filtration System Installation and Operating Instructions • 13
7. Insert the new cartridge into the housing. Make sure the
cartridge slips over the standpipe in the bottom of the
housing.
NOTE: Be sure to install cartridges in proper
housings (Figure 1).
8. Screw the housing back onto the manifold.
HAND-TIGHTEN ONLY.
9. Slowly open the cold water supply until it comes to a stop.
Check for leaks.
10. Let water drip from drinking water faucet for 3 hours.
Continue to periodically check for leaks.
11. Close faucet and wait 6–12 hours to allow the tank to fill.
Open the drinking water faucet and drain one full tank to
flush the carbon fines out of the system.
12. If the unit is attached to an icemaker, wait one hour before
turning on the icemaker.
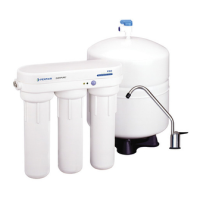
Replacing the Reverse Osmosis Membrane
Replacement Filter Cartridges
The Gray/Black Prefilter Cartridge and the White
Post-polishing Filter Cartridge should be replaced when
changing the membrane. See Materials Required below.
Materials Required
• PRO Replacement Cartridge Kit
• New membrane:
PRO_RM Membrane
• Clean rubber gloves
• Clean washcloth
• Dishwashing soap
• Chlorine bleach
• FDA-Grade silicone grease
• Needle-nose pliers
• Safety glasses
• Large bucket
• 9-volt battery
• Non-abrasive brush or sponge
The Membrane (PRO) should be replaced every 12–24 months.
NOTE: When handling the membrane, do not squeeze it, as
this will damage the membrane’s effectiveness.
NOTE: It is recommended that you sanitize the system each
time you change the membrane. It is not necessary to
sanitize the system when changing only the prefilter
or post-polishing filter cartridges.
NOTE: When installing a new membrane, it is recommended
that you also replace the prefilter and post-polishing
filter cartridges.
Removing the Filter Cartridges and Membrane
1. Turn off cold water supply. Place a tray under the system to
catch any water that spills during the removal of the filter
housings. If an icemaker is attached to the unit, turn it off
along with the shut-off valve found at the 1/4-inch
supply adapter.
2. Open the drinking water faucet to drain the tank. When the
tank is drained, close the faucet.
3. Unscrew the middle (membrane) housing.
4. Remove the locking device by turning it clockwise. Grasp
the membrane tube with a needle-nose pliers and pull.
Discard the old membrane.
5. Unscrew the pre- and postfilter housings from the
manifold and discard used cartridges.
6. Remove the housing o-ring from the grooves below the
housing threads. Wipe the o-rings clean and also the
grooves in the filter housing. Set o-rings aside.
NOTE: Use clean rubber gloves or wash hands thoroughly
for this procedure to avoid contaminating the
cleaning solution or any of the components of the
system. It is recommended that clean rubber gloves
be worn when cleaning and/or sanitizing the system
and its components or handling new filter cartridges.
7. Wash the housings in the sink with dish soap and a clean,
non-abrasive washcloth or brush. Clean the filter housings
and the inside of the manifold and rinse them well with
clean, potable water.
NOTE: Do not get any of the electronic circuits or wiring wet
when cleaning the unit.
WEAR SAFETY GLASSES WHILE PERFORMING THIS
PROCEDURE TO AVOID EYE CONTACT AND INJURY.
Read WARNING information on the bleach
container before using its contents.
Handle sanitizing solution carefully to avoid
contacting and injuring unprotected areas of
the body.
8. Make up a sanitizing solution of 1/3 teaspoon (1.5 ml) of
household bleach and 1 gallon (3.8 L) of clean, potable
water in a bucket. Mix solution well.
NOTE: Excessive concentrations of bleach may damage
plastic and rubber components. Rinse all parts that
contact bleach thoroughly with clean, potable water.
9. Lightly lubricate each housing o-ring with a coating of
clean silicone grease. With two fingers, press each o-ring
securely into groove below the threads of the housing.
The housing o-ring provides the water-tight seal
between the cap and the bottom of the housing. It
is important that the o-ring be properly seated in
the groove below the threads of the housing or a
water leak could occur.
10. Add one cup or 8 oz. (236 ml) of sanitizing solution to each
filter housing and install them onto the manifold. DO NOT
INSTALL FILTERS OR MEMBRANE AT THIS TIME.
NOTE: TIGHTEN FILTER HOUSINGS BY HAND ONLY. DO NOT
USE WRENCH.
11. Slowly open source water at the cold water supply until
completely open.
12. Open the drinking water faucet. Close the faucet as soon as
water begins to flow from the spout.
13. Wait 5 minutes, then close the source water at the cold
water supply.
 Loading...