WHOLE HOUSE WATER SOFTENING SYSTEM • 7
INSTALLATION INSTRUCTIONS CONTINUED
5. TURN OFF THE WATER AND DRAIN THE PLUMBING
• Turn off the water at the meter or the pressure tank.
• Drain all the pipes. Do not sweat the pipes with water in them; steam will damage plastic parts in
the valve.
• To drain the plumbing system, open all the faucets in the house and flush the toilets. This procedure
will allow air to enter the plumbing system. The water will drain out of the lowest faucet or outlet.
6. BYPASS THE OUTSIDE FAUCETS
• When possible, it is best to bypass the outside faucets. However in some cases the outside faucets
cannot be accessed. In this situation, the bypass valve should be used whenever watering outside
for extended periods of time. If the installation is outside or in a garage, a faucet can be installed on
the inlet water side to provide an option for untreated water.
7. CONNECT THE PLUMBING TO THE BYPASS VALVE AND BRINE TANK
• Do not point the soldering torch directly at the system. The thermo-plastic material will last a lifetime,
within normal operating temperatures, but will melt in a torch flame.
• To prevent hot water from backing up into the
conditioner, avoid short connections of pipe between
the softener and the hot water heater. If you can’t
avoid a short connection, move the equipment to another
location. As a last resort, install a check valve. If the
check valve causes “water hammer”, install a
water hammer suppressor.
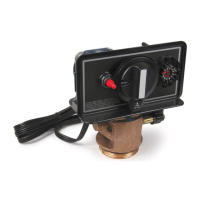
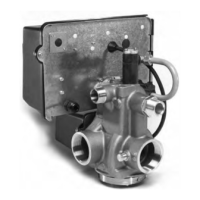
• Connect the raw water pipe to the INLET pipe connection of the bypass valve. hen looking at the front of
the unit, the inlet is the pipe connection on the LEFT side of the valve.
• Connect the treated water pipe to the OUTLET pipe connection of the bypass valve. When looking at
the front of the unit, the outlet is the pipe connection on the RIGHT side of the valve.
• Install the brine line to the brine tank.
OUTLET
INLET
 Loading...