DIP Switches
No.Control On Off
1 Serial speed See below See below
2 Serial speed See below See below
3 Self test On Off
4 Cleaning On Off
5 Paper size & See below See below
character set
6 DTR polarity; Active low Active high
paper size & See below See below
character set
7 Xon / Xoff Disable Activate
8 Auto-off timer Disable Activate
Quick Reference Card
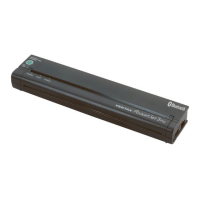
Main Switch
Power On: Push main switch once quickly
while printer is off.
Form Feed: Push once quickly while printer is
on and partial page has been sent to printer.
Power Off: Push twice quickly.
Charge battery: Push once and hold for
several seconds until green BATTERY
indicator stays lit. When printer finishes
discharging battery, it starts to charge
battery, and green BATTERY indicator starts
to blink.
Refresh battery: While in Charge mode, push
once and hold for several seconds until
green BATTERY indicator starts to blink.
Power off during Charge or Refresh mode:
Push twice quickly.
Density Dial
Density dial is on side of printer closest to
operation panel. Larger numbers make
prints darker. Smaller numbers make prints
lighter.
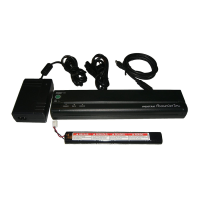
Charging the Battery
1 Make sure printer is off and it is
connected to AC power outlet with AC
adapter and power cord.
2 Press main switch and hold it down for a
few seconds until green BATTERY indicator
stays lit. This puts printer in Charge mode,
which completely discharges battery and
then charges it. Green BATTERY indicator
stays lit until discharging is completed;
then it blinks until charging is completed.
When finished, printer turns itself off.
Tips on Using the Battery
◆ Charging battery after it has been
completely discharged takes about 70
minutes.
◆ When you run printer on battery power,
it can print approximately 30-35 pages
on a full charge.
◆ Darker prints discharge battery faster
than lighter prints do. Use density dial to
adjust lightness and darkness.
◆ Printer’s protective vinyl case has sleeve on
inside for extra battery. With two batteries,
you can print twice as many pages before
you have to charge batteries.
Serial Handshaking: Used with serial interface.
DTR handshaking: set switch 7 to ON. This
disables Xon / Xoff handshaking. Xon / Xoff
handshaking: set switch 7 to OFF. Letter/A4
and Letter/Legal models: set switch 6 to OFF.
Auto-off Timer: Printer must be powered from
its battery. When switch 8 is OFF, printer turns
itself off after 60 seconds if it is not receiving
data (unless there is data in printer buffer).
NOTE: Your Ni-Cd battery will last much longer
and carry a greater charge if it is always
completely discharged prior to charging.
Refreshing the Battery
You may refresh a
seasoned
battery
occasionally
when you don’t have time to
completely discharge and charge it.
Refreshing a battery “tops off” the charge
without first discharging battery.
CAUTION: This procedure is not recommended,
particularly with a new battery, as it may reduce
the battery’s life and its ability to carry a charge.
1 Make sure printer is off and it is
connected to AC power outlet with AC
adapter and power cord.
2 Press main switch and hold it down for a
few seconds until green BATTERY indicator
stays lit. This puts printer in Charge mode.
3 Press main switch and hold it down for a
few seconds until green BATTERY indicator
starts to blink. This bypasses discharging
process and puts printer in Refresh mode,
which charges battery. Green BATTERY
indicator blinks until charging is completed.
When finished, printer turns itself off.
Default Paper Size and Character Set
Letter/A4 model.
Letter & PC-8: switch 5 OFF;
A4 & PC-850: switch 5 ON.
Letter/Legal model.
Letter & PC-8: switch 5
OFF; legal & PC-8: switch 5 ON.
Letter/Legal/A4 model.
Letter & PC-8:
switches 5 & 6 OFF; legal & PC-8: 5 & 6 ON;
A4 & PC-850: 5 ON & 6 OFF (or 5 OFF & 6 ON).
Self-Test Sheet: To print sheet, set switch 3
to␣ ON. Turn printer on. Insert paper. When
done, turn printer off. Set switch 3 to OFF.
Clean Print Head: To clean print head with
cleaning cloth, set switch 4 to ON. Turn
printer on. Press main switch quickly again to
start platen roller. Insert cloth with rough
black side towards rear of printer. When
done, turn printer off. Set switch 4 to OFF.
®
™
POWER
DATA
BATTERY
CHARGE
REFRESH
ON
OFF
2
0
Lighter
10
Darker
Main
Switch
Density
Dial
Red POWER
Indicator
Green DATA
Indicator
Green BATTERY
Indicator
Serial Speed: Used with serial interface.
◆ 2,400 bps: switches 1 and 2 ON.
◆ 9,600 bps: switch 1 OFF and 2 ON.
◆ 19,200 bps: switch 1 ON and 2 OFF.
◆ 38,400 bps: switches 1 and 2 OFF.
Figure shows
factory settings.
SW1
Battery compartment
SW1
ON
OFF
1
2
3
4
5
6
7
8