Current carrying wires - stromführende Kabel
Insulating sleeve - Isolierhülse
Locking pin - Sicherungsstift
Locking nut - Sicherungsmutter
Insulating sleeve - Insolierhülse
Earth wire- Schutzleiter
Safety cord - Sicherungsseil
Motor shaft - Motorachse
Cross bolt- Querbolzen
Figure B: Acceptable (wires not under stress) - Abbildung B: Zulässig (Kabel nicht unter Druck)
Installation instruction / Installationsanleitung
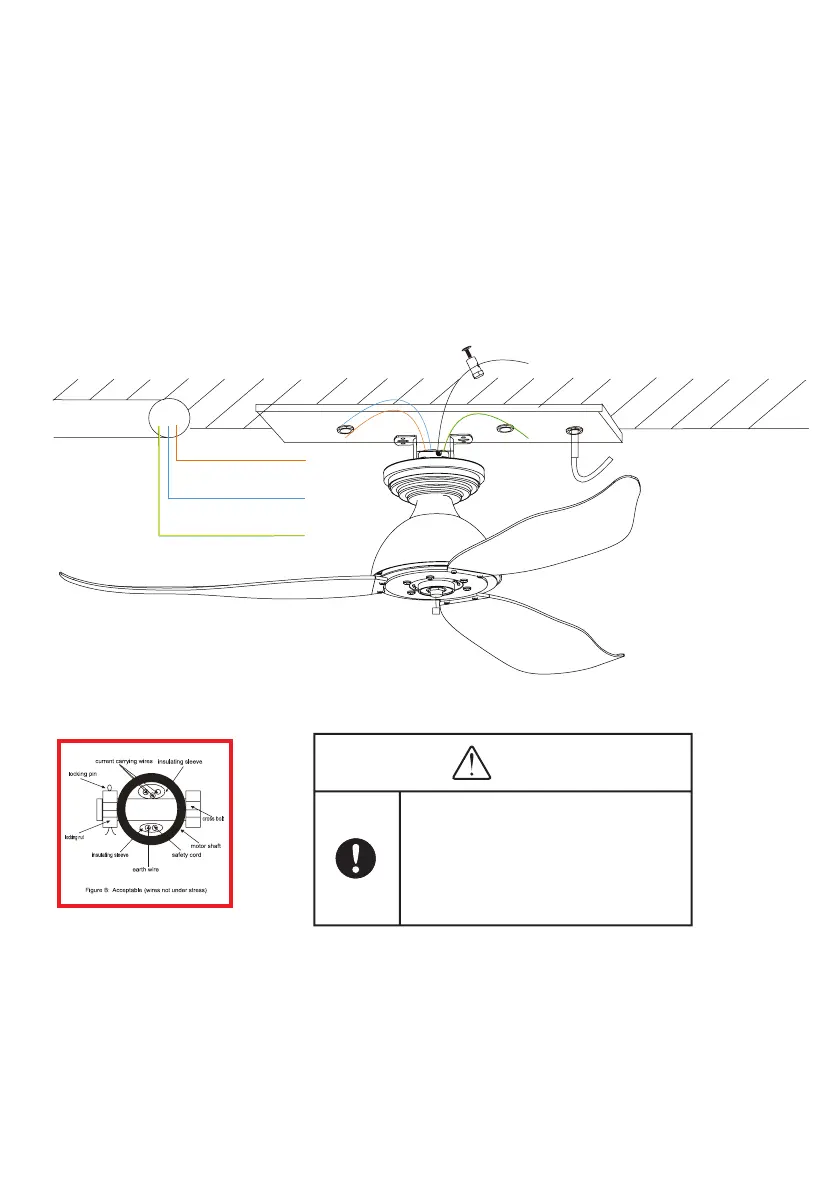
Step 3: Installation of the canopy
a) Installation of the mounting bracket
Use expansion bolt to x mounting bracket and J hook to the ceiling, also use the nut to lock them tightly.
WARNING: THE COTTER PIN MUST BE INSERTED TO PREVENT THE NUT FROM BECOMING LOOSE!
b) Hanging up the ceiling fan
Secure the ceiling fan onto the bracket.
Schritt 3: Befestigung des Baldachins
a) Befestigen der Deckenhalterung
Nutzen Sie die Spreizdübel um die Deckenhalterung und den J-förmigen Haken an der Decke zu befestigen. Nutzen Sie ebenfalls
ACHTUNG: DER SPLINT MUSS EINGEFÜHRT WERDEN UM ZU VERHINDERN, DASS SICH DIE MUTTER LOCKERT!
b) Den Deckenventilator aufhängen
Befestigen Sie den Deckenventilator an der Deckenhalterung.
Concrete ceiling / Betondecke
AC 160-240V,
50/60Hz
Live (brown) / Außenleiter (braun)
Neutral (blue) / Neutralleiter (blau)
Earth (green/yellow) / Schutzleiter
(grün/gelb)
Power cable /
Stromkabel
WARNING / ACHTUNG
The safety cable must withstand 20 times the
ceiling fan weight. Plug the cotter pin into the
bolt and bend the cotter pin.
Das Sicherungsseil muss dem 20-fachen
Gewicht des Deckenventilators standhalten.
Stecken Sie den Splint in den bolzen und bie-
gen Sie den Splint.
7
 Loading...