www.petex.de
10
11
08
2.2.2 Adjusting the headrest (from 100 up to 135 cm)
1.
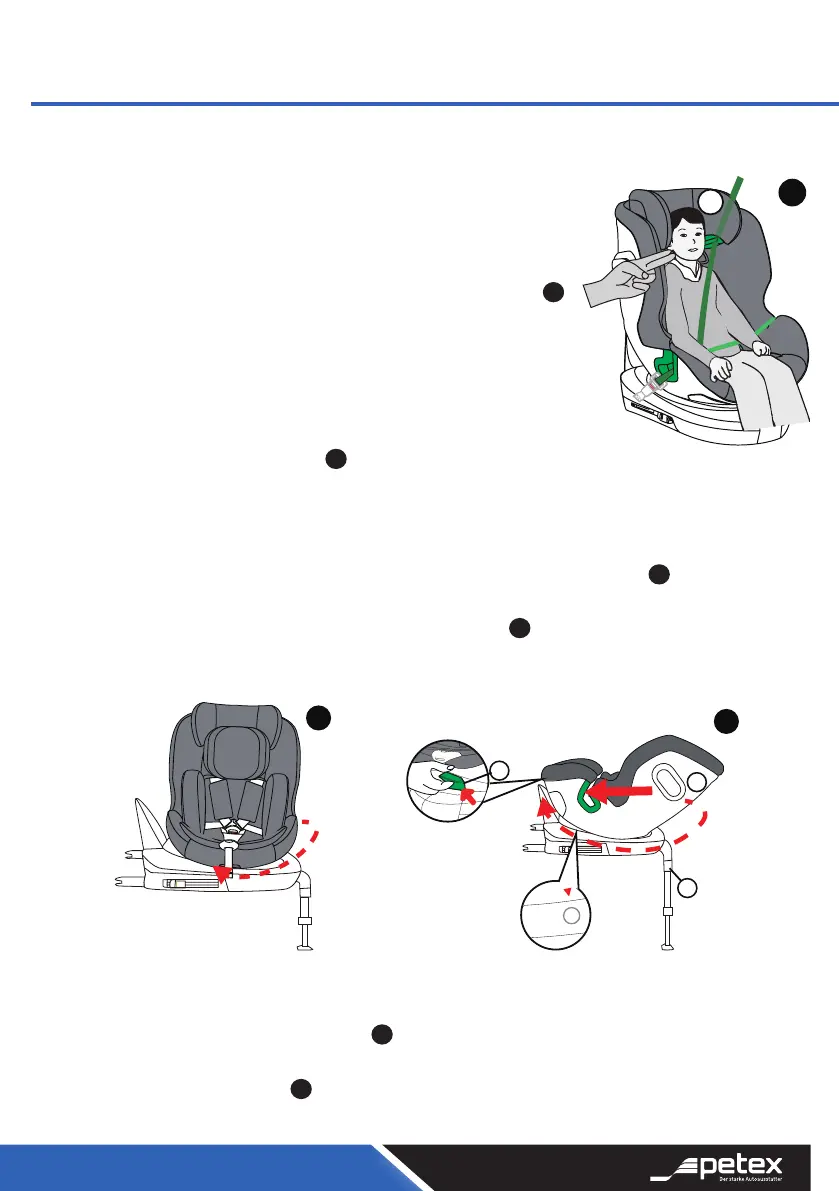
Make sure the ve-point seat belt is hidden.
Make sure the seat cushion is removed.
Press on the adjusting handle (09) in the direction of the arrow to release the he-
adrest (08), and then adjust the headrest up or down to the desired position. Upon
release of this handle , the headrest will lock into place automatically. (08)
The headrest is in the correct position when the diagonal belt section of the 3-point
vehicle belt sits on the child’s shoulders and when you can t 2 ngers between
headrest and the shoulder of the child.
11
2.2.2 Einstellen der Kopfstütze (von 100 bis 135 cm)
1. Vergewissern Sie sich, dass der Fünf-Punkt-Gurt verborgen ist.
2. Stellen Sie sicher, dass das Sitzkissen entfernt ist.
3. Drücken Sie auf den Verstellgri (09) in Pfeilrichtung, um die Kopfstütze
(08) zu entriegeln, verstellen Sie die Kopfstütze dann nach oben oder
unten in die gewünschte Position. Beim Loslassen des Gris rastet die
Kopfstütze automatisch ein. (08)
4. Die Kopfstütze ist in der richtigen Position, wenn der Schultergurt des
3-Punkt-Gurtes des Fahrzeugs auf den Schultern des Kindes liegt und
wenn 2 Finger zwischen Kopfstütze und Schulter des Kindes passen.
11
2.3 Verwendung des 360°-Drehsystems
2.3.1 Um 180° entgegen der Fahrtrichtung zu drehen (von 40 bis 105 cm rückwärtsgerichtet)
1. Ziehen Sie den Drehgri (13) nach außen, um den Autokindersitz (12) zu entriegeln, und drehen Sie dann
den Kindersitz um 90° an die Stelle, an der Sie das Kind in den Sitz setzen möchten.
2. Um ihn wieder in die rückwärts gerichtete Position zu drehen: Ziehen Sie den Drehgri (13) nach außen,
um den Kindersitz zu entriegeln, und drehen Sie dann den Kindersitz um 180° zurück in die rückwärts
gerichtete Position, in der der Kindersitz automatisch einrastet.
3. Vergewissern Sie sich, dass sich der Kindersitz in der nach hinten gerichteten Position und in der vollstän-
dig zurückgelehnten Position bendet.
4. Überprüfen Sie den Stützfuß. (11)
2.3 Using the 360° rotation system
2.3.1 To rotate 180° to Rearward Facing (from 40 up to 105 cm Rearward Facing)
1. Pull the rotation handle (13) outwards to release the child car seat (12), and then rotate the children-seat by 90°,
at where you want to put the child in the seat.
2. To rotate it back to the rearward facing position: pull the rotation handle (13) outwardsto release the child car
seat, and then rotate the child car seat by 180° back to the rearward facing position, at where the child car seat
will lock into place automatically.
3. Ensure the child car seat is at the rearward facing position, and in fullest recline position.
4. Double check the support leg. (11)
13
13
12
11
12
12
12
13
13
2.0 Vorbereitende Arbeiten und Funktionen
2.0 Preparatory Work and Functions
 Loading...