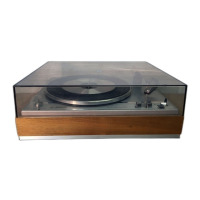
balance
when ified Íree
Írom ils supporl ánd the
pick-up
a.m lilt. This means
lhai lhe
pick
up arm
íloals íreely and doês nol move
upwards oÍ
downwards. Now
push
slide weisht
G)
Íoeards
unli its chamíere<l side is agáinst the
frsl, sec
ond, lhird,
lourlh
or fiíh ring on the
pick-up
arm,
lor
0.75;
1;2;
a;4
grammes
respeclivêly.
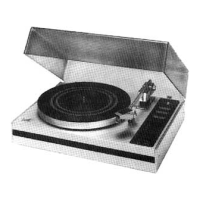
{Fig. 1A
shows án êxámpe oi a slylus lorce
011
gÉmj
The optimum stylus loÍcê Íor
GP400 êrd GP401
SUPER M ca ridgês is 2
grammes
and íor
GP412VE and GP422 SUPER M 1.2
grammes.
For rhe required slylus Íorce oí olhêr cártÍ'dges
consult
then lechnicêl
dala.
Side
thtu sr
conpen
sation
Turn knob
O
in á
position
corêsponding
lo that
ol slide weight
o.
For exàmpe when lhe cham-
íered side is hêlíváy bêhvêên lhe
3rd
and 4lh
iig
(2.5
grêmnês),
sel knob
O
lo á
posilion
hall-
way bêtween 2 and 3.
Íhe calibralion wilh indicàlion
'O'
is ïor lhe
caF
lridges with ê spheÍical
(conica)
slylus lip and
lhe cêlibrêtion wilh lhe indication
'o
is íor cêÍ
rridges with an ellepli.al(biradiêD slyus tip.
.
Press
down mains swilch
O.
Tie lêmp in
toLch conlrolO lights
up.
. Placê a record on the turntêble; Ior 4s r.p.m.
Íêcords with large cenlre hole, use the adápleÍ.
. Depress rocker key
O
ár lhe end mê*ed
!',
liÍ lhe
plck
up êrm.Íom ils supporl and
position
it
above
the
beginning ol
the
paft
oí
lhe record
. Slêrl
the tuÍnláble
by
operaling louch contro
@
lor a5 r.p.m. or conlrol
O
ïor 33 r.p.m. The
rouched control
will lighi
up. l/ole:
When il is de-
sned b change speed whlle lhe
lurntàbe is re-
volving il is necessary
lo
louch slóp control
O
firsl belore lhe
speed caf be chosen.
. Depress key
O
at
lhe
end
márked
'Y'.
The
builrin dahping mechanism lhen shoothly lo*
ers lhê
pick-up
onto lhe record.
. Playing can bê inlêÍuplêd àt ány desnêd mo
ment by dèprêssing key
(t
êt lhê end ma*ed
':'.
The
molor cên be stopped by touchins srop
@n'rc
o
.
Alter the record
has finished
playing
the
pho-
to êlêcÍonic switch
clts out the
motór
a
iact
which 's visualy indicated by lhe illuminátion ol
slop conlrol
O.
Depress key
O
êt lhê ênd
maÍked
'!'
and relLrn
rhe
pick
up êrm ro irs sup
. Dèprêss mains swilch
O
lo swilch oí lhe êp
Fine spêed ádjushenl
P'ess down
maine
swich
O.
Torch
conÍotat
oÍ
O
toÍ Ihê desied speed.
Íhe
appropflare
f;ure
on
lhê stÍoboscopic ring should appear
srations
ry
when
viewed undeÍ an e/ectric lanp
o]èÍaring
Íom
s0 Hz mains.
(For
counÍies
wirh
60
Hz
mèins
a coÍesponding skoboscopr.
ring
has
been èpplied.)
Thè inne' stroboscopc 'inq
is loÍ
33
Í.p.m.
and
the ouler one
tor 45 Í.p m.
ll it
ap
pears
to móve lum knob
@,
coÍespondins ro
lhe requned speed, ánti'cockwide ií lhe ngure
êppeárs to lurn clockwise, and vice versa.
When ê musical inslÍumenl is
played
along wilh
lhe record
player
il is
possible
that lhe
pilch
oí
lhê rêcord needs to
be êdjusted
lo lhat ol lhe in
slrumenl. The
pitch
ol lhê record can be vêrie<l
by vêrying the tuÍnlable speed. This is achieved
by lurning knob
O
coÍesponding to the
tum-
The diêmond slyus is subjêct lo very litlle weaí.
bul il is recohhended to have it checked regu
lêrly
(e.9.
once a
year)
by
your
dealer. Slylus
cleaning is bèst êchieved wilh a smali solt haired
The ile ol records is
prolonged
iÍ they are kepl
clean
ánd àre hándled wilhout touching the re-
PLtling on, táking oÍf or clèaning à record should
only be done while the turntable is at rest.
Thê mechênism oí lhis record
player
does not
require êny
maintenance
since its bearings are
Re-àdjustks the cavq hinges
(Fig.
2)
lï the coveÍ does nol slêy in the req!Íed
posilion
re adjust by tightêning lhe hingê screw@.
/Vore:
Do nol oillhe hinges.
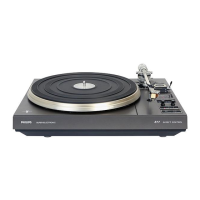
Chánging the
pick-up
cartridgê
Pull support wilh
pick-up
cárlridge
cáreluly
írom
lhe head shêll
(Fig.
3, A)
SUPER M
pick-up
càrhidgès
(GP
4aa, GPlal,
GP4I2 VE, GP 422)
Pull lhe cêrlridge cêreíuly
ÍÍom
ihe
supporl
(Fig.
4). Mounling lhe
new canridge
is done
by
push-
ing it
inlo rhe sLppod
(Fig.
5). Slide suppod
with
caÍtridqê
into the
head shel
(Fig.
3, B). Ihê
elêc
lricalconnections
are
made áulohalica
ly.
 Loading...