Do you have a question about the Philips HC3505/15 and is the answer not in the manual?
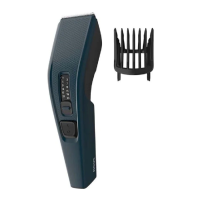
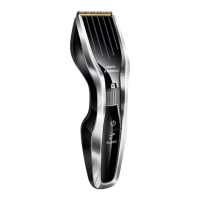
Lists and identifies the main parts of the hair clipper and its accessories shown in Fig. 1.
Critical warnings regarding electrical hazards, supply unit dryness, and child supervision.
General warnings about product usage, damage, maintenance, and use by children.
Cautions regarding appliance washability, intended purpose, hygiene, and cleaning agents.
Information on the appliance's compliance with standards regarding exposure to electromagnetic fields.
Instructions on how to connect the supply unit and operate the on/off slide switch.
Step-by-step guide to trimming hair using the comb attachment and length adjustment slide.
Instructions for trimming hair close to the skin or for outlining necklines and sideburns.
Detailed steps for cleaning the appliance housing, comb, cutting unit, and internal parts.
Guidance on replacing worn or damaged cutting units with original Philips parts.
Information on how to purchase additional accessories or spare parts from Philips.
Addresses frequent problems like uneven cutting results and the appliance not working.
Explains limitations on the international warranty, specifically for cutting units subject to wear.
Instructions for environmentally friendly disposal of the product at official collection points.
This document describes the Philips HairClipper, model HC3505/15, a hair cutter designed for personal grooming. The manual provides instructions for its use, maintenance, and troubleshooting, ensuring users can effectively manage their hair length and style.
The Philips HairClipper is primarily designed for trimming hair. It features a trimming comb that allows for hair length settings ranging from 1 mm to 23 mm, indicated in millimeters. These settings correspond to the remaining hair length after trimming, offering a wide range of styling options from a very short cut to a longer, more styled look. The appliance can also be used without the trimming comb to achieve a very close cut (0.5 mm) or to contour the neckline and sideburns, providing versatility for different hair cutting needs.
The device operates when connected to a wall socket via its detachable supply unit. It is equipped with an on/off slide for easy operation. The supply unit contains a transformer that converts mains voltages (100-240 volts) to a safe low voltage (less than 24 volts), ensuring user safety during operation.
Trimming with the Trimming Comb: To use the appliance with the trimming comb, first attach the comb to the device. Then, select the desired hair length by sliding the length setting adjustment slide. For first-time users, it is recommended to start with the highest length setting to familiarize oneself with the appliance before gradually reducing the length to achieve the desired result. Once the length is set, switch on the appliance. Move the appliance slowly and with light pressure against the direction of hair growth. It is crucial to ensure that the flat part of the comb always maintains contact with the skin to achieve an even cutting result. This technique helps in achieving a consistent and professional-looking haircut.
Trimming Without Comb: For a very close cut (0.5 mm) or for detailing the neckline and sideburns, the trimming comb can be removed. To do this, pull the comb off the appliance. After switching on the appliance, touch the hair lightly with the trimmer and make well-controlled movements. Users should exercise caution when trimming without the comb, as the cutting unit removes every hair it touches, making it easy to cut hair shorter than intended.
General Usage Tips: When trimming for the first time, it is advised not to move the trimmer too fast. Instead, use smooth and gentle movements to ensure an even cut and prevent mistakes. Since not all hairs grow in the same direction, it is beneficial to move the appliance in different directions (upwards, downwards, and across) to ensure all hairs are captured and trimmed evenly. If an uneven cutting result occurs, it could be due to the comb not touching the skin fully or moving the appliance in only one direction. Adjusting the technique to ensure full skin contact and varied movement directions can resolve this.
Cleaning: Proper cleaning is essential for maintaining the appliance's performance and hygiene. The Philips HairClipper is not washable, meaning it should never be immersed in water or rinsed under the tap. The supply unit must also be kept dry.
To clean the appliance, first ensure it is switched off and disconnected from the wall socket. The housing of the appliance should be wiped with a dry cloth. The trimming comb can be removed, cleaned with the provided cleaning brush, and rinsed with water.
The cutting unit is also detachable for thorough cleaning. To remove it, press the release button. Once detached, the cutting unit can be cleaned with the cleaning brush or rinsed under the tap. After cleaning, shake off any excess water from the cutting unit. The inside of the appliance, where the cutting unit attaches, should also be cleaned with the cleaning brush. To reassemble, insert the lug of the cutting unit into the guiding slot and push the cutting unit back onto the appliance until it clicks into place.
Important Cleaning Precautions: Never use scouring pads, abrasive cleaning agents, or aggressive liquids such as petrol or acetone to clean the appliance, as these can cause damage. Compressed air should also not be used. For hygienic reasons, the appliance should only be used by one person.
Replacement: In case of a worn or damaged cutting unit, it can be replaced with an original Philips cutting unit, available from authorized Philips service centers. The replacement process is similar to detaching and reattaching the cutting unit for cleaning. First, press the release button to remove the old cutting unit. Then, insert the lug of the new cutting unit into the guiding slot and push it back onto the appliance. Cutting units are considered wear-and-tear parts and are not covered by the international warranty.
Troubleshooting: The manual includes a troubleshooting section to address common issues. For instance, if the appliance produces an uneven cutting result, possible causes include the comb not touching the skin fully, moving the appliance in only one direction, or the comb setting changing during trimming. Solutions involve ensuring full skin contact, moving the appliance in multiple directions, and checking the comb setting. If the appliance does not work when switched on, the most likely cause is that it is not connected to the wall socket, and the solution is to insert the small plug into the appliance and the supply unit into the wall socket. If the cutting performance decreases, it often indicates that the cutting unit and comb are dirty, requiring cleaning.
| Cutting element | Stainless steel blades |
|---|---|
| Length settings | 13 |
| Precision (size of steps) | 2 mm |
| Power system | Corded |
| Cutter width | 41 mm |
| Power Source | AC power |
| Voltage | 220-240 V |
| Included Accessories | Cleaning brush |
| Warranty | 2 years |
| Range of length settings | 0.5 to 23 mm |
| Maintenance-free | Yes |
| Cleaning | Washable |
| Blade Type | Self-sharpening |
| Cutting Lengths | 0.5 - 23mm |