EasyManua.ls Logo

Philips HD7762/00/C - User Manual

Philips HD7762/00/C
15 pages
Print Icon
To Next Page IconTo Next Page
Loading...
Published by Philips Consumer Lifestyle Printed in the Netherlands © Copyright reserved Subject to modification
Service Manual
Philips Consumer Lifestyle
Coffeemaker Grind & Brew
15/01
HD7762/00
HD7762/00/C
PRODUCT INFORMATION
Safety
This product meets the requirements regarding
interference suppression on radio and TV.
After the product has been repaired, it should function
properly and has to meet the safety requirements as
officially laid down at this moment.
TECHNICAL INFORMATION
• Voltage : 220-240V
• Frequency : 50 Hz
• Power consumption : 1000W
Color setting : Black / Metal
• Dimensions
Appliance H x W x D : 440 x 210 x 310 mm
F-Box L x W x H : 320 x 280 x 505 mm
Cord length : 0,8 m
• Filter size : 1x4
• Contents
Jug (max.) : 1320 mL
Water container (min.) : 264 mL (2 cups)
Water container (max.) : 1320 mL (10 cups)
Avg. water loss during brew process : 10%
• Materials
Appliance : PP
Metal wrap : Stainless steel
Jug : Glass
Hoses : Silicon
Brew time (max.) : 10 min
Temperature (full jug) : > 80 °C
Keep warm time : 120 minutes
: 30 min per WK1501
for EU countries only
Auto Shut-off time : 30 mins
(/C version only)
= changed
Question and Answer IconNeed help?

Do you have a question about the Philips HD7762/00/C and is the answer not in the manual?

Overview

This document provides a comprehensive service manual for the Philips Coffeemaker Grind & Brew, models HD7762/00 and HD7762/00/C. It covers technical specifications, safety information, repair instructions, and exploded views for various components.

Function Description

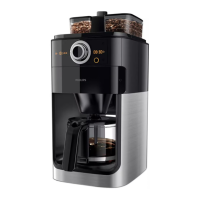
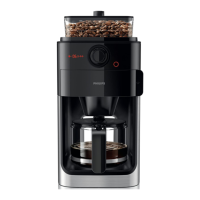
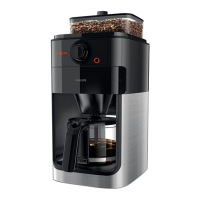
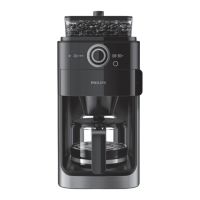
The Philips Coffeemaker Grind & Brew is designed to brew coffee from freshly ground beans. It integrates a grinder, a brewing system, and a warming plate to deliver hot coffee. The device allows users to select grind fineness and offers an auto shut-off feature for safety and energy saving. The inclusion of a self-check mode enables quick diagnostics of the main components, facilitating troubleshooting and maintenance.

Important Technical Specifications

  • Voltage: 220-240V
  • Frequency: 50 Hz
  • Power Consumption: 1000W
  • Color Setting: Black / Metal
  • Dimensions (Appliance HxWxD): 440 x 210 x 310 mm
  • Dimensions (F-Box LxWxH): 320 x 280 x 505 mm
  • Cord Length: 0.8 m
  • Filter Size: 1x4
  • Jug Capacity (max.): 1320 mL
  • Water Container (min.): 264 mL (2 cups)
  • Water Container (max.): 1320 mL (10 cups)
  • Average Water Loss During Brew Process: 10%
  • Materials:
    • Appliance: PP
    • Metal wrap: Stainless steel
    • Jug: Glass
    • Hoses: Silicon
  • Brew Time (max.): 10 min
  • Temperature (full jug): > 80 °C
  • Keep Warm Time: 120 minutes (30 min per WK1501 for EU countries only)
  • Auto Shut-off Time: 30 mins (/C version only)

Usage Features

The coffeemaker is designed for ease of use, incorporating several features to enhance the coffee brewing experience:

  • Integrated Grinder: Allows for fresh grinding of coffee beans, ensuring optimal flavor. The grind fineness can be adjusted via a rotary knob.
  • Water Level Indicator: Provides clear visibility of the water level in the container, preventing overfilling or underfilling.
  • User Interface (UI) Panel: Features an intuitive display and controls for operating the coffeemaker.
  • Keep Warm Function: Maintains the coffee at an optimal temperature for an extended period after brewing, up to 120 minutes (or 30 minutes for /C versions in EU countries).
  • Auto Shut-off: Automatically turns off the appliance after 30 minutes (for /C versions) or 120 minutes (standard) of inactivity, enhancing safety and energy efficiency.
  • Filter Holder: Designed for standard 1x4 paper filters, which can be easily removed for cleaning.
  • Removable Bean Container: Simplifies the process of filling and cleaning the bean container.

Maintenance Features

The manual outlines several maintenance procedures and considerations to ensure the longevity and optimal performance of the coffeemaker:

  • De-scaling:
    • The appliance indicates when de-scaling is needed.
    • Recommended de-scaling agents include vinegar or a 10-15% solution of acetic acid, citric acid, or tartar acid mixed with cold tap water.
    • A paper filter should be used to catch any particles during de-scaling.
    • Other de-scaling agents are not recommended as they may harm the appliance.
    • For stubborn build-up, the coffeemaker can be switched off with the acid solution inside and left overnight, then the cleaning operation continued/repeated.
    • After de-scaling, the coffeemaker should be operated twice with tap water to rinse out any residual substances.
  • Self-Check Mode:
    • Activated by pressing the On/Off button while plugging the mains cord into the socket.
    • Displays hardware and software versions.
    • Allows checking the status of the heating element (enabled/disabled).
    • Tests the grinder motor (enabled/disabled, with 6 beeps if disabled).
    • Performs a microcontroller check (5 = ok, E1 = Nok).
    • Checks zero-cross detection (6 = ok, E2 = Nok).
    • Verifies valve micro switches (CLO = valve is closed, --- = valve is working, OPE = valve is open).
    • Tests the inspection window micro switch (L- = Closed, H- = Open).
    • Checks the thermostat (1111 = closed, 0000 = open).
    • Verifies rotary knob functionality (increasing/decreasing values).
    • Performs an LED check (all digits on/off).
    • Returns to stand-by mode when the On/Off button is pressed again.
  • Disassembly and Reassembly Instructions:
    • Detailed steps are provided for removing and reassembling key components such as the bean container, top cover, UI panel, bottom cover, main PCBA, heater assembly, grinder, synchro motor, and water supply.
    • Gasket Management: Emphasizes the critical importance of properly reinstalling all gaskets (on top of the grinder, under the UI panel, of the UI panel, for wires entering the UI panel, for the valve/synchro motor, for the steam vent, for the steam base, and of the shower head) to prevent leaks and ensure proper sealing. Liquid seals, if broken, must be replaced, and mating surfaces cleaned with new liquid sealing applied.
    • Wire Routing: Special attention is required for proper wire routing from top to bottom, ensuring all wires pass through designated slots and not through the grinder opening.
    • PCBA Reinstallation: When reinstalling the main PCBA, ensure it slides back into its guiding recesses and that the Grinder (DC-motor) and Synchro-motor (AC-motor) leads are correctly positioned to avoid startup issues. The PCBA holder's notch must fit into the bottom cover's recess.
    • Grinder Calibration: It is not advisable to disassemble the grinder as this will disrupt its calibration, which is set using special tools in production for optimal grind-fineness.
    • Valve and Seal: When removing the valve or seal, ensure the seal is not damaged and is reinstalled correctly, as it is crucial for sealing the grinder from steam.
    • Heater Assembly: Disassembling the heater from the keep-warm plate is not recommended. If necessary, heat-conductive paste should be applied to ensure optimal heat transfer.
    • Top Water Supply: The silicon hose between the elbow joint and the showerhead does not need to be removed to uninstall this component. If the hose needs replacement, ensure hose clamps are properly reinstalled. If the showerhead is removed, it should be cleaned of residual liquid gasket, and new liquid gasket (supplied in 45g tubes) should be applied for a proper seal.
    • Complete Base: The main PCBA and Heater assembly must be completely removed to detach the base, which is secured by 6 screws.

This comprehensive manual ensures that users and service technicians have all the necessary information for the safe operation, maintenance, and repair of the Philips Coffeemaker Grind & Brew.

Philips HD7762/00/C Specifications

General IconGeneral
BrandPhilips
ModelHD7762/00/C
CategoryCoffee Maker
LanguageEnglish

Related product manuals