11
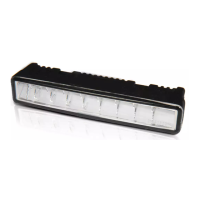
EN How to identify the correct cable to connect
the LED DayLight 9
1 Depending on the type of engine
● Standard: turn engine on
● Hybrid and Stop & Start: connect KL15
(see diagram p 10)
LED DayLight 9 modules turn on.
2 Switch on the position light.
3 Unplug the position light connector.
4 Touch each connector pin with the orange cable
extremity.The control box identifies the powered
cable by turning the LED DayLight 9 off.See the Tip
on the Wiring instructions diagram, pages 9 or 10.
AR
CZ Zjištění správného kabelu pro připojení světel LED DayLight 9
1 V závislosti na typu motoru:
● Standardní: spusťte motor.
● hybridní a Stop & Start: připojte kontakt KL15
(viz schéma na str. 10).
Moduly LED DayLight 9 se rozsvítí.
2 Zapněte obrysová světla.
3 Odpojte konektor obrysového světla.
4 Dotkněte se postupně jednotlivými kontakty konektoru
konce oranžového kabelu.Napájecí kabel poznáte podle
zhasnutí modulů LED DayLight 9.Viz tip ve schématu
s pokyny k zapojení, str. 9 nebo 10.
DE So erkennen Sie das richtige Kabel zum Anschließen des
LED DayLight 9 Moduls
1 Je nach Art des Motors:
● Standard: Schalten Sie den Motor ein.
● Hybrid und Start & Stopp: Verbinden Sie KL15
(siehe Diagramm S. 10).
Die LED DayLight 9 Module werden eingeschaltet.
2 Schalten Sie das Positionslicht ein.
3 Ziehen Sie den Steckverbinder für das Positionslicht heraus.
4 Berühren Sie jeden Stift des Steckverbinders mit dem
orangefarbenen Kabelende. Das Steuergerät zeigt an,
welches Kabel stromführend ist, indem es das
LED DayLight 9 ausschaltet.Siehe Tipp in dem
Diagramm mit den Verkabelungsanweisungen, S. 9 oder 10.