1.3
1 INTRODUCTION
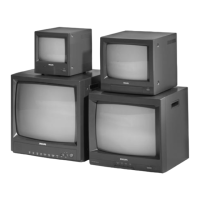
1.1 Monitor Types
Read these instructions carefully.
Monitors:
LTC 2009/51 9” Monitor (CCIR) 230 VAC 50 Hz
LTC 2009/61 9” Monitor (EIA) 120 VAC 60 Hz
LTC 2012/51 12” Monitor (CCIR) 230 VAC 50 Hz
LTC 2012/61 12” Monitor (EIA) 120 VAC 60 Hz
LTC 2017/50 17” Monitor (CCIR) 230 VAC 50 Hz
LTC 2017/60 17” Monitor (EIA) 120 VAC 60 Hz
LTC 2020/90 20” Monitor (CCIR/EIA) 100 to 240 VAC
50/60 Hz
1.2 Monitor Features
n Possible use as a closed circuit television monitor, or as a
video preview/playback monitor.
n Loop through connection - Video IN and OUT.
n Electrical circuits provide safeguards against interference,
noise and changing signal strengths to maintain a clear and
stable picture.
n Auto termination BNC connector.
n Detachable power cord for the LTC 2009, LTC 2012 and
LTC 2020.
1.3 Additional features of 17" Monitors
n Switchable scanning size. (Over scan & under scan).
n Switchable DC restoration.
1.4 Additional features of 20” Monitor
n Video A and Video B inputs.
n Audio input/output with volume control.
n Switchable scanning size on front panel, (Over scan & under
scan).
n Switchable DC restoration.
n Automatic scan system selectable (CCIR/EIA).
n Universal power (90 to 264 VAC).
2 INSTALLATION
Up to 3 monitors can be connected using the loop-through
feature of these units (Fig. 3, 6, & 9).
When this monitor is connected to additional monitors, the
same picture can be obtained on all the connected monitors.
2.1 Ventilation
In order to prevent overheating, ensure that the ventilation
openings in the monitor are not covered.
2.2 Connection - Mains Supply
Model Rated Voltage Power at Sync
No. Voltage Range Rated Voltage Format
LTC 2009/51 230 VAC. 50 Hz 198 to 264 18 W CCIR
LTC 2009/61 120 VAC. 60 Hz 108 to 132 18 W EIA
LTC 2012/51 230 VAC. 50 Hz 198 to 264 18 W CCIR
LTC 2012/61 120 VAC. 60 Hz 108 to 132 18 W EIA
LTC 2017/50 230 VAC. 50 Hz 198 to 264 27 W CCIR
LTC 2017/60 120 VAC. 60 Hz 108 to 132 27 W EIA
LTC 2020/90 100 - 240 VAC. 90 to 264 45 W CCIR/EIA
50/60 Hz
The LTC 20xx/5x monitors are delivered with a
2 pole Euro connector.
The LTC 20xx/6x monitors are delivered with a
3 pole US style connector.
The LTC 2020/90 monitor is delivered with a 2
pole Euro cord and a 3-pole US cord.
If you need to change the connector cut off and
mount your own approved connector.
IMPORTANT:
The wires in the fixed mains lead for the LTC 2017 are
coloured according to the following code:
LTC 2017/50 (220-240 VAC):
Blue = neutral
Brown = live
Green/Yellow = Safety Earth
LTC 2017/60 (100-120 VAC):
White = neutral
Black = live
Green = Safety Earth
2.3 Connections
Single monitor
See Fig. 2 for 9" & 12" monitors, see Fig. 5 for 17" monitor
and see Fig. 8 for 20” monitor.
Looped-through monitors
Up to three monitors can be connected in series by using the
VIDEO IN and VIDEO OUT connectors (see Figs. 3, 6 & 9).
The impedance is automatically set to 75 Ω by the input of a
signal on the input connector while operating in a single
connection mode. However, if a cable is connected to the
output connector, the connection is placed into the open status
by the multiple connection and high impedance automatically
selected.
Note: Do not leave an unused cable connected to the monitor.
If a single cable is used, then it must be connected to the input
connector for 75 Ω auto termination selector to function
properly.
3 OPERATION
3.1 Operating Controls and Connectors for 9" &
12" Monitors (Refer Fig. 1)
(1) POWER switch - Power on/off switch
Press the switch to turn the monitor on. Press again to
turn the monitor off.
(2) CONTRAST - For adjusting the proper contrast
between the black and the white portions of the picture.
(3) BRIGHT - For adjusting the brightness of the picture
and should be used in conjunction with the
CONTRAST control (2).
(4) V-HOLD - When the picture is rolling up or down,
adjust this control until a stable single picture is
obtained.
 Loading...