Do you have a question about the Philips MML1941-PCR and is the answer not in the manual?
Highlights long-term luminance stability, viewing angle consistency, and automatic brightness control.
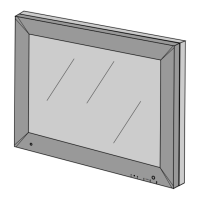
Lists MML1941-PCR (with pedestal) and MML1942-PER (with protective screen).
Details compliance with various medical equipment safety standards like IEC 60601.
Specifies indoor use, protection against electric shock, and avoiding flammable anesthetics.
Outlines copyright restrictions and manual copying policies.
Explains FCC rules for Class B digital devices and interference mitigation.
Alerts users to risks of electrical shock and advises against opening the enclosure.
Covers power cord requirements, protective earth connection, and cable anchorage.
Advises against extreme temperatures, vibration, magnetic fields, and dust.
Instructions on screen care, cleaning, and managing residual images.
Guidance on safe transport and troubleshooting backlight issues.
States no user-serviceable parts inside and intended for trained integrators.
Addresses suitability for medical environments and decontamination procedures for returns.
Notes optimization of packaging, weight, and energy consumption.
Prohibits disposal with household waste and advises adherence to local regulations.
Warns that fluorescent lamps contain mercury and require proper disposal.
Details compliance with WEEE (disposal) and RoHS (hazardous substances) directives.
Directs users to Philips website for REACH SVHCs information.
Explains how the monitor interacts with computer power management states.
Provides details on display size, type, resolution, and grayscale.
Lists physical dimensions and weight for different models.
Details supported video inputs like BNC, DVI, and DSUB-15.
Specifies power consumption, operating temperature, and humidity limits.
Provides detailed measurements for the MML1942-PER model.
Provides detailed measurements for the MML1941-PCR model.
Guides on preparing a suitable workspace and positioning the monitor.
Lists items to check after unpacking for both MML1942-PER and MML1941-PCR.
Explains how to tilt the monitor using its built-in pedestal.
Details how to attach a VESA mount using screws and washers.
Shows the location and connection of the external ground safety connector.
Guides on connecting the power cord to the adapter and monitor.
Instructions for connecting analog video signals via SXGA cable.
Details connecting composite (BNC) and digital (DVI) video cables.
Describes the power switch and AC input connector standards.
Provides pin configurations for RS232 and DVI-I connectors.
Details pin assignments for DSUB15 and BNC connectors.
Identifies key buttons, their symbols, and functions.
Explains the meaning of the GREEN, RED, and ORANGE LED indicators.
Details how to adjust brightness and the LED behavior.
Explains cursor movement within the OSD menu.
Describes using ENTER for menu access and LOGO for backlight control.
Explains how to lock the keyboard and the sequence to unlock it.
Presents the overall structure of the On Screen Display menu.
Outlines the main sections: Information, Language, Video Source, etc.
Lists sub-menus within the Image Adjust section.
Lists sub-menus within the Advanced and Service sections.
Explains the function of Enter and Adjust keys for OSD interaction.
Provides a step-by-step guide for using the OSD controls.
Briefly describes the purpose of Main, Image Adjust, Advanced, Service, and Exit menus.
Guides users on how to activate and move through the main OSD menu.
Explains the information shown in the 'Information' menu item.
How to select the OSD display language.
How to choose the active video input source.
How to enable or disable the keyboard lock feature.
Sets the duration before the OSD menu automatically disappears.
Adjusts the horizontal positioning of the image.
Adjusts the vertical positioning of the image.
Introduces the Image Adjust menu and how to navigate it.
Lists Hor. Position, Vert. Position, and Image Size controls.
Introduces LUT, Black Value, Color Emulation, Border Color, Freeze.
Detailed instructions for adjusting horizontal and vertical image position.
Explains how to select different image size formats.
Details Transfer Function curves and Black Value adjustment.
Enables or disables color emulation for monochrome monitors.
Settings for image border color and freezing the display.
Introduces the Advanced menu and its sub-sections.
Covers manual and automatic adjustments for Phase and Clock.
Options for video calibration and restoring factory defaults.
Detailed instructions for Phase, Clock, and Auto Clock adjustments.
Detailed instructions for Auto Phase, Video Calibration, and Restore Factory.
Settings for Ambient Light Compensation, Baud Rate, and 5V DVI.
Introduces the Service menu and its control items.
Manual adjustment for Red, Green, and Blue offsets.
Manual adjustment for Red, Green, and Blue gains.
Settings for Daisy Address and analog bandwidth filter.
Saving brightness presets.
Detailed instructions for Red, Green, and Blue offset adjustments.
Detailed instructions for Red, Green, and Blue gain adjustments.
Settings for Daisy Address and analog bandwidth filter.
Saving current brightness as a user preset.
Options to cancel or exit the OSD menu.
Explains 'Check Input Signal' and 'Input Available' messages.
Describes the 'Unsupported Mode' message for invalid video timings.
Lists supported video resolutions and their corresponding refresh rates.
Details FCC, CE, CCC ratings and manufacturer information.
Explains how to interpret Model, Serial Number, and Date of Manufacture.
Explains symbols like 'Warning: Important Information' and 'Dangerous Voltage'.
Defines symbols for electrical safety, WEEE, and conformity marks.
Lists and defines common abbreviations used in the document.
Defines standard units of measurement for technical parameters.