EasyManua.ls Logo

Philips PM 6672 - Page 21

Philips PM 6672
21 pages
Print Icon
To Previous Page IconTo Previous Page
Loading...
23
Set
the
pulse
width
to
approx
0.4us
and
increase
the
frequency
slowly
until
the
counter
starts
to
display
an
incorrect
pulse
width.
Push
SLOPE
for
input
A
and
release
SLOPE
for
input
B.
The
dead-time
should
be
less
than
O.Sps.
Release
COM
via
A
and
SLOPE
for
input
A.
Check
of
FREQUENCY
AVERAGE
Select
FREQ
A.
Set
slide
switch
E
on
the
rear
panel
to
position
FREQ
AVERAGE.
•Connect
a
120MHz
sine-wave
with
50mVpp
ampli
tude
to
input
A.
Set
the
measuring
time
to
Is.
The
display
read-out
should
be
120.XXXXX
MHz.
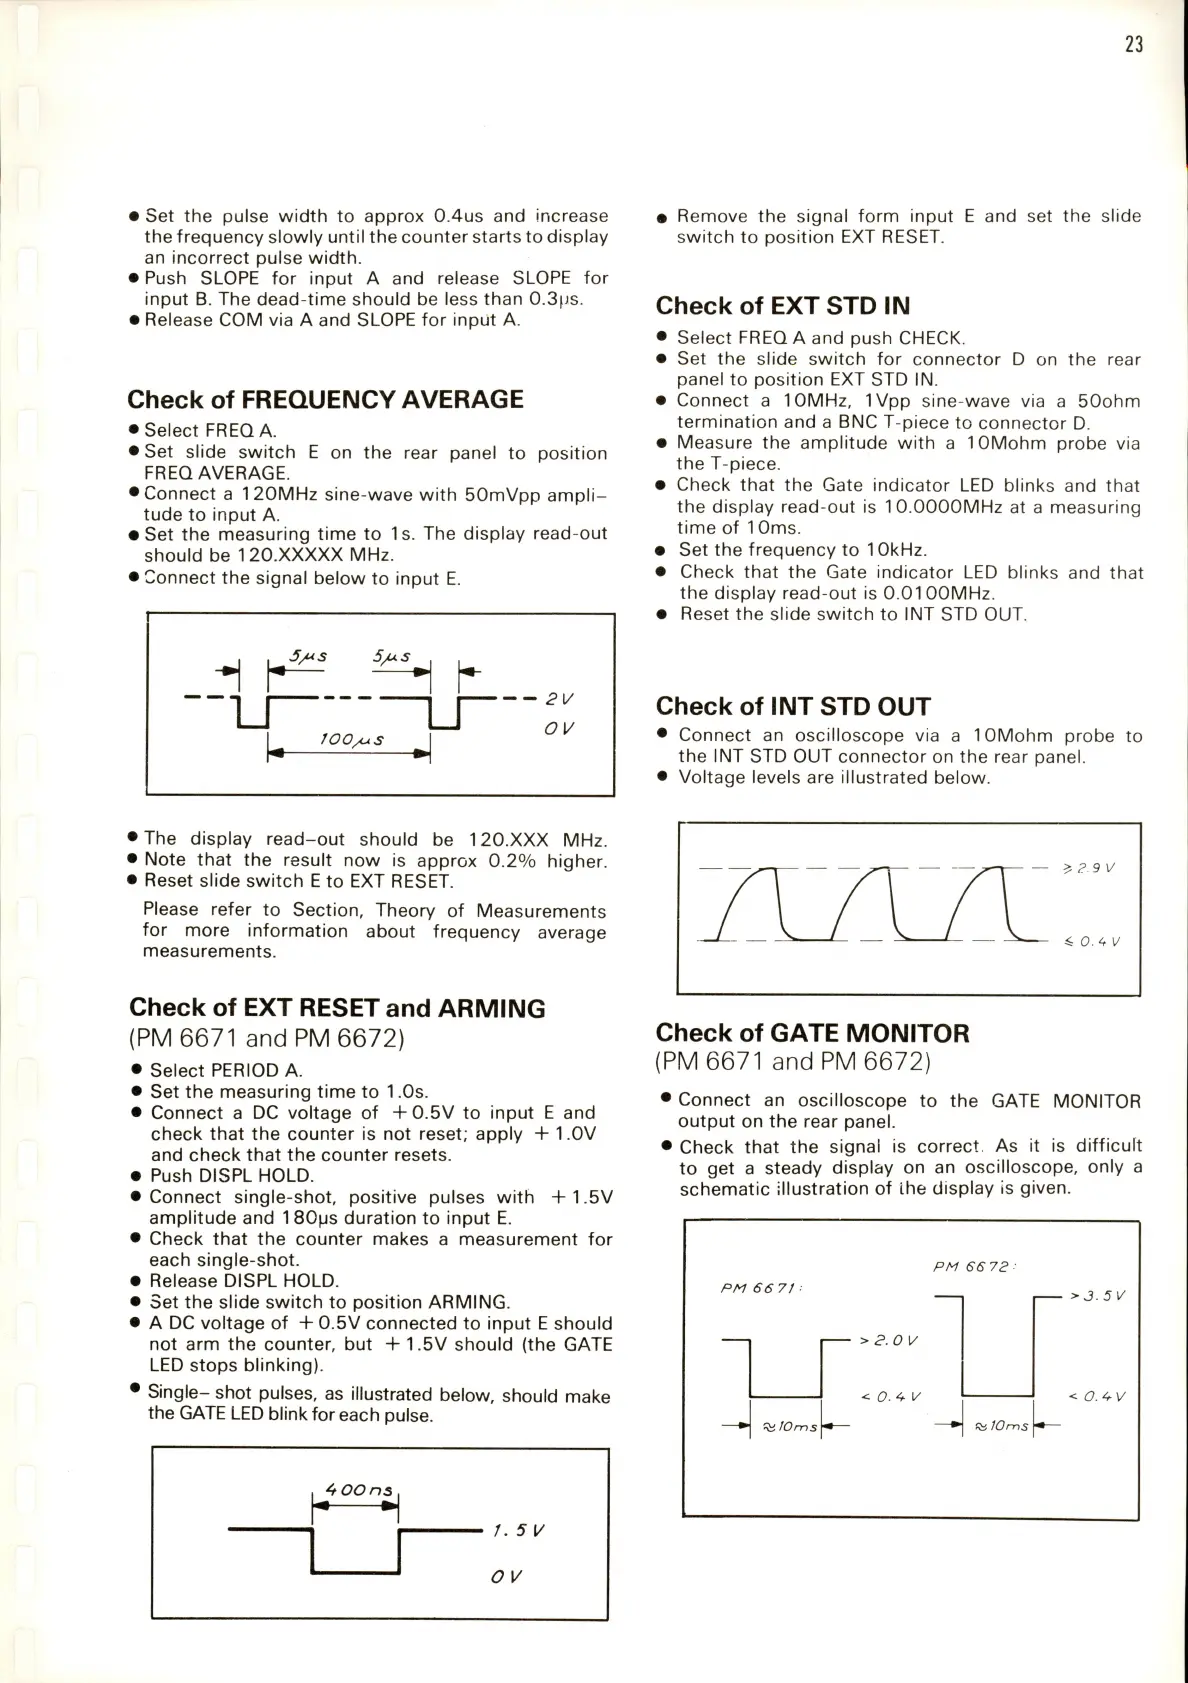
Connect
the
signal
below
to
input
E.
"""L
5/us
JOO/jS
OV
Remove
the
signal
form
input
E
and
set
the
slide
switch
to
position
EXT
RESET.
Check
of
EXTSTDIN
Select
FREQ
A
and
push
CHECK.
Set
the
slide
switch
for
connector
D
on
the
rear
panel
to
position
EXT
STD
IN.
Connect
a
10MHz,
IVpp
sine-wave
via
a
50ohm
termination
and
a
BNC
T-piece
to
connector
D.
Measure
the
amplitude
with
a
lOMohm
probe
via
the
T-piece.
Check
that
the
Gate
indicator
LED
blinks
and
that
the
display
read-out
is
10.0000MHz
at
a
measuring
time
of
10ms.
Set
the
frequency
to
10kHz.
Check
that
the
Gate
indicator
LED
blinks
and
that
the
display
read-out
is
0.0100MHz.
Reset
the
slide
switch
to
INT
STD
OUT.
Check
Of
INT
STD
OUT
Connect
an
oscilloscope
via
a
10Mohm
probe
the
INT
STD
OUT
connector
on
the
rear
panel.
Voltage
levels
are
illustrated
below.
to
'The
display
read-out
should
be
120.XXX
MHz.
'
Note
that
the
result
now
is
approx
0.2%
higher.
'
Reset
slide
switch
E
to
EXT
RESET.
Please
refer
to
Section,
Theory
of
Measurements
for
more
information
about
frequency
average
measurements.
Check
of
EXT
RESET
and
ARMING
(PM
6671
and
PM
6672)
Select
PERIOD
A.
Set
the
measuring
time
to
1
.Os.
Connect
a
DC
voltage
of
+0.5V
to
input
E
and
check
that
the
counter
is
not
reset;
apply
+
1.0V
and
check
that
the
counter
resets.
Push
DISPL
HOLD.
Connect
single-shot,
positive
pulses
with
+
1.5V
amplitude
and
1
80ps
duration
to
input
E.
Check
that
the
counter
makes
a
measurement
for
each
single-shot.
Release
DISPL
HOLD.
Set
the
slide
switch
to
position
ARMING.
A
DC
voltage
of
+
0.5V
connected
to
input
E
should
not
arm
the
counter,
but
+
1.5V
should
(the
GATE
LED
stops
blinking).
Single-
shot
pulses,
as
illustrated
below,
should
make
the
GATE
LED
blink
for
each
pulse.
4
OOns
f.5[/
?9V
Check
of
GATE
MONITOR
(PM
6671
and
PM
6672)
Connect
an
oscilloscope
to
the
GATE
MONITOR
output
on
the
rear
panel.
Check
that
the
signal
is
correct.
As
it
is
difficult
to
get
a
steady
display
on
an
oscilloscope,
only
a
schematic
illustration
of
the
display
is
given.
PM
66
72
:
PM
66
7t
>3.5V
>
2.0
V
<
0.
4
1/
<
O.PV
JOms
10ms