12 EN
3 Get started
Caution
• Ensure you have read the safety instructions before you
connect and install your recorder. Safety instructions,
p. 5.
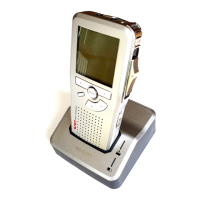
Connect the docking station
1
Plug the USB cable supplied with the docking station into
the power adapter and connect it to the main power
supply.
2
Insert the micro USB plug into the power adapter port
( ) on the rear side of the docking station.
3
Plug the USB cable supplied with the recorder into a USB
port on your computer.
4
Insert the micro USB plug into the USB port ( ) on the
rear side of the docking station.
Connect the remote control
1
Connect the plug of the remote control to the remote
control (EAR) socket of the digital recorder.
Note
• When the remote control is connected, all buttons on
the digital recorder are still usable except the recording
function of the slide switch.
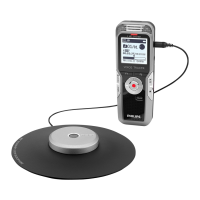
Connect and position the meeting
microphones
1
Connect the plug of splitter cable to the microphone (MIC)
socket of the recorder.
2
Connect the plug of each microphone to one socket of the
splitter cable
3
For optimal recording quality, position the microphones on
the table so that all participants are not more that 2 meters
or 6.5 feet away from the microphone.
5 m / 16.5 ft.
2 m / 6.5 ft.
Tip
• For large meetings, the operating range can be extended
by joining together and connecting three microphones on
each of the two microphone sockets of the splitter cable.

 Loading...