Pan & Tilt Adjustments 9
PL1 LED Luminaires
Installation & User’s Manual
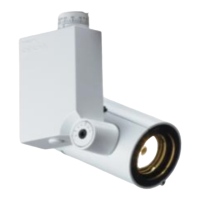
PL1 LED Luminaire - With AC Input Cable and Half-Coupler Mount
WARNING! All PL1 LED Luminaires must be mounted - vertically - as shown above to allow proper cooling.
Luminaire head may be positioned as desired.
5. Pan & Tilt Adjustments
To adjust pan and/or tilt:
Step 1. At either pan or tilt, locate Allen
head screw as illustrated in Figure
1.
Step 2. Using supplied Allen Wrench Tool
(part number ARLAKTOOL),
loosen, but do not remove,
retaining screw.
Step 3. Position / adjust pan (left or right)
and/or tilt (up or down) as desired.
Step 4. Hand-tighten, but do not over
tighten, retaining screw.
Note: *Models with Half-Coupler mounting hardware includes a 39-inch (1 meter) AC input cable.
PL1 LED Luminaire Shown with
Half-Coupler Mount*
North American / International
Half-Coupler Mount
AC Input Cable
Tilt Retaining Screw
Pan Retaining Screw
Figure 1: PL1 Luminaire Pan & Tilt Adjustment
Note: Mount not shown
for clarity.
Allen Wrench
Tool
 Loading...