Do you have a question about the PiModules UPS PIco HV3.0 HAT and is the answer not in the manual?
Introduces the UPS PIco HV3.0 HAT and its purpose.
Lists and describes optional hardware accessories for the UPS PIco HV3.0.
Describes the different available models of the UPS PIco HV3.0.
Lists the main features and capabilities of the UPS PIco 3.0 HAT.
Provides detailed technical specifications for the UPS PIco 3.0 HAT models.
Lists all the components included in the UPS PIco HV3.0 HAT package.
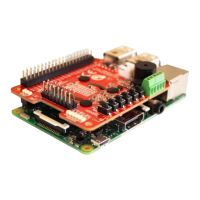
Instructions for physically assembling and connecting the UPS PIco HV3.0 HAT.
Explains how the HAT communicates and interacts with the Raspberry Pi.
Instructions for installing the POGO pin for hardware reset.
Steps to install the necessary software for the UPS PIco HV3.0 HAT.
Guide for installing daemons and email broadcasting software.
Essential for maintenance.
Detailed steps for updating the UPS PIco HV3.0 firmware.
Guide for initial system startup after installation.
Describes the core functions and features of the UPS PIco HV3.0 HAT.
Details different startup modes and LED status indications.
Crucial for safety and operation.
Outlines the different powering modes of the UPS PIco HV3.0 HAT.
Description of system and user-programmable LEDs.
Explains the function and usage of system and user buttons.
Details the sound generation capabilities of the HAT.
Information about the bi-stable relay and its functionality.
Explains the different power states the system can be in.
How to monitor the current battery charge level.
Specifies registers for reading A/D converter data.
Specifies registers for configuring A/D converter settings.
Explains the simple, time-based scheduling functionality.
Defines terms and concepts related to the Event Triggered RTC SAS.
Describes how different ETR SAS components and schedules interact.
How the Raspberry Pi can reprogram ETR SAS schedules.
Provides a template to help users prepare ETR SAS schedules.
Example configuration for a basic Pi ON/OFF schedule.
Example for controlling a bi-stable relay with ETR SAS.
Example for complex Pi ON/OFF scheduling with ETR SAS.
Step-by-step guide for the first ETR SAS example.
Step-by-step for the second ETR SAS example.
Procedure for performing an automatic factory default recall.
Procedure for performing a manual factory default recall.
Lists the settings that are restored during factory reset.
Explains the I2C interface for controlling peripherals.
Details the status registers at I2C address 0x69.
Specifies registers for accessing the Hardware RTC.
Lists commands and registers for module control.
| Input Voltage | 5V |
|---|---|
| Input Current | 3A |
| Output Voltage | 5V |
| Battery Voltage | 3.7V |
| Charging Current | 1A |
| Communication Interface | I2C |
| Compatibility | Raspberry Pi |
| Efficiency | 90% |
| Battery Type | Li-ion |
| Battery Connector | JST |
| Dimensions | 65mm x 56mm |
| Mounting | HAT |
| Output Current | 3A (limited by input and battery) |
| Max Continuous Current | 3A (limited by input and battery) |