Parts List Step 2
500
kg
BENCHTOP
WARRANTY CONDTIONS: Any claim under this warranty must be made within 1 year of the date of purchase of the product. To make a claim under this warranty, take the product (with proof of purchase) to any
Bunnings store (for AUS customers see www.bunnings.com.au and for NZ customers see www.bunnings.co.nz for store locations). Pinnacle Hardware bears reasonable, direct expenses of claiming under the warranty.
You may submit details and proof of purchase to our support centre for consideration. The warranty covers manufacturer defects in materials, workmanship and finish under normal use. This warranty is provided in
addition to other rights and remedies you may have under law: Our goods come with guarantees that cannot be excluded under the Australian consumer law or Consumer Guarantees Act 1993 (NZ). You are entitled to
a replacement or refund for a major failure and compensation for any other reasonably foreseeable loss or damage. You are also entitled to have the goods repaired or replaced if the goods fail to be of acceptable
quality and the failure does not amount to a major failure. This warranty excludes damage resulting from product misuse or product neglect, any modifications, additions or alterations to the product including the
addition of extra shelves. Additions or modifications can compromise the structure and safety of the product. The warranty covers domestic use only and does not apply to commercial applications. This warranty is
given by Pinnacle Hardware, ABN 87 614 496 196, 28 Hudson Court, Keysborough Vic 3173, 1800 349 776, Email: support@pinnacle.net.au. Products sold in New Zealand are imported by Bunnings New Zealand.
‘Pinnacle’ is a trademark © Pinnacle Hardware. Suitable for model number GOS159.
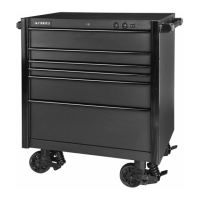
605mm
DEPTH
800mm
WIDTH
2090mm
HEIGHT
ITEM NO: GOS159
Turn the cabinet base upside down and and
attach the adjustable feet “G”.
Turn the cabinet back over onto its feet and
remove the draws from the cabinet.
Step 3 Step 4
Not to scale.
Step 1
Very Important: Unpack the unit and confirm that you have all the parts listed. Assemble the
unit on a solid, level surface. Avoid carpet. You will need the assitance of a second person
during assembly.
Safety tip: For added safety and support we recommend you fix unit to a wall.
You will need the following: Phillips-head screwdriver.
A
B
E
X 4PCS
P
P
4 DRAWER STORAGE STATION
Timber
Benchtop (B) x1
Pegboard (C) x1
Slimline
Cabinet (D) x1
Left Bottom Upright x1
Left Top Upright x1
Right Bottom Upright x1
Right Top Upright x1
Connector Plate x2
Wiring Grommet (H) x2
Adjustable Feet (G) x4
Logo (I) x2
M6 x 13mm Pan Head
Hex Bolt (K) x20
M5 x 16mm Countersunk
Screw (M) x16
4mm Allen Key x1
4 Drawer
Cabinet (A) x1
Shelf (E) x4
M4 x 16mm Self Tapping
Screw (P) x24
Non Slip Drawer
Liner (J) x4
Fix shelf in drawer with 6x screws "P" from the
bottom and repeat the same step with
all drawers.
Please note: The timber benchtop is not bolted
to the cabinet. Carefully lift timber benchtop o
and place all the contents on a flat surface.
G
G