EasyManuals Logo

Pioneer XR-P770F Operating Instructions

Pioneer XR-P770F
32 pages
To Next Page IconTo Next Page
To Previous Page IconTo Previous Page
Page #6 background imageLoading...
Page #6 background image
CONNECTIONS
a
3.
Connecting
an
additional
CD
player
e
Connect
this
unit’s
MD/CD
I!
input
jack
to
the
CD
player's
Output
jack
using
a
regular
audio
cord
available
in
stores.
@
When
connecting
a
Pioneer
CD
player
with
a
control
out
CD
II
jack,
connect
this
unit’s
control
out
CD
Il
jack
to
the
CD
player’s
control
input
jack
using
an
audio
cord
with
a
miniplug
(no
resistor).
You
can
use
this
unit’s
infrared
sensor
for
remote
control
of
the
connected
CD
player.
5.
Finally,
plug
the
power
cord
into
the
AC
wall
outlet.
NOTE:
Insert
the
plugs
securely
into
the
jacks.
Improper
connection
can
lead
to
sound
distortion
or
malfunction.
Connecting
the
OPTICAL
FIBER
CABLE
This
unit
can
be
connected
to
an
MD
or
DAT
equipped
with
an
optical
digital
jack.
1.
Remove
the
protective
dust
cap
from
this
unit’s
DIGITAL
OUT
OPTICAL
jack.
2.
Use
an
optical
fiber
cable
to
connect
the
DIGITAL
OUT
OPTICAL
jack
of
this
unit
to
the
optical
input
jack
of
the
MD
or
DAT.
MD
or
DAT
DraTAL
«
This
unit
e
Align
the
plug
of
the
optical
fiber
cable
with
the
optical
digital
jack
and
fully
insert
the
plug
to
make
a
secure
connection.
Use
a
separately
sold
optical
fiber
cable
for
the
optical
digital!
jack
connections.
Precautions
concerning
use
of
optical
fiber
cables
e
Fully
insert
the
optical
fiber
cable
plugs
all
the
way
into
the
jacks.
e
Be
careful
not
to
fold
or
crimp
the
cable.
When
coiling
an
optical
fiber
cable
for
storage,
make
sure
the
diameter
of
the
coil
is
15
cm
or
larger.
e
Use
an
optical
fiber
cable
with
a
length
of
3
m
or
less.
@
Protect
the
optical
fiber
cable
plugs
from
scratches
and
dust.
@
When
the
unit
is
not
connected
using
an
optical
fiber
cable,
be
sure
to
keep
the
protective
dust
cap
plugged
into
the
optical
digital
output
jack
at
all
times.
ANTENNA
CONNECTIONS
Radio
reception
is
not
possible
unless
the
antenna
is
properly
connected.
The
strength
of
broadcast
signals
varies
from
one
area
to
another.
Signal
propagation
is
especially
poor
in
metropolitan
areas,
where
there
are
many
tall
buildings
and
in
mountainous
areas.
Proper
antenna
installation
is
vital
to
good
reception.
FM
ANTENNA
FM
antenna
Stretch
the
antenna
and
affix
it
to
a
wall,
etc.
v4!
AM
LOOP
Kal
ANTENNA
Ea
External
FM
antenna
installation
Use
an
external
antenna
when
the
signals
from
the
stations
are
weak
and
cannot
be
picked
up
by
the
accessory
FM
antenna,
or
when
the
sound
heard
is
accompanied
by
too
much
noise.
6
<ARB7110>
AM
ANTENNA
The
antenna
should
be
placed
at
a
distance
from
this
unit,
and
should
not
be
allowed
to
touch
metallic
objects.
Avoid
placing
it
near
CD
players,
personal
computers,
television
sets
and
other
devices
generating
radio
frequencies.
e
Place
the
antenna
on
a
level
surface
and
rotate
it
to
find
the
orientation
that
yields
the
best
reception.
To
attach
the
antenna
to
a
wall,
etc.
1.
Select
the
place
that
yields
the
best
reception.
2.
Screw
the
leg
to
the
wall,
etc.
3.
Insert
the
clip
on
the
bottom
of
the
antenna
into
the
groove
on
the
leg.
External
AM
antenna
Indoor
AM
antenna
Provide
a
vinyl-coated
wire
(5
to
6
meters
long).
Secure
one
end
to
the
AM
terminal
and
the
other
end
to
a
wall
or
other
high
location.
Outdoor
AM
antenna
If
reception
is
still
poor
even
when
a
lead
antenna
has
been
fully
extended
indoors,
stretch
out
a
vinyl-coated
wire
and
secure
it
outdoors.
NOTE:
Do
not
detach
the
AM
loop
antenna
when
using
the
external
AM
antenna.
Outdoor
AM
antenna
indoor
AM
Casa
Vinyl
SS
wire
(5
-
6
meters)
AM
LOOP
ANTENNA
AM
loop
antenna
The
;}
(signal
earth)
helps
reduce
noise
when
an
antenna
is
connected.
It
is
not
a
safety
earth.
When
moving
the
unit
Remove
all
the
discs,
and
then
unplug
the
power
cord
from
the
wall
socket
about
10
seconds
after
a
CD
has
stopped
playing.
@
Leaving
discs
in
the
rack
when
you
move
it
may
result
in
damage.
@
When
packing
the
unit
or
removing
it
from
its
box,
be
sure
not
to
touch
the
front.

Other manuals for Pioneer XR-P770F

Questions and Answers:

Question and Answer IconNeed help?

Do you have a question about the Pioneer XR-P770F and is the answer not in the manual?
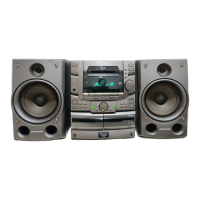
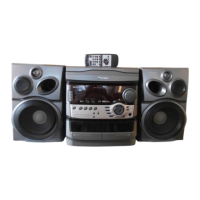
Pioneer XR-P770F Specifications

Amplifier Section IconAmplifier Section
continuous power output (RMS)100 W + 100 W
channels2 channels (stereo)
continuous power output (DIN)80 W + 80 W
Power IconPower
power requirementsAC 230 V, 50/60 Hz
power consumption530 W
music power (DIN)115 W + 115 W
FM Tuner Section IconFM Tuner Section
reception frequencies (FM)87.5 MHz to 108 MHz
reception frequencies (AM)531 kHz to 1, 602 kHz (9 kHz step)
frequency response (Type II tape)35 Hz to 15, 000 Hz +6 dB
Weight and Dimensions IconWeight and Dimensions
external dimensions260 (W) x 310 (H) x 371.5 (D) mm
weight11.5 kg
antenna input75 Ω unbalanced

Related product manuals