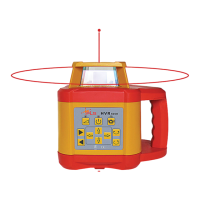
The PLS HVR 505 is a fully automatic, self-leveling rotary laser designed for height transfer and layout tasks. It is available in two models: the HVR 505 R, which uses a traditional visible red beam, and the HVR 505 G, which features a highly visible green beam. Both models are suitable for both interior and exterior applications, with the green beam model being ideally suited for interior layout due to its enhanced visibility. The device incorporates micro-controlled charging technology for its rechargeable NiMH batteries.
Function Description:
The PLS HVR 505 operates in both vertical and horizontal modes, offering versatility for various construction and layout tasks. It includes an up and down plumb beam for precise vertical alignment. An additional line marker (scanning) function allows for specific beam angles (0°, 10°, 45°, 90°, 180°), which can be adjusted by pressing the scanning key multiple times. The unit can be controlled remotely using the PLS RC 505 remote control, which mirrors the keypad functions. The instrument is water-resistant, allowing for use in rain, but should not be submerged.
Keypad Functions and Indicators:
The keypad provides comprehensive control over the device's operations:
- Power Switch (1): Turns the unit on or off.
- Power Light (2): Red light indicates power is on.
- Low Battery Indicator (3): Blinking LED signals that the battery needs charging or replacement.
- Manual Indicator (4): Green LED illuminates when the unit is in manual mode.
- Accelerate Key (5): Adjusts rotational speed through a cycle of 0, 60, 120, and 600 r.p.m. Pressing it multiple times cycles through these speeds.
- Scanning Key (6): Adjusts the scanning angle (0°, 10°, 45°, 90°, 180°).
- Manual/Automatic Key (7): Toggles between automatic and manual leveling modes.
- Counterclockwise Rotation Key (8): Starts scanning in a counterclockwise direction when rotation is stopped.
- Clockwise Rotation Key (9): Starts scanning in a clockwise direction when rotation is stopped.
- X Slope Adjustment Key (10): In manual mode, adjusts the slope in the X direction.
- Y Slope Adjustment Key (11): In manual mode, adjusts the slope in the Y direction.
- Tilt or ADS (Automatic Drift System) (12): Blinks slowly when active and quickly to warn of alignment changes from the original setup.
Operating Modes:
- Power On: Pressing the power switch initiates self-leveling. Once leveled, the laser beam stops blinking and rotates up to 600 r.p.m. If the gradient exceeds ±5°, the manual indicator blinks. The unit will shut off if it doesn't level within 5 minutes.
- Rotation Mode: The accelerate key (5) adjusts rotation speed. Pressing it again stops rotation. The clockwise (9) and counterclockwise (8) keys control the direction of rotation.
- Scanning Mode: After stopping rotation, pressing the scanning key (6) activates scanning mode. Subsequent presses adjust the scanning angle. The counterclockwise (8) or clockwise (9) keys move the scanning laser line.
- Setting Slope: The PLS HVR 505 supports dual-axis slope setting. Pressing the manual/automatic key (7) activates manual mode, indicated by a green LED.
- X-direction Slope: Aim X1 of the instrument in the desired direction and use key (10) to adjust the laser beam upwards or downwards.
- Y-direction Slope: Aim Y1 of the instrument in the desired direction and use key (11) to adjust the laser beam upwards or downwards.
- Automatic Drift System (ADS): Activated by pressing key (12). The power indicator blinks slowly. After automatic leveling (approx. 3 seconds), ADS is active. If the instrument is disturbed, the power indicator blinks quickly, automatic leveling shuts off, and the laser module stops scanning and starts blinking.
Applications:
- Height Transfer (Leveling): Turn on the instrument and allow it to self-level. Once the LED lights continuously, attach the PLS HVD 505 Detector to a rod at a reference point and move it to zero. The detector can then be used to measure height differences on the ground.
- Laying out Slope: Mount the PLS HVR 505 on a tripod, plumb it over a benchmark, and ensure the X-axis points towards the desired slope. Auto-level the unit, then attach the detector to a grade rod. Find level on the detector (solid tone/line on LCD). Engage manual mode via the remote control (RC 505). Lower the detector by the required distance for the slope. Use the arrow keys (right for down, left for up) to fine-tune the laser adjustment until the detector indicates level.
- Vertical Use: The PLS HVR 505 has a third leveling axis (z-axis). Place the instrument as shown in the manual; the plumb beam will auto-level. The rotating head projects an upright plane at a 90° angle to the plumb beam. Arrow keys move the laser beam left/right to adjust alignment.
Important Technical Specifications:
- Accuracy:
- Horizontal: +/- 1/8 inch @100 feet (3 mm @ 30 meters)
- Down point: +/- 1/8 inch @10 feet (3 mm @ 3 meters)
- Up point: +/- 1/8 inch @100 feet (3 mm @ 30 meters)
- Leveling Range: ±5°
- Operation Range: Radius 500 feet with detector (150 m)
- Rotation Speed: 0 - 600 rpm
- Light Source:
- HVR 505 R: Laser diode, wavelength 635 nm, <1 mW (Class II)
- HVR 505 G: Laser diode, wavelength 532 nm, <5 mW (Class III)
- Operating Temperature: 32 °F (0 °C) to 140 °F (40 °C)
- Storage Temperature: -22 °F (-30 °C) to 140 °F (60 °C)
- Power Supply: 4 x C Size NiMH Batteries
- Operating Time: Approximately 20 hours
- Charging Time: Maximum 7 hours (NiMH ONLY)
- Protection Grade: IP64 (Water-resistant), not submersible
- Size / Weight: 7.5 inch x 8 inch x 6 inch (190.5 mm x 200 mm x 152 mm) / 4.9 lbs (unit only) / 2.22 kg
PLS RC 505 Remote Control:
- Operating Distance: 70 feet
- Charger (LDG 2+2): Model KD500-CV, Input AC 100 VAC-240 VAC, Output DC 5.6 V 700 mA. Use indoors only; do not attempt to charge alkaline batteries.
PLS HVD 505 Detector Specifications:
- Available Distance: From rotary PLS HVR 505 (2.0 in)
- Accuracy:
- Precise detecting: ± 1 mm (±0.04 in)
- Rough detecting: ±2mm (±0.08 in)
- Detecting Indication: Bi-surface LCD, buzzer
- Power: DC9V alkaline battery
- Automatic Power-off Time: Approx. 20 minutes
- Working Temperature: -4 °F to +122 °F (-20 °C to +50 °C)
- Dimensions: 135 (L) X 65 (W) X 24.5 (H) mm (5-3/4" x 2-3/4" x 1")
- Weight: 0.15 kg (0.44 lbs) (with battery)
- LCD Display: Shows precise/rough detecting reference position, higher/lower than reference (slow/fast frequency beep), in reference line (long beep), and poor power.
- Panel: Features LCD (front and back), Buzzer ON/OFF, Mark, Laser Receptor, Detecting Mode, and Power Switch.
- Caution: The HVD 505 R + G detectors are dedicated to their respective HVR 505 R + G rotary lasers and may not be used with other laser tools.
Maintenance Features:
- Battery Charging: The PLS HVR 505 uses rechargeable NiMH batteries. Insert the re-charger plug into the charging panel outlet. The charging lamp indicates charging in process (on) and completion (green). Charging takes approximately 7 hours.
- Calibration Check: The instrument should be checked for calibration before use.
- Method B (Instrument Checking): Place the instrument 90 feet from a wall/scaleplate. Measure the h1 of the X1-beam. Rotate the instrument 180° and measure the h2 of the X2-beam. The D-value (difference between h1 and h2) should be less than 1/8 inch. Repeat for the Y-beam.
- Level Adjusting (if D-value > 1/8 inch):
- Y-axis adjustment: Turn on, allow auto-leveling. Simultaneously press the "↑" and "→" keys for 3 seconds to enter adjusting mode (mode indicator blinks). Use "↑" or "↓" keys to adjust the laser beam position until the D-value is less than 1/8 inch. Simultaneously press "↑" and "→" again to hold adjustment.
- X-axis adjustment: Turn on, allow auto-leveling. Simultaneously press the "→" and "↓" keys for 3 seconds to enter adjusting mode (undervoltage indicator blinks). Use "←" or "→" keys to adjust the laser beam position until the D-value is less than 1/8 inch. Simultaneously press "↑" and "↓" again to hold adjustment. If canceling, shut off and restart. If the adjusting range is exceeded, the power indicator will flash, requiring professional repair.
- Plumb Point Check: Place the instrument between two walls 90 feet apart. Adjust it on its side, switch on, and measure the middle point of the laser beam (hA, hB, hA', hB'). The D-value (hA-hA' and hB-hB') should be less than 1/8 inch. If not, adjust as per the level adjusting procedure.
- Storage: Do not put the laser back into its case unless it is thoroughly dry to prevent corrosion and beam distortion.
- Laser Safety: The HVR 505 R is a Class II laser, and the HVR 505 G is a Class IIIA laser. Do not stare into the beam or view directly with optical instruments. Do not remove warning labels. Disassembly is not recommended as it may lead to excessive laser radiation and void the warranty.
Warranty:
The PLS HVR 505 is warranted by PLS Pacific Laser Systems for three years from the date of purchase against defects in material and workmanship under normal use. Repairs or replacements (at PLS's option) will be free of charge for parts and labor, but the purchaser bears shipping, packing, and insurance costs. The warranty is void if the product has been abused or altered, including battery leakage, dents, gouges, broken optic windows, or damage to the switch/LED membrane. Tampering with or removing caution/certification labels also voids the warranty. This warranty provides specific legal rights, which may vary by state.