Do you have a question about the Power Wheels NINJA J8472 and is the answer not in the manual?
Addresses electrical system modifications, incorrect batteries/chargers, and hot motors.
Covers adult supervision, safe riding areas, and essential riding rules for safety.
Warns about small parts in the unassembled state and the need for adult assembly.
Advises using the charger exclusively in dry locations to prevent hazards.
Provides a phone number for product problems or missing parts instead of returning to the store.
Advises identifying all parts and saving packaging material before assembly.
Explains how to access the battery compartment by lifting the seat.
Instructs to wipe metal parts with a paper towel to remove protective lubricant.
Lists and shows components like Rear Axle, 12 Volt Battery, 12 Volt Charger, Hubcaps, Wheel Covers, Bushings, Hand Grips.
Shows actual size fasteners like screws, washers, and cotter pins with quantities.
Provides instructions on tightening screws with a Phillips screwdriver, warning against over-tightening.
Illustrates the assembly of various parts with corresponding numbers for identification.
Lists components not depicted in the main diagram, like Label Sheet and specific screws.
Alerts to risks like battery falling, fire from modifications, or improper battery/charger use.
Recommends using the charger only in dry locations to prevent electrical hazards.
Explains the thermal fuse's function, automatic shut-down, and how to reset it.
Details initial charge time, charging after use, battery orientation, and charger safety.
Step-by-step guide to plugging the charger into the battery and wall outlet.
Clarifies that the power indicator shows outlet power, not battery charge status.
Specifies initial charging duration (18 hours) and subsequent charging (14 hours).
Instructs how to fit a cotter pin into the rear axle for proper assembly.
Detailed steps for attaching rear wheels, covers, bushings, and drivers to the axle.
Guides on positioning the vehicle and sliding the rear axle assembly into place.
Reinforces fitting the cotter pin into the rear axle correctly.
Instructions for fitting the handlebar and steering column through the vehicle's opening.
Details on attaching the steering column cap and securing it with a screw.
Guides on sliding a plate under the steering column and securing it with a screw.
Steps for attaching front wheels, covers, bushings, and washers to the front axle.
Instructions for snapping hubcaps onto the center of each wheel cover.
Guides on fitting the front clip onto the front of the vehicle.
Reinforces fitting the cotter pin into the front axle correctly.
Steps to fit the brush guard onto the front clip and secure it with screws.
Instructions for fitting hand grips onto the ends of the handlebar, with a tip for difficulty.
Guides on locating and connecting the battery indicator and high speed connectors.
Advises wiping the vehicle surface with a clean cloth before applying labels.
Instructions on placing labels exactly as shown and avoiding repositioning.
Steps to fit the seat tabs into the corresponding slots on the vehicle.
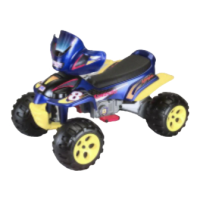
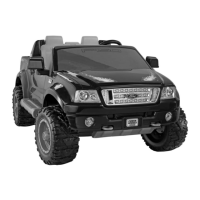
Illustrated view of the Model J8472 from the right side with numbered parts.
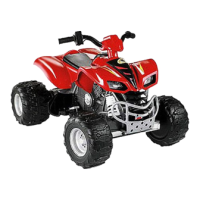
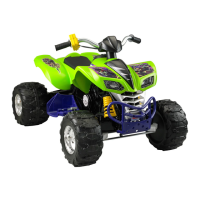
Illustrated view of the Model K0450 from the right side with numbered parts.
Illustrated view of the Model J8472 from the left side with numbered parts.
Illustrated view of the Model K0450 from the left side with numbered parts.
Instructions on lifting the seat and retainer to access the battery compartment.
Guides on placing the battery upright and plugging in the motor harness connector.
Details on lowering the battery and securing it with the battery retainer.
Steps to properly re-attach the seat to the vehicle after battery installation.
Procedures for handling battery leaks, including skin/eye contact and ingestion.
Covers charging frequency, duration, storage, and using the correct battery type.
Information on environmentally sound disposal and recycling of lead-acid batteries.
Emphasizes the importance of teaching children safety rules and adult supervision.
Lists specific rules for children to follow: sitting, shoes, single rider, no street, water, dark, slopes.
Provides instructions to disconnect the motor harness from the battery for storage.
Explains how to operate the vehicle in beginner low speed mode.
Details how to connect high speed connectors to enable higher speeds.
Guides on how to back up the vehicle and practice steering in reverse.
Advises practicing steering in high speed and notes outdoor-only usage.
How to use the indicator button to check the battery's charge status.
Explains what the four lights on the indicator mean regarding battery charge percentage.
Advises checking screws, nuts, plastic parts, and performing regular tightening.
Guidance on storing the vehicle indoors or under cover, especially during bad weather.
How to clean the vehicle, including using non-wax furniture polish for shine.
Recommends periodic checks by authorized service centers for optimal operation.
Troubleshooting steps for when the vehicle does not run, covering battery, charger, and connections.
Explains thermal fuse tripping due to overload or severe conditions and how to reset.
Addresses issues caused by loose wires or connectors to motors and battery.
Explains battery death due to age or improper care and how to test it.
Troubleshooting for short run time, including undercharged/overcharged batteries and old batteries.
Solutions for a sluggish vehicle, covering battery charge, overloading, and driving conditions.
Explains why the vehicle may only run in low speed and how to enable high speed.
Addresses the scenario where only one rear wheel spins, indicating potential drive system issues.
Troubleshoots issues where the vehicle runs inconsistently due to wiring or switches.
Explains normal noises from the charger and battery during use or charging.
Details the one-year bumper-to-bumper warranty for the vehicle against defects.
Specifies the six-month limited warranty for the included 12-volt battery.
Lists conditions that void the warranty, such as misuse, neglect, or unauthorized repairs.
Provides instructions for seeking service, contact information, and saving the sales receipt.
| Model Number | J8472 |
|---|---|
| Number Of Riders | 1 |
| Number of Speeds | 2 |
| Theme | Ninja |
| Product Type | Ride-On Toy |
| Age Range | 3+ |
| Max Weight Capacity | 65 lb (29.5 kg) |
| Speed Forward | 2.5 mph (4.0 km/h) |
| Speed Reverse | 2.5 mph (4.0 km/h) |
| Battery | 12V |
| Color | Green |