ENGLISH
CONTENTS
• Controller
• USB adaptor
• 5 ft. / 1.5 m USB-C
®
to USB-A Cable
• Two analog caps
• User Manual
CHARGING CONTROLLER
For best results, fully charge controller prior to first use.
1. Using a USB-C Cable connect to the USB-C port at
the top of the controller, and connect the other end
to any powered USB source.
2. When charging, the battery indicator LED will
flash AMBER.
3. When fully charged the battery indicator LED will
be solid GREEN.
4. Battery Indicator will flash RED when battery is low.
WIRELESS MODE: 2.4G
1. Insert wireless USB dongle into open PC USB port.
2. Select “RF” on the mode switch
on back of controller.
3. If controller is off, press the Home
button (icon) to turn on (LED will illuminate
WHITE).
4. Press and hold the SYNC button (icon) on top of
the controller for 3 seconds to enter pairing mode
(LED will flash WHITE rapidly).
5. Enter the Settings menu on your device and
choose the PC Wireless controller. The LED will
turn solid WHITE when connected.
WIRELESS MODE: BLUETOOTH
1. Select “BT” on the mode switch
on back of controller.
2. If controller is off, press the Home button (icon) to
turn on (LED will illuminate BLUE).
3. Press and hold the SYNC button (icon) on top of
the controller for 3 seconds to enter pairing mode
(LED will flash BLUE rapidly).
4. Enter the Bluetooth settings on your device.
5. Select the PC Wireless Controller.
WIRED MODE USB
1. Select “USB” on the mode switch
on back of controller.
2. Using the included USB-C Cable, connect to
the USB-C port at the top of the controller, and
connect the other end to an available USB port
on the PC.
3. If controller is off, press the Home button (icon) to
turn on (LED will illuminate GREEN).
NOTE: A previously paired device will automatically pair
to the controller when powered on.
MODE XINPUT TO DIRECT INPUT
(2.4 RF / USB WIRED MODE ONLY)
1. Press and hold the SELECT and START buttons
simultaneously for 3 seconds
2. LED indicator will flash 3 times to indicate MODE
has been changed.
3. To change modes again, press and hold SELECT
and START buttons again for 3 seconds until LED
flashes 3 times.
TRIGGER LOCK ADJUSTMENT
ANALOG CAPS (OPTIONAL ACCESSORY)
Enhance the controller’s grip and comfort by attaching
the analog caps to the analog sticks for improved
gameplay.
POWERING OFF
Hold the Home button (icon) for 5 seconds to turn
controller off and save battery capacity.
BATTERY STATUS INDICATION
LOW BATTERY = RED LED
BATTERY CHARGING = AMBER LED
BATTERY CHARGED = GREEN LED
ASSIGNING THE ADVANCED GAMING BUTTONS
A. Press the Program
Button on the back of the
controller for 3 seconds.
B. The LED Indicator will
flash, signaling the
controller is in assign
mode.
C. Press 1 of the following
buttons (A/B/X/Y/LB/RB/
LT/RT/Left Stick Press/
Right Stick Press/D- pad)
to re-assign.
D. Then press the Advanced
Gaming Button (AGR1/
AGR2 or AGL1/AGL2) that
you wish to assign. The
LED connection indicator
will stop flashing,
signaling the Advanced
Gaming Button has
been set.
E. Repeat for the remaining
Advanced Gaming
Buttons.
NOTE: Advanced Gaming Button assignments will
remain in memory even after disconnected.
RESETTING THE ADVANCED GAMING BUTTONS
1. Hold the Program Button down for 2 seconds.
The LED Connection Indicator will slowly flash,
signaling the controller is in assign mode.
2. Press the previously assigned button for 5
seconds, and the function will be cleared.
TURBO SETTING
A. Press and hold one of the
A,B,X,Y buttons that you
wish to set to Turbo.
B. While holding down the
desired button press the
Turbo button.
C. The LED indicator will
flash 3 times to show you
Turbo has been set.
D. Press the Turbo button
again to turn Turbo off.
TROUBLESHOOTING
PROBLEM: My controller will not power on.
SOLUTION: Confirm the controller is fully charged. Plug
in to recharge as needed.
PROBLEM: I don’t see my PC controller listed in my
device’s settings.
SOLUTION: Press and hold the Bluetooth sync button
on top of controller for 3 seconds to enter pairing mode
(LED will flash rapidly).
PROBLEM: My wireless controller is not pairing.
SOLUTION: Confirm the battery is charged by plugging
in USB-C cable.
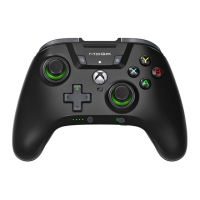
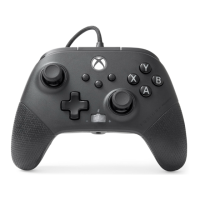
Start
Button
Select
Button
Home Button
LSB
LB
RSB
RB
LED
Indicator
Turbo
Detachable
Cable
D-Pad
USER MANUAL
Customer Service
MODEL: PCGPSTWL
www.powera.com/support
POWERA
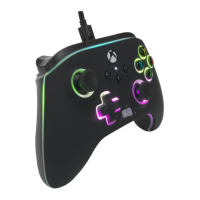
BATTLE DRAGON
WIRELESS CONTROLLER
TWO-YEAR LIMITED WARRANTY
For warranty details or support with your authentic PowerA accessories,
please visit www.powera.com/support.
A/B/X/Y
Buttons
Left
Trigger
Right
Trigger
Battery Indicator
Trigger Lock
Right
AGL 1
AGL 2
Trigger Lock
Left
MAP AGB
Reset
Sync
USB BT RF Switch
AGR 1
AGR 2
USB BT RF
USB BT RF
USB BT RF
®