Step 1
Attach the Pivot Stand Brace (pre-attached to Sweeper Chassis)
to the Sweeper Chassis using a 1/4” x 1-1/4” Bolt. Repeat this step
for the other Pivot Stand Brace. Fig. 1
Lock the Pivot Stand Tube in place by inserting a 1/4” x 1/2”
Bolt through the Pivot Stand Tube and Sweeper Assembly and
securing it with a 1/4” Lock Nut. Fig.1
Tighten the nut on the pre-attached 5/16” Bolt if needed.
Pivot Stand
Brace
Sweeper
Chassis
1/4 x 1-1/4”
Bolt
Step 2
Attach both Bottom Pivot Frame Assemblies to both right and left
sides on the front of the Sweeper Chassis using two 1/4” x 1-1/2”
Hex Head Bolts and two 1/4” Lock Nuts. Fig.2 (Right Bottom Pivot
Frame Assembly Shown) Next, bolt the Vertical Pivot Tube on the
Pivot Frame Assembly to the Caster Assembly using two
5/16” x 1/2” Bolts and two 5/16” Lock Nuts. Fig.2
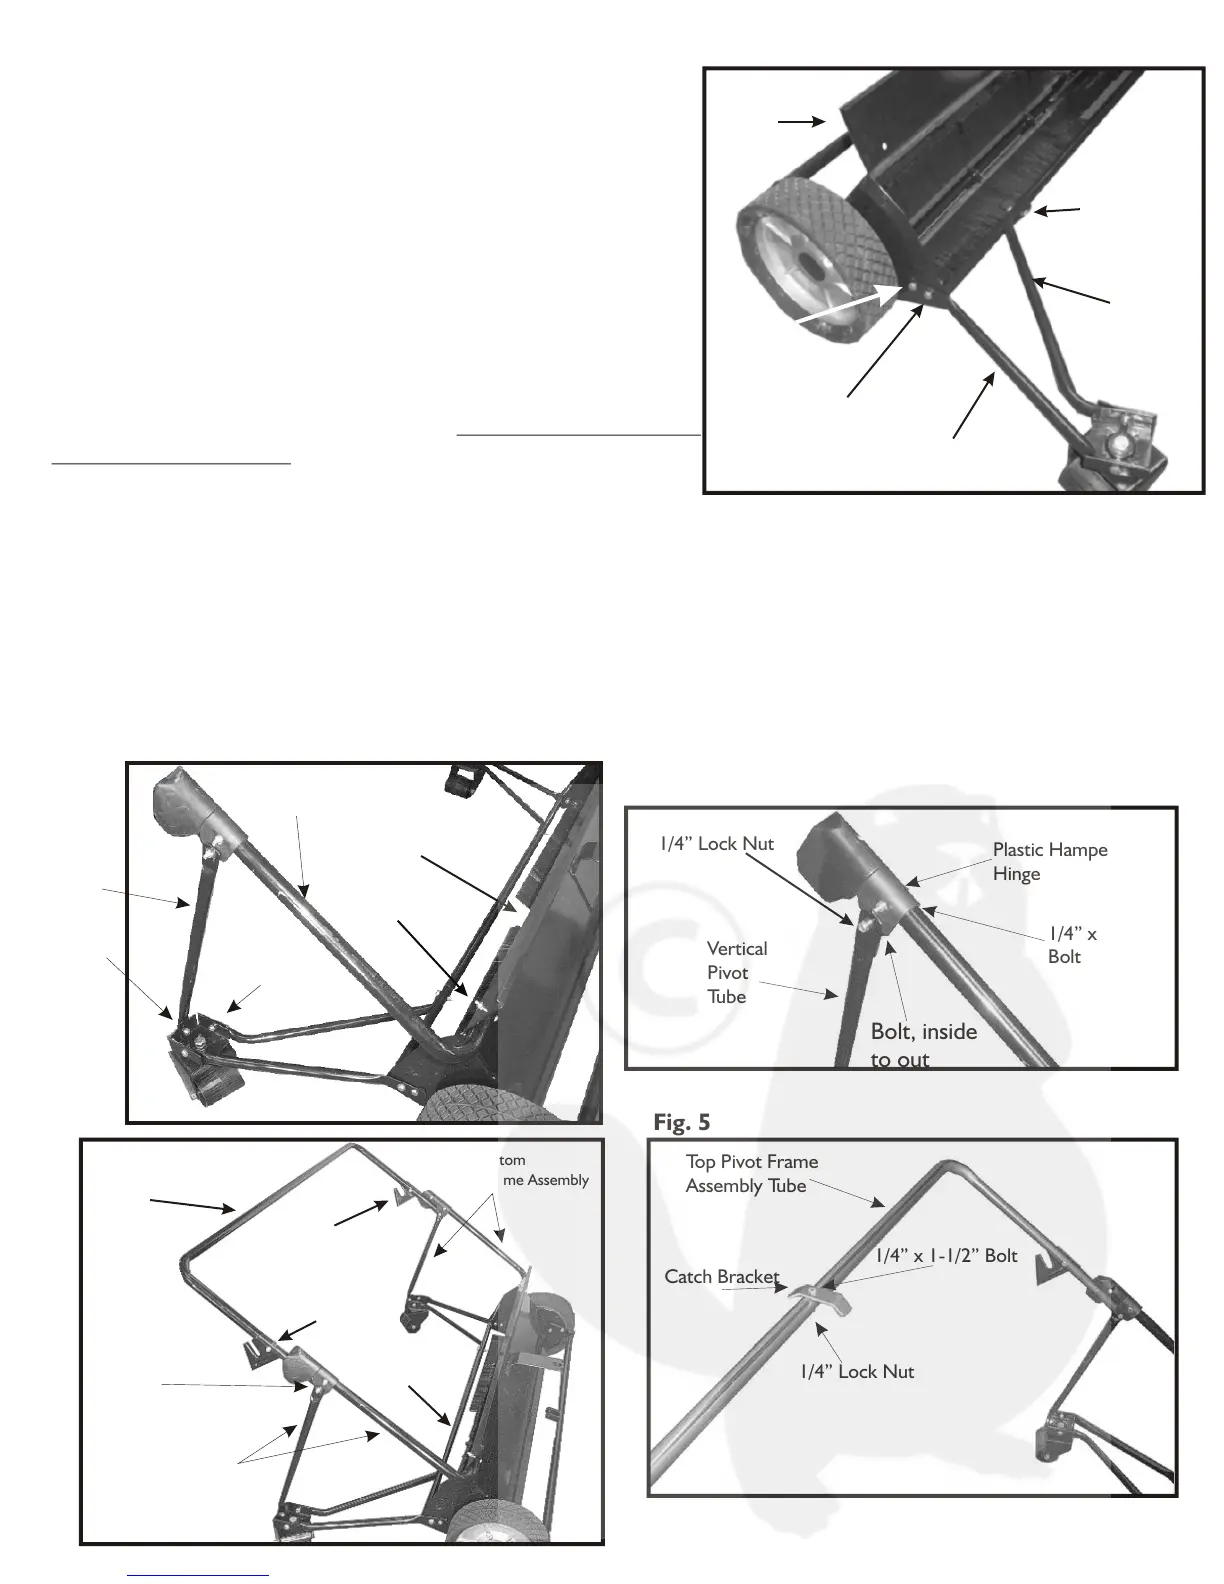
Remove the bottom 1/4” x 1-1/2” Bolts (on both Bottom Pivot Frame
Assemblies, Fig. 3) and insert the Top Pivot Frame Assembly into both sides. Fig.4
The tube ends will attach inside the Plastic Hamper Hinge. Re-insert
the removed 1/4” x 1-1/2” Bolts to secure the Top Pivot Frame Assembly.
Attach the Catch Bracket on top of the Top Pivot Frame Assembly Tube
using the (pre-attached) 1/4” x 1-1/2” Bolt and 1/4” Lock Nut. Fig 5
Top Pivot Frame Assembly
Sweeper Chassis
Pivot Frame Brackets
under the Pivot Frame
Assembly and gaps
opening towards the
rear of the unit
Caster
Assembly
Vertical
Pivot
Tube
5/16” x 1/2”
Bolt
Step 7
Insert the Hamper Dump Rope through
center hole on the Sweeper Chassis Assembly.
Next, lay the Hamper Dump Rope behind the
sweeper. Fig. 15
Loosen the bolts holding both right and left
Hamper Pivot Bracket Assemblies. Fig. 14
Install the Hamper Assembly onto the Pivot Frame
Assembly. The Hamper Pivot Bracket Assemblies
fit inside the slots on both Frame Pivot Brackets.
Tighten both bolts after Hamper installation. Fig. 16
The Hamper Dump Rope needs to go under
and up the back side of the Hamper Assembly
for proper dumping operation. Tie the Hamper
Dump Rope end to the center of the Top Hamper
Cross Brace. Fig. 17
Hamper Dump
Rope
Hamper Pivot
Bracket & Bolt
Hamper Dump
Rope
Top Hamper
Cross Tube
STORAGE:
Remove both Hamper Support Rods
on the inside of the Hamper.
Next, simply release both Cross Tube
Locks and fold the Hamper down.
You can also pull the Hitch
Arm Assembly up and tie
it off through the Clevis
Plates with the Hamper
Dump Rope.
Cross Tube Lock
1/4” x 1-1/2”
Bolt
1/4” x 1/2”
Bolt
Pivot Stand
Tube
NOTE: ALL REFERENCES TO “RIGHT” AND “LEFT” DIRECTIONS
ARE IN REFERENCE TO POSITION BEHIND SWEEPER.
Pre-Attached
5/16” Bolt
Fig. 1
Fig. 2
Sweeper Chassis
Fig. 3
Fig. 15
Fig. 16
Fig. 17
Vertical
Pivot
Tube
1/4” x 1-1/2”
Bolt
Right-Bottom Pivot
Frame Assembly
Top Pivot Frame
Assembly Tube
Right-Bottom
Pivot Frame Assembly
Left-Bottom
Pivot Frame Assembly
Catch Bracket
1/4” x 1-1/2” Bolt
1/4” Lock Nut
Plastic Hamper
Hinge
Plastic Hamper
Hinge
Bolt, inside
to out
1/4” Lock Nut
Fig. 4
Fig. 5
 Loading...