8
3.Cleanthecookercoverwithadamp,soapyclothandthendrycompletely.Do NOT immerse the cooker cover in water.
Washthesealingring,sealingringplate,andventlterinwarm,soapywater.DoNOTwashthesepartsinthedishwasher.
Thoroughly dry all cover parts after cleaning.
4.Tobesuretheventpipeisclear,holdthecoveruptothelightandlookthroughtheventpipe.Cleanitwithasmallbrushorpipe
cleanerifitisblockedorpartiallyblocked.Ifnecessary,cleantheventlterwithasmallbrushtoremoveanyfoodparticlesfrom
the slots and holes. Rinse and dry all parts thoroughly and reassemble.
5. Wash the cooking rack in warm, soapy water. Do NOT wash in the dishwasher.
6. Remove the cooking pot from the cooker body. Wash the pot in warm water and a mild detergent. Do NOT wash the cooking pot
in the dishwasher.
NOTICE:Repeatedwashingsinadishwasherwillcausethenonstickpropertiesoftheceramicnishtoslowlydiminish.
Theceramicnonsticksurfacemaybecleanedwithanylonmeshscouringpad,suchasScotch-Brite*Non-ScratchScrubSponge,
or a damp cloth. Do not use steel wool or abrasive cleaners on the cooking pot or the cooker body.
Soaking the cooking pot to loosen food residue is not necessary. If, however, soaking the pot is desired, do not soak for more than
2 hours. Soaking for more than 2 hours may damage the ceramic coating.
CAUTION! To prevent electrical shock, never pour water into the cooker body or immerse it or the power cord in water. Always be
sure the pot is COMPLETELYDRY before placing it back in the cooker body.
7.Cleantheplasticrimofthecookerbodywithadampcloth.Avoidgettingwaterinsideofthecookerbody.
Occasionally
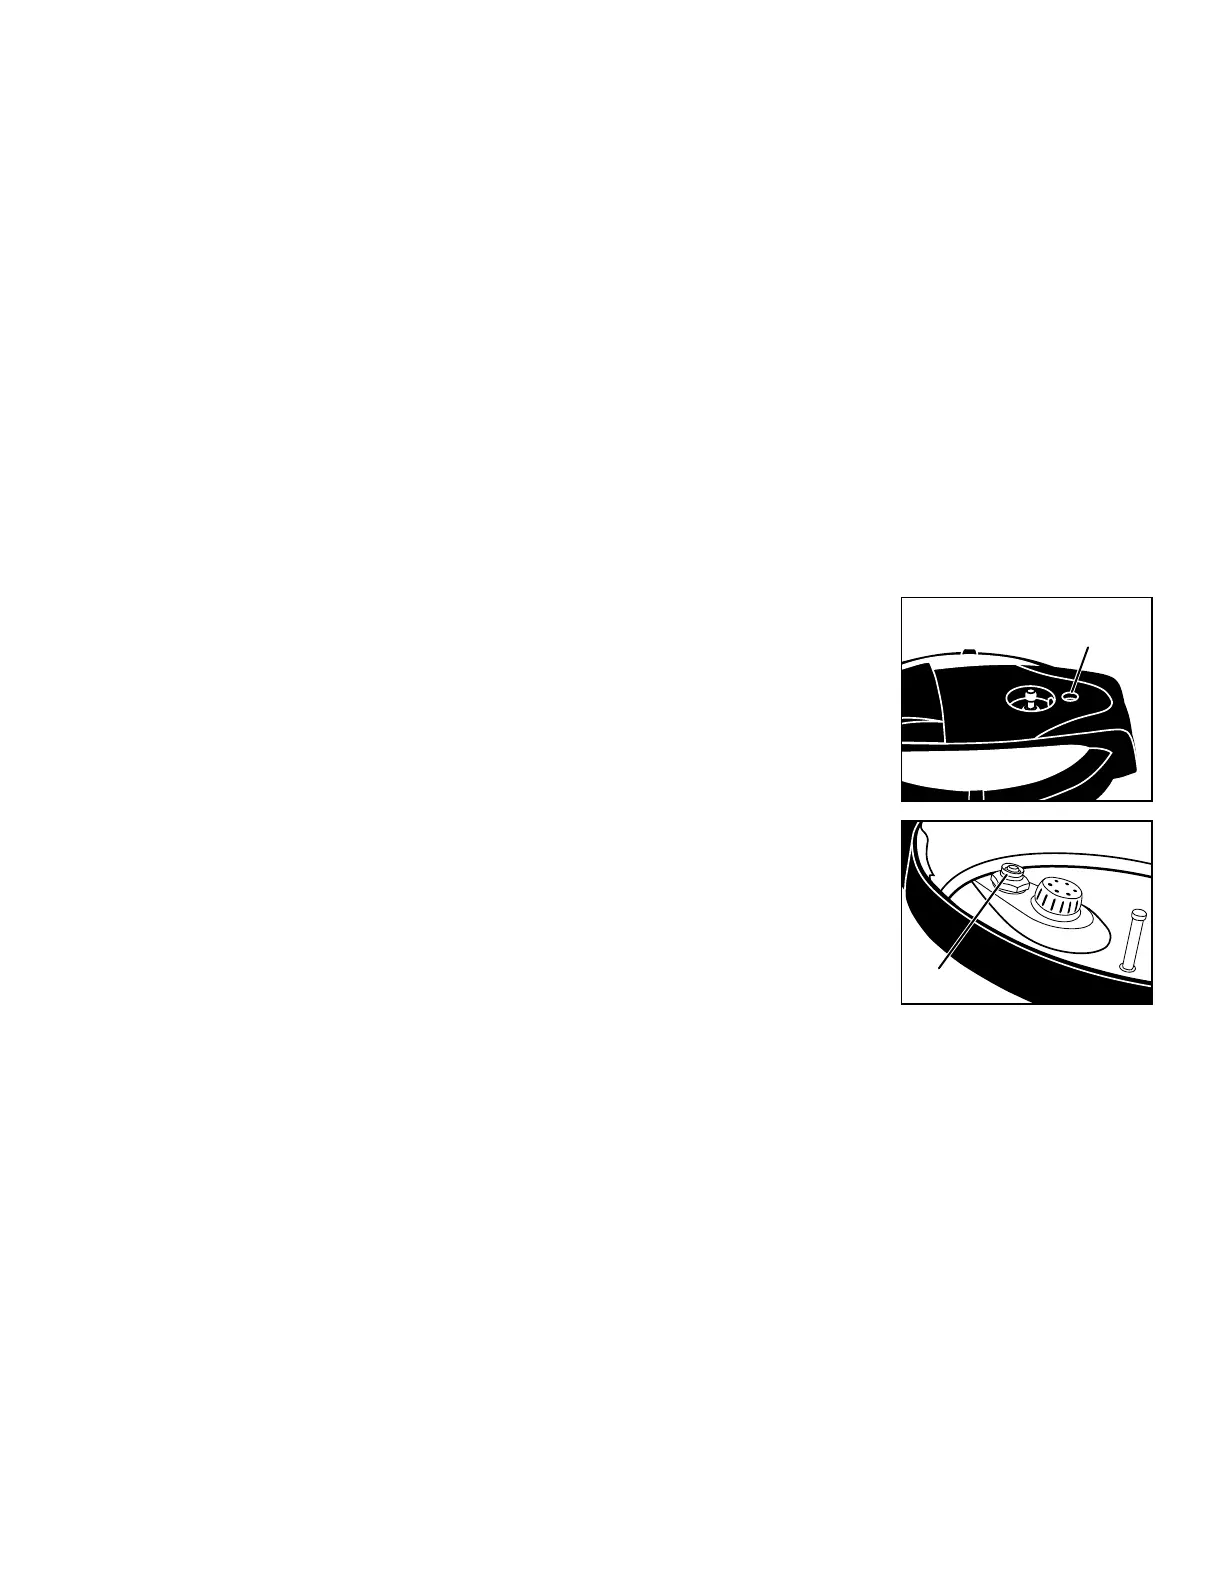
1.Removetheairvent/coverlockforcleaning.Placeyourngerovertheairvent/coverlockhole
in the top of the cover (Fig. N) and remove the gasket from the underside of the cover (Fig. O).
Push the air vent/cover lock through the top of the cover. Wash it and the gasket in warm, soapy
water.Themetalshaftmaybecleanedwithanylonmeshpad.Cleanthecoverholewithasmall
brush. After cleaning, reinsert the metal shaft from the top side of the cover down through the
coverhole.Placeangerovertheholeandpushthegasketontotheendofthemetalshaftuntil
it snaps into the groove.
2. Wipe the outside of the cooker body with a damp cloth.
CARE AND MAINTENANCE
● Whennotinuse,storeyourpressurecookerinadryplace.Topreventunpleasantodorsfrom
lingering, store the unit with the cover inverted on the cooker body.
● Asisthecasewithallcookware,avoidchoppingorcuttingfoodinsidethecookingpotwitha
knife or other sharp utensil. Do not use metal utensils as they may scratch the nonstick surface.
● Donotstriketherimofthecookingpotwithanycookingutensil.Thiscouldcausenicksinthe
rim which may allow steam to escape and prevent the pressure cooker from sealing.
● Thesealingringandgasketfortheairvent/coverlockmayshrink,becomehard,deformed,
cracked, or torn with normal use. When this happens, replace the sealing ring and/or the air vent/cover lock gasket. This is routine
replacement and not covered under the warranty.
Leakage between the cover and cooker body is usually caused by deterioration of the sealing ring after prolonged use.
● Periodicallychecktheventpipenutforlooseness.Ifnecessary,retightenwitha½″wrench.
● Ifforanyreasonthepressurecookercannotbeopened,contacttheConsumerServiceDepartmentinEauClaire,WIat
1-800-877-0441.
● Anymaintenancerequiredforthisproduct,otherthannormalhouseholdcareandcleaning,shouldbeperformedbythePresto
Factory Service Department (see page 24).
HELPFUL HINTS
● Your favorite recipes may be adjusted for cooking in the pressure cooker by following the general directions in this manual. Use
theincludedtimetablesandrecipesasaguideforspecicfoodsandcookingtimes.Thereisverylittleevaporationduringpressure
cooking, so the amount of liquid used should be decreased. A minimum of 1 cup of water or cooking liquid should always be used
for pressure cooking.
Ofcourse,theeasiestwaytoadaptyourfavoriteconventionalrecipeistondasimilarrecipeforpressurecookinginthisbook
and use it as a guide.
*Scotch-Briteisaregisteredtrademarkof3MCompany.Prestoisnotafliatedwiththiscompany.
Air vent/cover
lock hole
Gasket
Fig. N
Fig. O
 Loading...