2
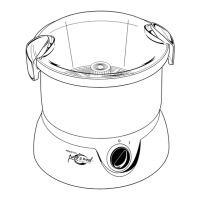
Cord Storage
Turn the motorized base
so the bottom is facing
towards you. Insert your
thumb or finger in the
slot below the words
“Pull to Open” (Fig. B)
and pull open the cord
storage cover. Remove
the desired length of
cord and position the
cord in the groove on
the base. Snap the cord
storage cover closed.
Important Plug Information
As a safety feature, this appliance has a polarized plug (one blade is wider than the other). This plug will fit in a polarized outlet
only one way. If the plug does not fit fully in the outlet, reverse the plug. If it still does not fit, contact a qualified electrician. Do
not attempt to defeat this safety feature.
Getting Acquainted
Before initial use, and after each subsequent use, wash all parts except the motorized base in hot, soapy water. The bowl, peeling disc,
and salad spinner may be washed in the dishwasher on the rack farthest away from the heating element; however, do not wash the
see-through cover in a dishwasher.
Wipe the motorized base with a damp cloth to clean. Never immerse the motorized base in water or any other liquid.
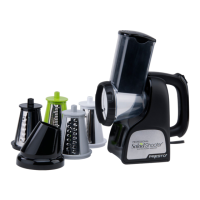
Preparing Food for the Electric Peeler
• The electric peeler is designed for peeling small and medium size potatoes, carrots,
and apples. Long, oblong type potatoes and large carrots can be peeled also, however,
they must rst be cut to t inside the bowl. The potatoes and carrots should be
cut so they are approximately ½ inch shorter than the hub to wall distance as
illustrated in Fig. D (maximum length is 2¾˝). Cut the ends off medium size
potatoes that are longer than 2¾ inches and discard the ends. Cut large potatoes in
half crosswise.
• Always use rm, fresh food.
• Use potatoes without deep “eyes” as they will peel more thoroughly.
• The apples that work best are those that are round in shape, such as Cortland, Rome
and Granny Smith varieties. Avoid using apples with bruises.
• Arrange a single layer of food uniformly around the peeling disc. Do not stack food
on the peeling disc. Position cut potatoes on the peeling disc with the cut ends to-
ward the hub and wall as shown in Fig. D.
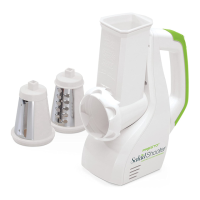
On/Off
switch
Peeling disc
See-through
cover
Removable
bowl
Post
Hub
Motorized
base
Cover handle
Fig. A
Salad
spinner
ring
Salad
spinner
Cord storage
cover
Groove
Slot
Fig. B
Fill line
Fig. C
Fig. D
Hub
Wall