3
3
Usage:
Fan Operation: Always operate the fan in the upright position
following all instructions and recommendations listed in this manual.
Fan Connection: Plug fan directly into 120 volt A.C., 60 Hz wall
outlet. Be sure plug fits tightly in outlet. A loose connection may cause
overheating and damage to the plug or fan.
Note: To prevent overloading a circuit, do not plug the fan into a
circuit that is servicing other electrical needs.
Turning Fan On: With fan mounted
to a stable wall surface, plug fan into
properly functioning outlet. To start the
fan, press SPEED/ON button. Press
SPEED/ON repeatedly to desired fan
speed (LOW, MID, HIGH). Press OFF
button to discontinue use. Unplug fan
when not in use.
Oscillation: To start fan oscillation,
press OSC. button on control panel or
remote control while fan is at any speed or mode. To discontinue
oscillation, press the OSC. button on control panel or remote control
again.
Remote Control: Place 2ea. AAA size batteries (not included) in the
remote control. Use the buttons on the remote as you would with the
control panel. Point the remote control towards the control panel for
the sensor to receive a signal.
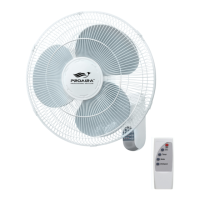
Timer Feature: Accessed using the remote control, the timer function
is designed to work during oscillation or any fan mode or speed. Press
the TIMER button, each time it is pressed, time duration indicator lights
illuminate. (0.5, 1, 2 or 4 hours). Simply add up the time value of the
lights to see timer setting up to 7.5 hours maximum time. To turn the
timer function off, press the TIME button continuously until all the timer
indicator lights are off.
Fan Modes: Accessed using the Remote Control, this fan has three
operating modes that will work with oscillation control ON or OFF.
Normal - Fan speed is consistent with the speed chosen and
operates like a standard fan.
Pulse - Fan will vary the speed from the highest fan speed chosen to
very slow speed.
Sleep - Fan will vary the fan speed like pulse mode but it is timed to
slow down after a period of time. The speed will change as follows:
Fan High Speed - When fan speed is set to HIGH, the fan will run
varying from HIGH speed to very slow speed for 30 minutes, then run
from MEDIUM to very slow speed for 30 minutes, then run from LOW
speed to very slow speed for the duration of use.
Fan Medium Speed - When fan speed is set to Medium, the
fan will run varying from MEDIUM speed to very slow speed for
30 minutes, then run from LOW speed to very slow speed for the
duration of use.
Fan Low Speed - When fan speed is set to LOW, the fan will vary
from LOW speed to very low speed for the duration of use.
Adjusting Fan Tilt: To adjust the tilt angle simply tilt the fan to desired
position. Ratcheting effect should hold the fan at the desired angle.
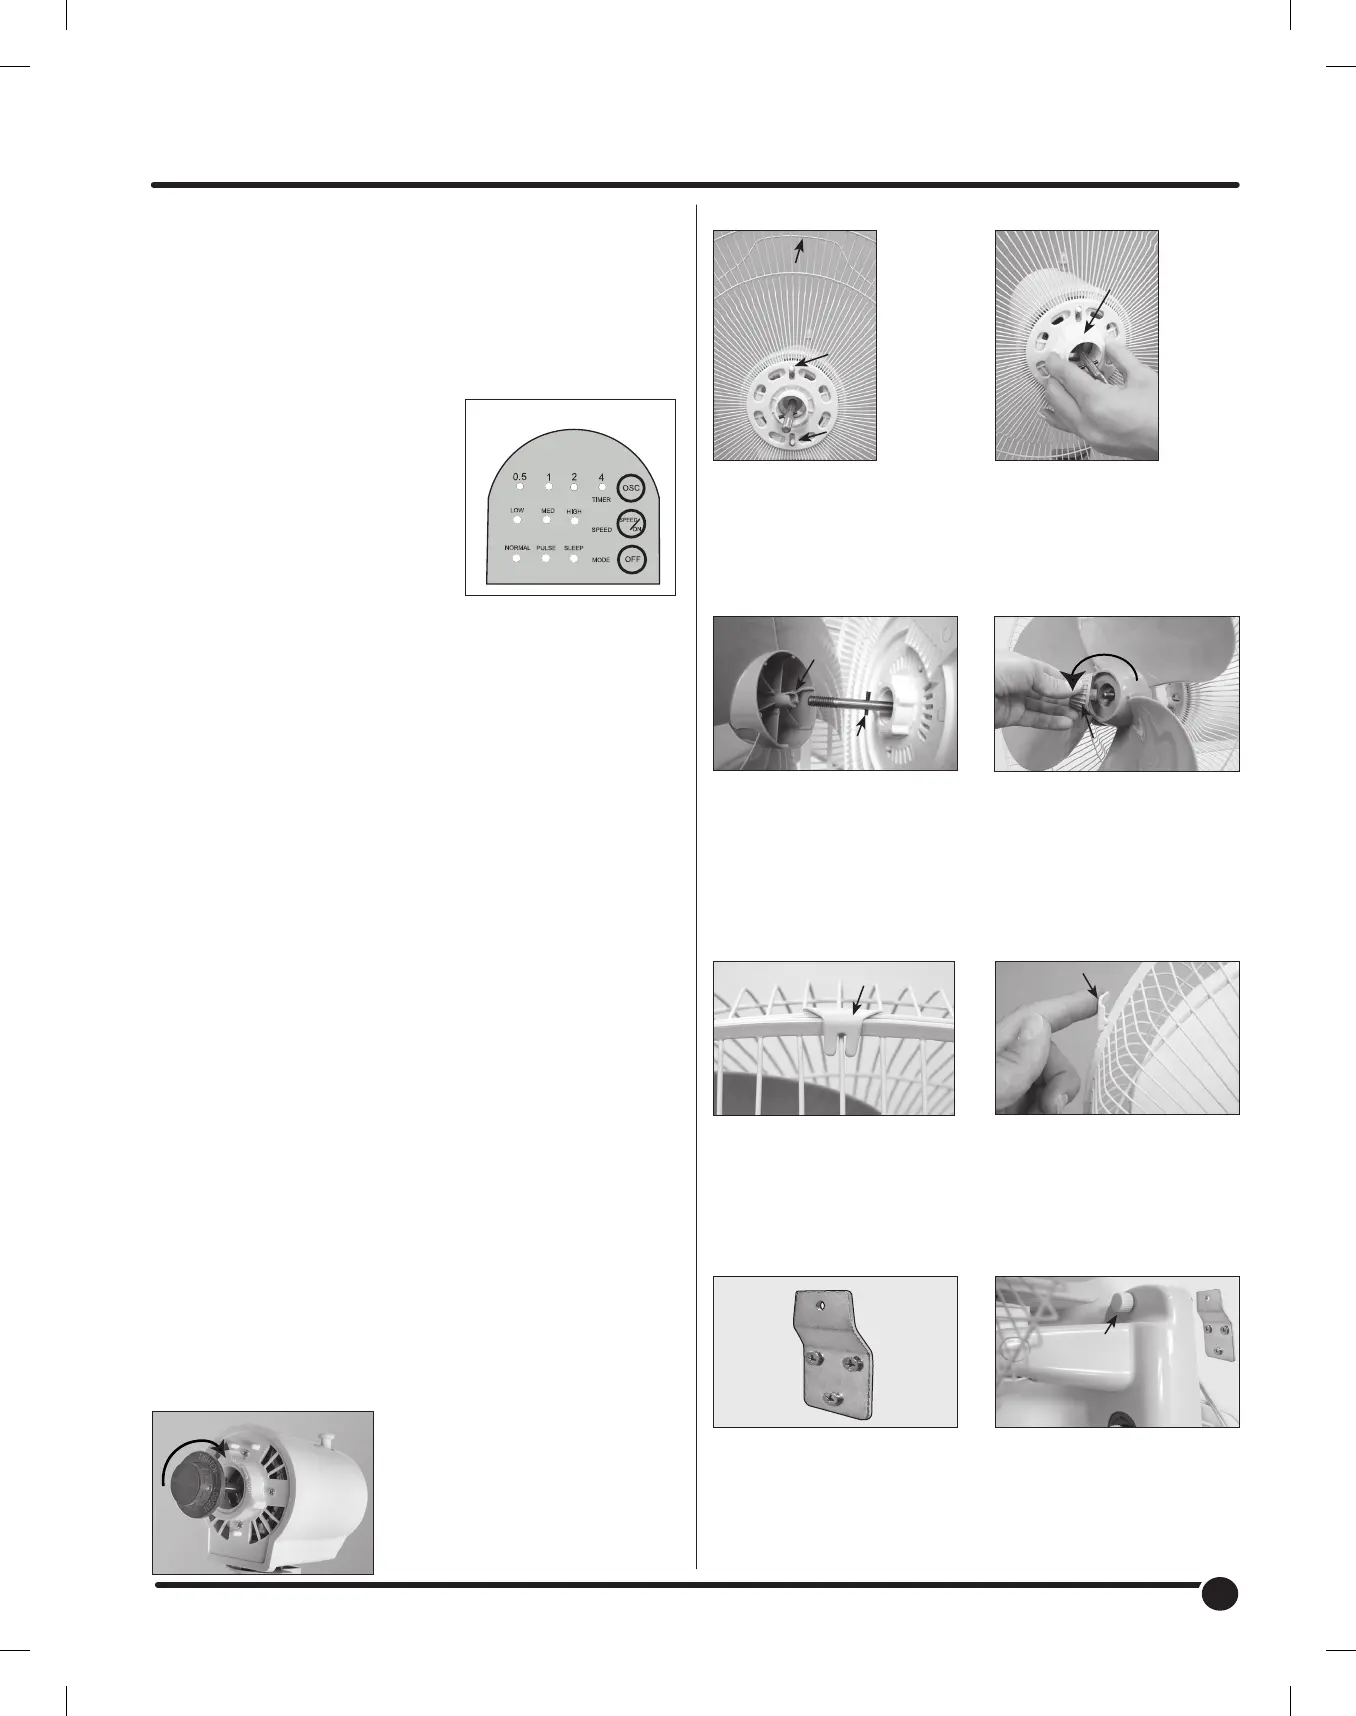
Assembly Instructions
(images may vary slightly from actual product)
Step 2 Step 3
Step 4 Step 5
Step 6
Step 8
Step 7
Step 9
Assemble Rear Grille onto
Motor Housing. Rear Grille
should fit into pins on fan
motor housing as shown.
Remove any protective
covering over shaft before Fan
Blade Installation. Place Fan
Blade onto Motor Shaft. Notice
the pin on Motor Shaft should
fit into slots of Fan Blade.
Attach Front Grille to Rear
Grille with Hook Clip centered
on the top above Wire Handle
Secure Wall Bracket to the
wall in the desired location.
Use proper anchors for
the wall material selected,
following the manufacturers
instructions. Mounting bracket
to wall studs is recommended.
Thread Locknut onto Motor
Housing to lock Rear Grille
in place.
Thread Blade Cap onto
threaded end of Motor Shaft.
Note: Threads are
reversed. Tighten =
Counter-clockwise.
Press remaining Grille Clips onto
Rear Grille to securely attach
Front Grille. Do not operate
fan without Grille in place.
Hang fan on wall bracket.
Place Bracket Screw through
fan and thread screw on to
bracket.
Wire
Handle
Pin
Pin
Pin
Lock
Nut
Slot
Blade Cap
Hook Clip
Grille Clip
Mount
Securely
to Wall
Bracket
Screw
T
i
g
h
t
e
n
Control Panel
Step 1
Remove the Blade Cap by
twisting it CLOCKWISE while
holding the metal shaft tightly.
Note: Threads are reversed.
Unscrew = Clockwise.
L
o
o
s
e
n
 Loading...