Range Hood Lights
Before replacing your range hood lights, make sure that they are turned off
and the range hood is unplugged.
1. Open the front panels of the island range hood.
2. Carefully remove the LED lights from their connectors using a at tip
screwdriver or similar tool.
3. Carefully clip the new LED lights into place.
That wraps up your ush range hood installation!
Great work!
We are happy to help you with any questions or
concerns you may have. Please create a ticket, email us
at support@prolinerangehoods.com or call our support
line at (877) 901-5530 to talk to a live representative.
Safety Information
Ask a qualied professional such as a licensed general contractor to
install your range hood. Electrical wiring must be installed, insulated,
and grounded by a licensed electrician familiar with your local codes
and regulations. If you don’t have this background, do not install the
hood yourself. Poor installation or electrical work may result in an
injury.
• Range hoods can be heavy to mount, so always ask a friend for help.
• Wear protective gloves when handling the range hood and its lters. The
edges can be sharp.
• For residential use only. Do not install your hood in a restaurant or other
commercial environment. Our hoods do not abide by the rules and
regulations for commercial use.
• Do not use your hood to vent hazardous or explosive materials and
vapors. This is incredibly dangerous and may result in serious injury.
• When cleaning the unit, make sure the power is turned off.
• When troubleshooting or replacing the touch panel, circuit board, or
other electrical components, turn the range hood off.
• Check your local codes and regulations to see what type of ductwork is
required. Some codes require rigid metal ductwork. Do not use ex duct
for your range hood, as it can wear down quickly. Air may escape into
your walls or attic.
• Never vent your ducted hood into an attic, joists in your ceiling, or a
soft. Always vent the hood to the outside to keep grease, smoke, and
unwanted contaminants out of your home.
• Avoid electrical wiring when drilling a hole into your wall or ceiling for
ductwork.
• Clean or replace old ductwork with new rigid ductwork to prevent
potential grease res and increase the efciency of your range hood.
• Seal all joints in your duct system with aluminum tape to prevent air from
escaping in your walls or attic.
• Check your local regulations to determine if you need make-up air. When
a range hood vents air out of your home, that air has to be replaced. If
you operate a powerful range hood (600+ CFM) in a small kitchen, you
may need makeup air. We do not sell makeup air kits.
• Clean your range hood lters, grease trays, and the range hood every
few weeks. Heavy grease buildup shortens the life of your hood and it
may lead to a grease re.
• All Proline range hoods are ETL certied. They meet all industry
standards and regulations to ensure your safety.
• Use the high setting on your range hood to vent heavy smoke or heat in
case of emergency. Otherwise, use the lower settings to prolong the life
of your hood.
• While your range hood is on, do not leave your cooking area unattended.
• When cooking with oils, do not heat them past their smoke point. If oil
starts smoking, turn off the burner and discard any food that came into
contact with it. Do not use Extra Virgin Olive Oil in high heat, since it
starts to smoke at around 300º Fahrenheit.
In the event of a grease re:
• Smother the ames with a large lid, pan, or baking sheet. If the re is
small, smother it with baking soda or salt. For larger res, use a re
extinguisher.
• Turn off all burners.
• Do not touch a aming pan. This may result in serious burns.
• Keep all ammable materials away from the grease re. This may
include nail polish remover, our, rubbing alcohol, and hand sanitizer,
among other household items.
• Do not pour water on a grease re. Water will spread the oil around,
making the re more potent and dangerous. Wet towels and rags will
also spread the oil, so avoid using these as well.
• If you cannot contain the re, call the re department immediately.
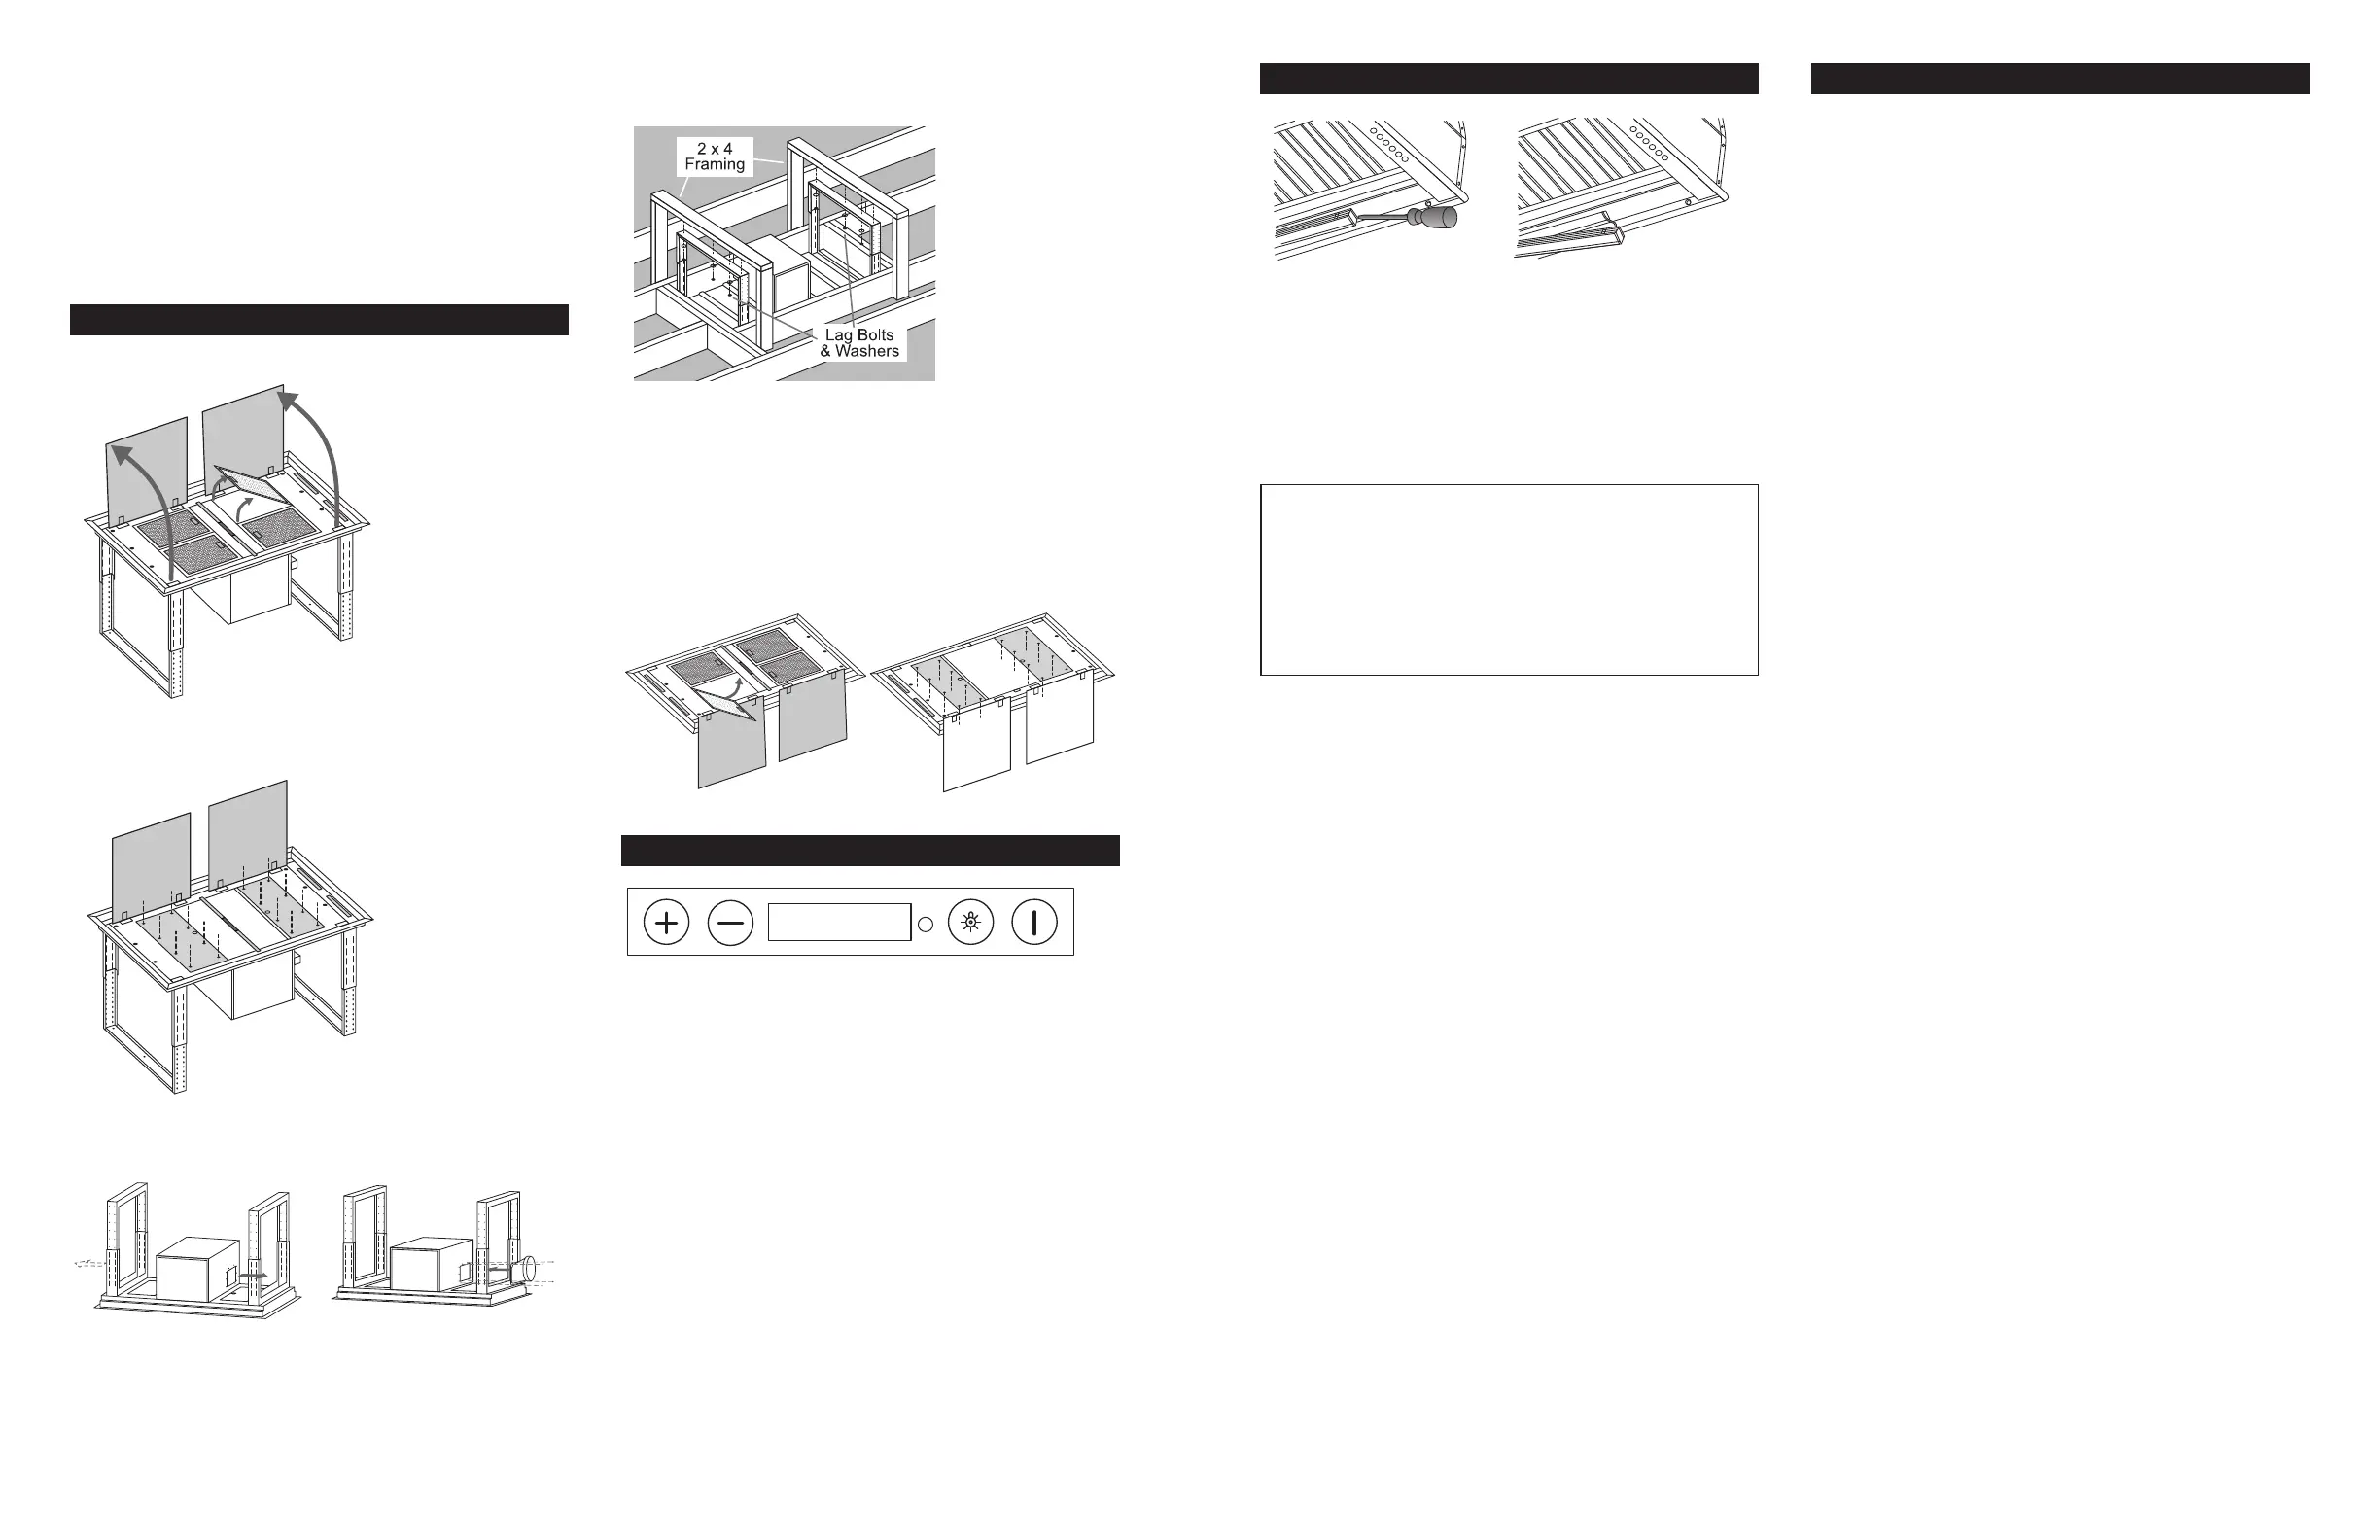
The hood must be centered over the cooktop. Make sure there is enough
room in your ceiling for the 44” hood and its ductwork. For the best
performance, mount your hood between 36” and 72” above the cooktop. You
may need to cut the joists in your ceiling to make room for this frame.
Use joist-size lumber to build the range hood frame. At a minimum, the wood
frame must be able to support the weight of the island hood.
The wood frame must support its own weight plus the weight of the island
hood.
Install the Hood
1. Open the perimeter panels and remove the grease lters.
2. Remove the two interior panels by unscrewing eight screws
from each panel.
3. Install two 6" round outlet adapters to the hood with the
provided mounting screws.
4. Lift range hood into the ceiling opening. Ask a friend for help
so you don’t risk an injury. The range hood is quite heavy.
5. Use the lag bolts and washers to secure the wooden support
in place.
6. Adjust the support frame until the range hood is ush with
your ceiling.
7. Connect rigid ductwork to the range hood. Apply aluminum
duct tape to all joints to ensure the system is completely airtight.
8. Reinsert the two panels you removed in step two.
9. Reinstall the grease lters.
Operations
Power button
Press the power button to turn the hood on. When the hood is on, press the
button again to start a 15 minute timer. When the timer runs out, the hood will
turn off. Press the power button a third time to turn off the range hood.
When the range hood is off, press and hold the power button for three
seconds to adjust the clock. Use the plus and minus buttons to adjust the
hour.
Press the power button to cycle to the minutes and adjust them using the plus
and minus buttons.
Lights
Press the button with the lights icon to turn the lights on and off.
Speed Control Buttons
The plus button increases the range hood blower speed and the minus button
decreases the blower speed. These buttons adjust the clock after you press
and hold the power button for three seconds.
Remote Control Button
The small button near the digital display enables the remote control sensor.
The remote control receives an infrared signal from the sensor to operate the
range hood.
 Loading...