WARNING: Always ensure that you are in a safe open area to ride before you engage the throttle. Never twist the throttle without being on the
scooter in a balanced, ready to ride position with both hands on the handlebar controls. Failure to follow these instructions may damage your
scooter and void your warranty.
Before You Ride
Before you ride always check and for the following:
Safety Gear
Always wear proper protective gear such as:
• Approved safety helmet. (Helmet may be legally required by local law or regulation in your area.)
• Elbow pads and knees pads
• Long sleeved shirt, long pants
• Gloves
• Lace up shoes with rubber soles.
Brake
Check the brakes for proper function. When lever is squeezed it should slow/stop the rear wheel without excessive effort. When you apply the brake with the throttle
on, the brake cut off switch should stop the motor. Make sure that the brakes are not rubbing when the lever is not being squeezed. Do not ride the scooter if the
brakes are not functioning properly.
Throttle
Make sure that before throttle is twisted that you are in an open and safe area to ride, you are balanced on the scooter and have both hands on the handlebar
controls. Push start scooter to approximately 3mph while twisting throttle in order for motor to engage. The scooter must be rolling at 3mph before the motor will
engage.
Tires
Inspect the wheels for excess wear and replace if necessary.
Frame, Fork and Components
Always carefully inspect your scooter before you ride. Check for cracks, broken worn or loose components which should be repaired or replaced before you ride.
Battery
Always make sure the power switch is in the “off” position whenever the scooter is not in use. Never store the product in freezing or below freezing temperatures.
These low temperatures will permanently damage the battery.
WARNING: The brake could be capable of locking up and skidding the rear wheel if not applied correctly. Always try and avoid skidding as this
could cause you to lose control of the scooter and will cause damage to the rear tire. Practice using the brake in an unobstructed open area to
become familiar with its function and can make smooth controlled stops.
Repair and Maintenance
WARNING: Turn the power switch "OFF" before conducting any maintenance procedures.
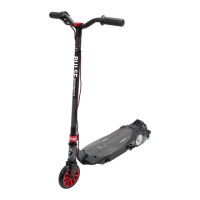
Adjusting the Brakes
Tools required: 10mm wrench
1. To adjust the brake cable thread clockwise (loosen)
or counter clockwise (tighten) the adjuster barrel on
the brake lever. Only turn the barrel in small
increments until the desired adjustment is reached. If
brake continues to need further adjustment proceed to
the next step.
2. If the brake cable is still either too tight or too loose
use a 10mm wrench to loosen the brake cable pinch
bolt for further adjustment on the cable. Ensure that
the 10mm nut is securely tightened after the
adjustment is made.
Loosen
Tighten
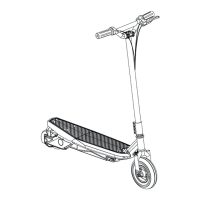
Chain and Rear Wheel Replacement
Tools required: 4mm hex wrench, 5mm hex wrench, two 13mm wrenches, 10mm wrench, Phillips screwdriver
1. Using a 4mm hex wrench remove the 4 bolts from
the rear axle cover on both sides of the scooter.
2. Loosen brake cable pinch nut with 10mm wrench.
3. Remove the brake arm bolt with a Phillips
screwdriver and 8mm wrench. Using two 13mm
wrenches loosen the rear wheel axle nuts. Pull up on
the chain tensioner and remove the rear wheel from
the frame.
4. Note the location of all rear wheel hardware and
ensure to properly reinstall all items.
5. If replacing the chain remove the motor
bolts with a 4mm hex wrench. Slide motor out
of the frame slightly so that there is enough
room to remove/replace the chain onto the
motor gear. Replace spacers and retighten
bolts.
6. Place the chain undder tensioner wheel and
onto the rear chain wheel gear and install
replacement wheel into the frame. Do not tighten
axle nuts yet. Install brake arm hardware, do not
tighten yet.
7. Ensure axle washers are seated correctly against
the frame. After tightening axle nuts with a 13mm
wrench check wheel alignment and the tracking of the
chain by rotating the wheel counter clockwise with
your hand. Adjustment washers may need to be
readjusted to align belt. Wheel should spin freely and
easily.
8. Retighten the brake arm bolt with a Phillips
screwdriver & 8mm wrench.
9. Retighten brake cable pinch nut with 10mm
wrench. Refer to the instructions on page 7
for proper adjustment.
10. Reinstall side covers with a 4mm hex wrench.
Do not over tighten bolts.
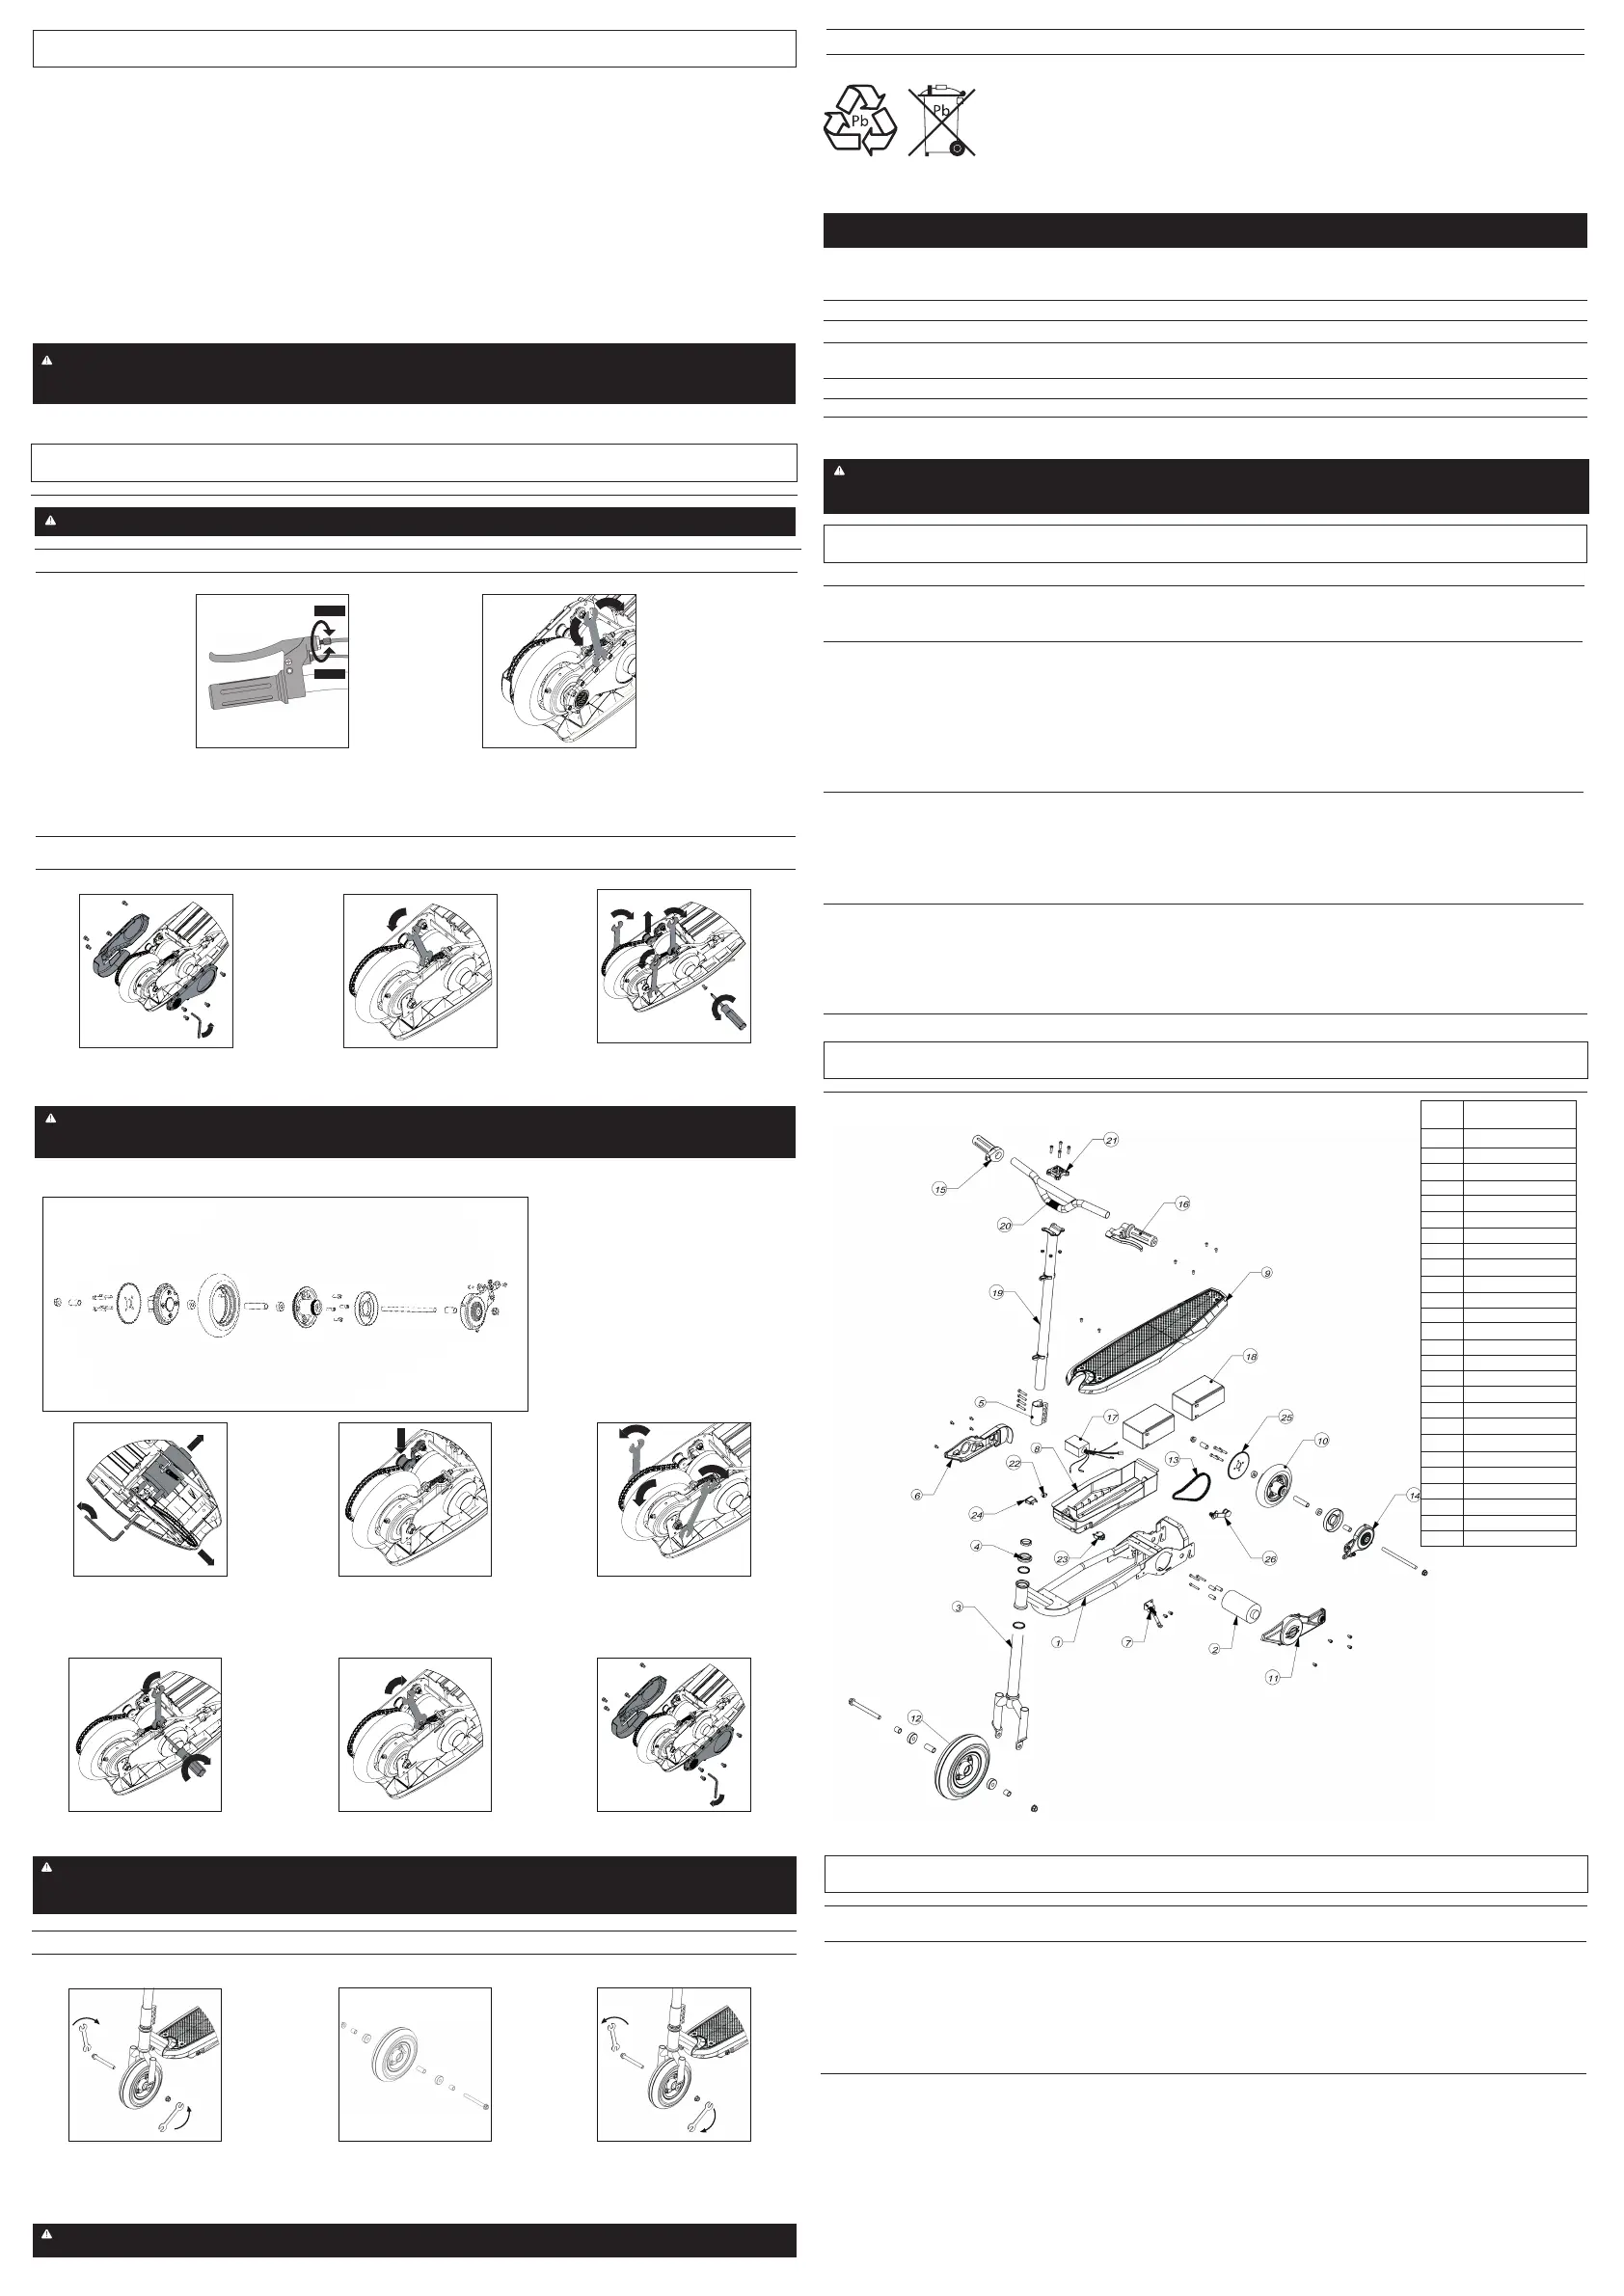
Front Wheel Replacement
Tools required: Two 5mm hex wrenches
1. Using a 13mm wrench and a
14mm wrench loosen and
remove the front axle by turning
the wrenches counter clockwise.
2. Reinstall new replacement
wheel ensuring to note the order
and location of all components.
3. Reinstall hardware and tighten
clockwise with a 13mm wrench
and a 14mm wrench.
Battery Care and Disposal
Do not store the battery in temperatures above 70°F (21°C) or below 32°F (0°C).
Disposal: This product contains sealed lead acid batteries which must be disposed or recycled in an environmentally safe manner. Do not dispose of the batteries in
your household trash. Do not dispose of the batteries in a fire, this could cause the batteries to leak or explode. The incineration, disposal in landfill and or placing
sealed lead acid batteries with household trash is prohibited by law in most areas. Return exhausted batteries to a state or federal approved lead acid battery recycler
or check with your local retailer of vehicle batteries.
THIS SCOOTER CONTAINS SEALED LEAD ACID BATTERIES WHICH MUST BE RECYCLED IN ACCORDANCE
TO YOUR LOCAL AND STATE LAWS. PLEASE CAREFULLY READ AND UNDERSTAND THE FOLLOWING
DISPOSAL INSTRUCTIONS:
WARNING: Do not mix old and new batteries. Do not mix alkaline, standard (carbon-zinc), or rechargeable (nickel-cadmium) batteries.
Do not store the battery in temperatures above 70°F (21°C) or below 32°F (0°C).
WARNING: For proper performances we recommend from time to time to clean the bearings by simply soaking in a common bearing cleaner to
remove dirt and dust. Before assembling spray a little oil.
WARNING: Self-locking nuts and other self-locking fixings may lose their effectiveness. Please check before every use and if needed proceed
to fix. If you do not feel comfortable performing the adjustments, consult an authorized Pulse Performance Products™ customer service
representative or a qualified bicycle or motorcycle mechanic.
Only use the supplied battery charger. If charger is damaged discontinue use immediately and replace with a Pulse recommended charger.
Charger
Wheels and drive system components are subject to normal wear and tear. It is the responsibility of the user to regularly inspect wheels for excess wear and adjust
and replace drive train components as required.
Wheels
Most of the common replacement parts are available for purchase on line at www.pulsescooters.com/shop.
Replacement Parts
Scooter will not run Battery is not charged Fully charge the battery. First charge should be 14 hours and up to 10 hours for
recharges.
Wires or connectors are loose or
unplugged
Check to ensure that charger is tightly plugged into both the wall and the scooter.
Scooter run time is short Battery requires charging Fully charge the battery. First charge should be 14 hours and up to 10 hours for
recharges.
Check to ensure that charger is tightly plugged into both the wall and the scooter.
Battery will not accept full charge Make sure power flow to the wall outlet is on.
Battery may need to be replaced. Even with proper care, rechargeable batteries
do not last forever. The average rechargeable battery life is 1 to 2 years
depending on scooter conditions and use. Replace only with Pulse replacement
batteries.
Brakes are not adjusted correctly Refer to the instructions on adjusting the brakes on page 5.
Scooter suddenly stops working Circuit breaker has tripped The reset button (on the left side of the battery box) will automatically trip and turn
off the power if the motor is overloaded.
An excessive overload (steep incline or too heavy of a rider) could have caused
the motor to overheat and tripped the breaker. If this occurs (scooter suddenly
stops running) wait a few seconds and then push the reset button in to reset the
circuit. Avoid repeatedly tripping the breaker.
Check all wires and connectors to make sure they are connected and tight.
Scooter runs sluggishly Brakes are not adjusted correctly
Problem Possible Cause Solution
Refer to the instructions on adjusting the brakes on page 5.
Scooter is overloaded Make sure you do not overload the scooter by exceeding the (80kg.) maximum
weight limit, going up steep inclines or towing objects behind the scooter. Avoid
overloading the scooter as this will prematurely wear out the batteries and
componentry.
Unsuitable riding conditions Ride only on solid, flat, clean and dry surfaces such as pavement or level ground.
Troubleshooting
Scooter Components
Pulse Limited Warranty
The manufacturer warranties this product to be free of manufacturing defects for a period of 90 days from the date of purchase. This Limited Warranty does not
cover normal wear and tear, tires, cables, or any damage, failure or loss caused by improper assembly, maintenance, storage or use of this Pulse electric
scooter.
This Limited Warranty will be void if the product is ever
• used in a manner other than for recreation or transportation
• modified in any way
• used as a rental
The manufacturer is not liable for incidental or consequential loss or damage due directly or indirectly to the use of this product.
For your records, keep your original sales receipt with this manual.
Warranty
WARNING: If you do not feel comfortable performing the adjustments, consult an authorized Pulse customer service representative or a
qualified bicycle or motorcycle mechanic.
Pulse Performance Products
A Division of Bravo Sports
12801 Carmenita Rd.
Santa Fe Springs, CA 90670
© 2012 - 2013 Pulse Performance Products - All Rights Reserved
EN14619
part description
frame
motor
front fork
headset
clamp
right side cover
kickstand
battery box
deck
rear wheel
left side cover
front wheel
chain
brake
throttle
brake lever
controller
battery
steer tube
handlebar
handlebar clamp
charger port
reset button
on/off switch
chain wheel
chain tensioner
1
2
3
4
5
6
7
8
9
10
11
12
13
14
15
16
17
18
19
20
21
22
23
24
25
26
Imported by: Hunter Products PTY Ltd, Level 2, 424 Warrigal Road
Moorabbin, Victoria, Australia 3189
www.hunterproducts.com.au
For queries please contact: 1800 224 094
 Loading...