Do you have a question about the Pyle PDIC60 and is the answer not in the manual?
Lists necessary tools and provides guidelines for optimal speaker placement during installation.
Offers solutions for common problems like no sound, low bass, or system shutdown during operation.
Illustrates wiring configurations for various speaker models, including 70V systems and standard amplifiers.
Provides essential advice on connecting speaker wires correctly, emphasizing polarity for optimal sound quality.
Details the step-by-step process for installing both in-wall and in-ceiling speakers.
Guides users on connecting and pairing Bluetooth devices with the PWA15BT amplifier for wireless audio.
Lists key features and capabilities of the PWA12 and PWA15BT In-Wall Audio Control Amplifier Receivers.
Outlines technical specs, power output, and connection methods for the amplifier systems.
This document provides user manuals for two Pyle audio products: a two-way stereo sound speaker system and a wireless BT receiver wall mount.
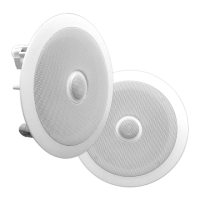
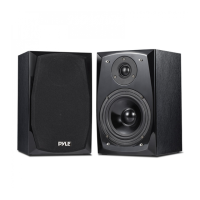
This speaker system is designed for both in-wall and in-ceiling installations, offering a versatile solution for home theater setups. The speakers feature a dual professional audio system with a 6.5-inch midbass driver and a 1/2-inch polymer tweeter, engineered to deliver clear and robust sound. The white mount flush design allows for a seamless integration into your living space, maintaining a clean and unobtrusive aesthetic.
For installation, the manual provides detailed instructions for both existing construction in-wall and in-ceiling setups. A template is included to assist with cutting the drywall accurately. For in-wall installations, it's crucial to allow at least one-half inch between a wall stud and the speaker cutout to ensure the locking tabs can swivel into place. After cutting the drywall, the frame assembly is placed in the wall, and the six Phillips head screws are tightened. These screws cause the locking tabs to swivel and secure the unit to the rear surface of the drywall. Adhesive strips are then applied to secure the grille.
The in-wall speakers are equipped with unique swivel mounts for the tweeters, allowing users to aim the high frequencies directly toward the listening position for optimal sound. Before installing the speaker grille, gently press on the outer edge of the tweeter mount to adjust its position. The tweeter can swivel up to 15 degrees in any direction; users are cautioned not to force it further. After adjusting, the metal grille is replaced.
For in-ceiling installations, a similar process is followed. After cutting the drywall, ensuring enough space for the locking tabs, the speaker wires are connected, and the frame assembly is placed in the ceiling. The four Phillips head screws are tightened to secure the unit. Adhesive strips are used to secure the grille. Like the in-wall speakers, the in-ceiling models also feature swivel mounts for the tweeters, allowing for precise aiming of high frequencies. The adjustment process is the same: gently press on the outer edge of the tweeter mount before installing the grille, ensuring not to exceed the 15-degree swivel limit. For specific models like PDIC60 and PDIC80, after installing the speaker grille, users can gently press on the mesh of the tweeter to adjust its position.
The wiring diagram for PDIC60T/PDIC80T models illustrates how to connect the speaker to either a 70V system or a normal 8Ω amplifier. A switch on the speaker allows selection between "Transformer" position for 70V systems and "8Ω" position for normal 8Ω amplifiers. The 70V system speaker wires are color-coded with different wattage options (Blue 10W/5W, Red 20W/10W, Orange 30W/15W, Yellow 40W/20W, White 50W/30W, and Black for Negative).
Speaker placement recommendations are provided to achieve the most realistic soundstage. Front speakers should be equidistant from each other and the listening position, ideally at ear-level height with tweeters aimed toward the listener. For home theater configurations, surround speakers should be placed slightly behind the listening position, facing each other, and at a level higher than the listener's ears. If in-wall or in-ceiling placement behind the listening position is necessary, they should face forward. The goal is to provide a diffuse, ambient sound. In Dolby Digital and DTS systems, tweeters should be aimed toward the listening position at ear-level height.
Connection tips emphasize using speaker wires of the same length for both speakers. Speakers and electronics terminals have corresponding (+) and (-) terminals, typically red for (+) and black for (-). It is crucial to connect both speakers identically (speaker (+) to amplifier (+) and speaker (-) to amplifier (-)) to avoid "out of phase" wiring, which can result in thin sound, weak bass, and a poor stereo image. Correct polarity is essential for multi-channel surround sound systems to preserve proper ambience and directionality.
Troubleshooting guidance covers common issues. If there is no sound from any speaker, users should check if the receiver/amplifier is on and a source is playing, verify all wire connections for fraying or touching, and review the receiver/amplifier's operation. If sound is missing from only one speaker, check the "Balance" control on the receiver/amplifier and inspect all wire connections. For low or no bass output, ensure correct polarity for left and right speaker inputs, consider adding a powered subwoofer, and for Dolby Digital or DTS modes, verify the receiver/processor configuration (subwoofer output enabled or front/rear speakers configured as "LARGE"). If the system plays at low volumes but shuts off when volume is increased, check all wire connections for proper contact and ensure no wires are frayed or touching. If multiple pairs of main speakers are used, check the minimum-impedance requirements of the receiver/amplifier.
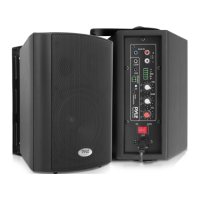
This product, available as PWA12 (without Bluetooth) and PWA15BT (with Bluetooth), is an in-wall/wall plate audio control amplifier receiver system. It is designed to provide convenient audio control and amplification in a compact, wall-mounted form factor.
The PWA15BT model features Bluetooth wireless music streaming, allowing users to connect and stream audio from their favorite devices such as smartphones, tablets, MP3 players, laptops, and computers. The Bluetooth network name is 'BT-RY', and no password is required for connection. The wireless range is approximately 30 feet (10 meters).
Both models include a built-in amplifier, a 1/4" microphone input for paging, and a 3.5mm AUX input for connecting external audio sources. The PWA15BT also adds a USB port for device charging and a USB card reader. A rotary master volume level control allows for easy adjustment of audio output. Speaker terminal blocks are provided to connect up to two speakers. An input selector switch allows users to choose between stereo, microphone, or Bluetooth (for PWA15BT) inputs. LED indicator lights provide visual feedback, and a power ON/OFF switch controls the unit. The system is designed with built-in safety features, including circuit and overload protection. It fits standard single gang device spaces and is compatible with most deep-sized electrical boxes or low voltage bracket systems, though minor fitting adjustments may be necessary during installation.
For installation, the unit can be hard-wired or powered via the included power adapter. Line level audio can be supplied through the front 3.5mm input jack or alternatively via the BLACK/WHITE/GRAY pigtail leads located on the rear of the amplifier receiver wall plate for hard-wired speaker connection. It is important to connect only one audio source at a time to ensure optimal performance.
Bluetooth setup instructions for the PWA15BT model are straightforward. First, ensure the unit is in 'Bluetooth Mode' by selecting 'BT' on the front panel input selector. Power on the unit by turning the rotary Volume Control knob. Press and hold the Volume Control knob button for 3 seconds (or until the 'BT' Bluetooth indicator light blinks) to initiate Bluetooth pairing. The system may prompt "Power ON." Next, go to your smart device's Bluetooth Network Settings and connect to 'BT-RY'. No password is required, but if prompted, enter '0000'. Once paired, the Bluetooth LED indicator light will blink progressively quicker, and the system will prompt "Paring" until a successful connection is established. A solid Bluetooth LED indicator light and the prompt "Your device is connected" confirm the unit is ready to transmit audio.
The rear of the unit features connection points for power and speaker outputs. Power can be supplied via the front panel power input with the AC adapter, or alternatively, a 12V DC power source can be hard-wired to the RED+ / BLACKS- pigtail leads. When the AC adapter is used, the RED+ lead is disconnected. The speaker output terminal connectors are clearly labeled for Right (+) and (-), and Left (+) and (-).
Maintenance features are not explicitly detailed but implied through the robust design and built-in safety mechanisms. The system's integration into a standard wall plate design suggests minimal external maintenance beyond ensuring clean connections and proper operation. The troubleshooting section for the speaker system also applies to the amplifier receiver in terms of checking connections and power.
| Speaker Size | 6.5 inches |
|---|---|
| Impedance | 8 Ohms |
| Sensitivity | 90 dB |
| Power | 100 Watts |
| Mounting Depth | 2.6" |
| Tweeter Size | 1" |
| Enclosure Type | Open |
| Input Connectors | Spring-loaded terminals |
| Speaker Type | 2-Way |