Do you have a question about the Pyramid APEX 5000 Series and is the answer not in the manual?
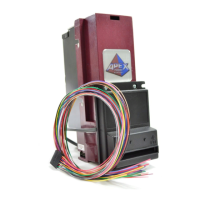
The Pyramid Technologies, Inc. (PTI) Apex Series bill acceptor is designed for indoor use in various markets, including amusement, gaming, lottery, and kiosks. This device is engineered to accept a range of currency denominations, from $1 and $5 bills up to $1, $5, $10, $20, $50, and $100 bills, depending on the specific model. The Apex Series is available in both stackered and stackerless configurations, with stackered models offering various cassette capacities (200, 500, 700, or 1000 bills), including lockable options.
The Apex Series bill acceptor features lighted arrows on its bezel and bill entry area, guiding users during bill insertion. It incorporates high-security measures to detect and reject fraudulent bills, ensuring reliable operation. The device's software is flash downloadable, allowing for easy updates via a PRO1 handheld programmer or a Windows PC, ensuring the acceptor remains current with new currency designs and security features. On-board pushbuttons and LEDs provide advanced diagnostics, simplifying troubleshooting.
The Apex Series supports multiple interfaces, with pinouts compatible with other manufacturers' bill acceptors, offering flexibility in integration. It includes a dual-stage optical anti-stringing mechanism to prevent fraudulent attempts to retrieve bills after acceptance. Configuration and setup are straightforward, with the Apex 7000 model offering a convenient 8-position DIP switch for quick adjustments. For more advanced configuration, both Apex 5000 and 7000 models can be configured via PC or a configuration card. The device operates on 12 VDC as standard, with optional 120 VAC or 24 VAC supply available. A removable bill path facilitates easy cleaning, and the acceptor can handle bills up to 72 mm wide, accommodating various international currencies. Auto-calibration is a key feature, eliminating the need for manual calibration.
The Apex Series can be configured for different modes of operation, including Pulse/Serial Mode, Always Enabled Mode, RS-232 Mode (True RS-232 and TTL RS-232), and MDB Mode. In Pulse/Serial Mode, the acceptor can operate in "High Level" mode using 120 VAC control signals or "Low Level" mode using low voltage signals, outputting pulses via relay contacts or an open-collector transistor. The Always Enabled Mode simplifies operation by keeping the acceptor continuously enabled to accept all programmed valid bills. RS-232 Mode supports both True RS-232 and TTL levels, offering a polled interface compatible with Mars GL5 style acceptors. MDB Mode utilizes a standard MDB connector for communication, integrating seamlessly into vending and other MDB-compatible systems.
The Apex Series bill acceptor offers flexible configuration options to suit diverse operational needs. For the Apex 7000, an 8-position DIP switch allows for quick adjustments. Setting any DIP switch to "ON" overrides PC or configuration card settings, while setting all switches to "OFF" enables PC or configuration card control. Bill denominations can be enabled or disabled by toggling DIP positions 1 through 4. For models accepting higher denominations, enabling the $20 bill automatically enables $50 and $100 bills.
Bill acceptance direction can also be configured. DIP position 5 allows selection between accepting bills in all four insertion directions or limiting acceptance to left-end, face-up only insertion. The acceptor enable mode can be set via DIP position 6: "ON" for Always Enabled Pulse mode, or "OFF" for other interface modes where the acceptor is enabled/disabled by external equipment. Pulses per dollar can be set using DIP position 7 for quarter-based equipment (4 pulses per dollar) or one pulse per dollar. Pulse speed (Fast or Slow) is controlled by DIP position 8.
For more detailed configuration, a configuration card can be used. This card, printed from the manual, allows users to select interface type (Pulse/Serial-Mars, RS-232, Always Enabled, MDB, $1/$5 Credit Line, Parallel), pulses per dollar, pulse speed (Slow or Fast), bezel lighting (Solid On or Flashing), specific bills to enable, security level (Low or High), and insert direction (Face up, Left 1st or All 4 Ways). Once configured with the card, these settings are stored in permanent memory, even if power is removed.
The PRO-1 Handheld Programmer (for Apex 5000) and the USB Flash Download Cable (P/N 05AA0026) facilitate firmware updates and diagnostics via PC. These tools allow for easy software downloading without opening the acceptor, ensuring the device remains up-to-date.
The Apex Series bill acceptor is designed for relatively low maintenance. Regular cleaning is the primary requirement to ensure optimal performance. To clean the acceptor, power must first be removed from the machine. If equipped with a stacker, the cassette can be unlatched and removed by pushing the top latch. The I/O and/or power connectors should be unplugged from the right side of the acceptor.
The Lower Transport assembly can be removed by pushing the latch located at the bottom rear of the acceptor and gently pulling it out. The bill path should then be cleaned using a soft cloth or towel. It is crucial to use only a 50/50 mixture of water and isopropyl alcohol for cleaning; no other cleaners, oils, or silicon sprays should be used. Special attention should be given to cleaning the gray oval plastic pieces in both the lower and upper transport areas, as these are critical for proper operation.
Diagnostic features are built into the Apex Series bill acceptors, accessible via the Diagnostic Pushbutton located at the left rear of the unit. Pressing and holding this button for 1-5 seconds (but no more than 5 seconds) enters Diagnostic Mode, where the front bezel lighting flashes a specific number of times to indicate an error code. For example, constant "OFF" indicates no power, constant "ON" means no error, one flash indicates an object in the bill path, two flashes suggest an obstruction in the stacker, three flashes mean the cassette is full, four flashes indicate the cassette has been removed, five flashes signify a defective acceptor, and six flashes mean the acceptor is not enabled. Ten flashes indicate Configuration Mode has been entered, requiring a configuration card insertion or power cycle to exit. Rapid flashing during operation signals a stringing attempt or a dirty anti-stringing sensor.
To address a dirty anti-stringing sensor, the Lower Transport should be removed, and the optical anti-stringing sensor pair openings cleaned. These openings are located about 1.5 inches behind the round, white plastic rollers, to the far left and right of the bill path. It is recommended to clean all sensors in both the upper and lower halves of the bill path at this time. After cleaning, the Lower Transport should be reinstalled, and power cycled. The acceptor automatically exits Diagnostic Mode after 30 seconds or by pressing the button again for 1-5 seconds.
| Type | Snack and beverage vending machine |
|---|---|
| Manufacturer | Pyramid Technologies |
| Series | APEX 5000 |
| Payment Options | Cash, credit/debit cards, mobile payments |
| Display | LCD |
| Security Features | anti-theft locking system |