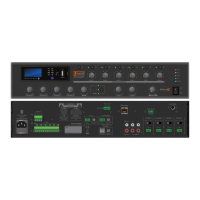
• Rack-mounting amplifiers for the road
The Chassis of the QA series is fabricated from Q235
Cold Steel Rolling and is quite durable. However,
suspending an amplifier in free space in a rack
and then vibrating in the back of a truck for long
rough journeys may cause fatigue to the front panel
mounting. It is essential that the amplifier be supported
from the front and rear in rack-mounting especially
when the amplifier rack is to be transported. Failure
to install correctly may void warrantee. IMPORTANT:
Clean air filters regularly and always allow
adequate ventilation and do not block air flow to
amplifier!
• Bridge/Parallel mono
T
he Br
idge/Parallel mono mode is selected to convert
the two-channel amplifier into a mono amplifier of
greater power. This configuration would be selected
when for example more power is needed to drive
sub bass boxes to higher power. The functional
difference between the bridge mono and parallel mono
is determined by the speaker impedance of your
intended speaker system.
INSTALLATION
Bridge Mono is elected when you need to get the
most power available when driving a total load of 8 Ω
or more.
In this configuration channel A level control is used to
control amplifier level.
Parallel Mono is selected when you have an odd
number of speakers, such a three. Instead of leaving
the amplifier in stereo two-channel mode and driving
two on one side and one on the other. By selecting
Parallel Mono you can parallel all three and drive them
with equal power when connected to either or both
speaker outputs. Parallel mono is also more desirable
for the amplifier for speaker loads of 3-4Ω.
Care must be taken with speaker connections to
never have the amplifier outputs joined together
by a daisy chain of speaker connections . In this
configuration channel A level control is also used to
control amplifier level.
• Recommendations for speaker cables
S
peaker cable needs to be as heavy gauge as
conveniently possible for low-loss results.
Light gauge cable (below 1.5mm) will create extra
resistance and waste amplifier power–this particularly
applies to long speaker runs. The damping factor
statistic (“punch” for the non technical) is greatly
diminished so keep your speaker cables short and fat.
Quality microphone cable will also lower noise and
improve high frequency response
Using the guidlines below, select the appropriate size of
wire based on the distance from amplifier to speaker
distance wire size indicitive
up to 25 ft 16AWG
25-40 ft 14AWG
41-60 ft 12A
WG
61-100 ft 10AWG
101-150 ft 8A
WG
151-250 ft 6AWG
CAUTION
: Never use shielded cable for output wiring
QA SERIES
User Manual
7
QA Series
Power Amplifiers
User Manual