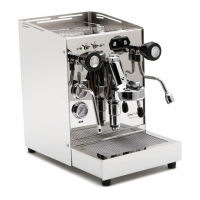
The QM67 Dual Boiler Espresso Machine is a high-performance espresso machine designed for home use, offering classic beauty, value, and the ability to make delicious espressos, cappuccinos, and lattes. It features a dual boiler system, allowing for simultaneous brewing and steaming, and is proudly "Made In Italy."
Function Description:
The QM67 is a dual boiler espresso machine, meaning it has separate boilers for coffee brewing and steam generation. This design ensures optimal temperature stability for both functions, leading to consistent espresso quality and powerful steam for milk frothing. The machine is equipped with an E61 grouphead, a standard in high-end espresso machines, known for its pre-infusion capabilities and thermal stability. A PID controller manages the temperature of both boilers, allowing for precise control over brew and steam temperatures. The machine also includes a hot water wand for dispensing hot water for americanos or tea.
Important Technical Specifications:
- Boiler System: Dual Boiler (separate coffee and steam boilers)
- Grouphead: E61 Grouphead
- Pump: 52W Vibratory Pump (thermally protected)
- PID Controller: Yes, for precise temperature control of both coffee and steam boilers.
- Coffee Boiler Temperature Range: Recommended 195°- 205°F (90°- 96°C), adjustable via PID.
- Steam Boiler Temperature: Default 263°F (approx. 1.7 bars of steam pressure), adjustable via PID.
- Pump (Brew) Pressure: Recommended 9 - 10 bar with backflush disc, 8.5 - 9.5 bar during espresso extraction. Adjustable via expansion valve.
- Electrical Outlet: 3-prong 115V grounded outlet, rated for 15 amps. GFCI outlet highly recommended.
- Water Reservoir: Removable, with magnetic float for low water level detection. Capacity not specified, but requires refilling after 2 boiler fills initially.
- Dimensions (implied): Features a cup warming tray on top, and a drip tray at the bottom.
Usage Features:
- First Time Set Up:
- Water hardness test: Essential to prevent damage. Recommended 3 grains or less of hardness. Softener recommended for harder water. Brita/PUR filters do not remove hardness.
- Water reservoir: Rinse and fill with cold softened water. Ensure silicone lines are at the bottom and the float is on the left side, not pushed down.
- Initial power-up: Verify steam and hot water knobs are closed, brew lever down, and power switches off before plugging in. Turn on coffee boiler power switch. Pump will fill boilers. If PID/heating lights don't come on, refill reservoir.
- Grouphead flush: After boilers fill, place portafilter in grouphead, lift brew lever for at least 15 seconds until water comes out, then lower.
- Heating: Heating indicator lights and PID will illuminate. Machine reaches temperature in approx. 15 minutes, but 30-45 minutes with portafilter in grouphead is recommended for optimal espresso.
- Steam boiler: Turn on steam boiler power switch if steaming milk or using hot water. Coffee boiler must be on for steam boiler to operate.
- Normal Operation:
- Gauges: Top gauge for steam boiler pressure (1.2-1.7 bar). Lower gauge for pump (brew) pressure (9-10 bar with backflush disc, 8.5-9.5 bar during extraction).
- Lights: Green indicator lights for coffee and steam boiler power. Red indicator lights for coffee and steam boiler heating. Red lights flash rapidly to maintain temperature.
- Pump: 52W vibratory pump. Can be loud. Periodically comes on to maintain boiler water level.
- Water Reservoir: Accessed via hinged lid. Remove to fill to prevent spills. Must be properly installed for machine to function (float on left, lines not pushing float down). PID/heating lights turn off when low.
- PID Controller:
- Display cycles between coffee (T1) and steam (T2) boiler temperatures. Decimal point position indicates which boiler.
- Setting Temperature: Press both arrow keys simultaneously for T1 (coffee boiler). Press up arrow to see/change setting. Repeat for T2 (steam boiler). Press down arrow after T2 to save.
- Coffee Boiler Temperature: Default 200°F. Adjust to match coffee blend for desired flavor (bittersweet chocolate at hotter temps, fruity at colder). Avoid too hot (bitter) or too cold (sour).
- Steam Boiler Temperature: Default 263°F (approx. 1.7 bars). Do not change unless at higher elevation and pressure exceeds 2 bar (reduce to stay below 1.8 bar).
- Advanced PID Settings: (Requires thorough understanding of PID controllers)
- Access: Turn machine off, hold both arrow keys, turn machine on until F.01 displays.
- Parameters: F.01 (Fahrenheit/Celsius), F.02 (Mode - must be 4), P (Proportional), I (Integral), D (Derivative), T1 (Coffee Boiler Temp), T2 (Steam Boiler Temp), E1 (Coffee Boiler Offset), E2 (Steam Boiler Offset).
- Offset: Coffee boiler offset (E1) is calibrated and should not be changed. Steam boiler offset (E2) is 0° by default, can be changed up to 5° to increase steam pressure (ensure not to exceed 2 bars).
- Brewing Espresso:
- Three main variables: Quantity of ground coffee, tamping, grind.
- Quantity: Loosely fill basket, level with finger for even extraction.
- Tamping: Apply 30lbs pressure evenly, then lightly twist to "polish" grounds. Consistency is key.
- Grind: Adjust for a "tapered tail of a mouse" flow, taking approx. 25 seconds for a 2 oz. double shot. Finer for quicker shots, coarser for slower/no flow. Particle size between powder and salt.
- Consistency: Keep coffee quantity and tamping pressure consistent; only change grind if shots are off.
- Cooling Flush: Not needed for dual boiler, may ruin temperature stability. Not recommended.
- Cleaning Tip: Dispose of spent grounds immediately. Rinse grouphead by raising brew lever for a few seconds to remove oils/grounds. Prevents tar-like buildup.
- Steaming Milk - Basics:
- Milk: Whole milk recommended for best foam and flavor.
- Temperature: Use cold milk. Stop steaming at 150-160°F to avoid burnt taste.
- Frothing Pitcher: Size relative to drinks. "Pro Barista Steaming Pitcher" recommended for rolling milk and micro-foam.
- Amount of Milk: 1/3 to 1/2 full, or half an inch below spout if pitcher has one. Prevents splashing/overflow.
- Stretching: Initial heating and air introduction until milk reaches approx. 100°F ("body temperature"). Sound like "sucking."
- Texturizing: Submerge wand tip to spin milk, breaking large bubbles into tiny ones for smooth, creamy texture. Continue until pitcher bottom is too hot to hold (approx. 155°F).
- Note: Steam milk before pulling shot. 20oz pitcher or smaller recommended for optimal performance.
- Steaming Milk - Technique:
- Purge steam wand: Point over drip tray, open valve to remove condensation.
- Position wand: Facing you, angled 45 degrees from base.
- Submerge wand: Approx. 1 inch below milk surface, pitcher bottom parallel to countertop, wand gently resting in spout. Tilt pitcher left, away from side.
- Stretching: Open steam knob completely. Position tip just below surface until "sucking" sound and milk reaches "body temperature" (approx. 100°F).
- Texturizing: Submerge tip approx. 1 inch to spin milk, breaking bubbles. Continue until pitcher bottom is too hot to hold (approx. 155°F).
- Thermometer: Helpful for learning, but "body temperature" and "too hot to hold" can be used as guides.
- Steaming Milk - Tips:
- Turning off steam: Keep tip under milk surface for approx. 3 seconds to preserve micro-foam.
- Clean wand: Immediately after use, position over drip tray, open knob for 1-2 seconds, then wipe with damp cloth.
- Turbulence: Lowering tip too far during texturizing creates turbulence, not micro-foam.
- Bubbles: Tap pitcher edge and swirl milk to remove any remaining bubbles.
- Separation: Keep steamed milk moving/swirling until ready to pour.
- Hot Water Wand Operation:
- Requires steam boiler to be up to temperature.
- Position cup, open knob, close when desired level reached.
- Important: Do not remove more than 6oz at a time to prevent heating element damage (not covered under warranty).
- Warning: Water is approx. 250°F and exits under pressure. Use extreme caution.
Maintenance Features:
- Backflushing: Vital for machine longevity.
- Plain water backflushing: At least once a week, or as often as desired.
- Use backflush disc (blank insert). Remove basket from portafilter, insert disc, slap to secure.
- Lock portafilter into grouphead. Raise brew lever for 15 seconds, then lower. Repeat 3-5 times.
- Backflushing with espresso machine cleaner: Approx. once a month or every 35-50 espressos. Avoid overuse (removes lubrication).
- Place 1/4 tsp cleaner into backflush disc. Lock into grouphead.
- Follow plain water backflush procedure until water runs clear (5-10 flushes).
- Remove/rinse portafilter. Wipe underside of group with damp cloth.
- Pull and dispose of one espresso shot to "cure" the group.
- Setting Pump (Brew) Pressure:
- Install backflush disc in portafilter, lock into grouphead.
- Remove cup warming tray to expose expansion valve adjustment screw.
- Raise brew lever. After pressure rises, use flat blade screwdriver to adjust. Clockwise increases pressure, counter-clockwise decreases.
- Recommended setting: 9.5 - 10 bar with backflush disc.
- Note: If brew pressure is low during espresso, grind finer. Tamping pressure also affects brew pressure (30lbs recommended).
- Group Gasket And Shower Screen Replacement: Recommended yearly.
- Gasket: E61 8.5mm gasket.
- Screen: E61 shower screen.
- Procedure: Turn off machine and cool down.
- Removal (Method 1 - for newer gaskets): Insert flat blade screwdriver or spoon into indent around screen, carefully pry gasket/screen down.
- Removal (Method 2 - for older/dried gaskets): Use scratch awl or ice pick to pierce and pry gasket down. Remove all remnants.
- Cleaning The Group: Very important to clean grouphead with hot water and backflushing cleanser. Ensure groove is free of debris.
- Installation (Step 1): Insert screen into gasket (writing/beveled side up). Apply food-grade lubricant around gasket perimeter.
- Installation (Step 2): Remove insert basket from portafilter. Insert screen/gasket into portafilter.
- Installation (Step 3): Press portafilter (with gasket/screen) into grouphead with equal upward pressure. Lock portafilter and turn as far right as possible. Remove portafilter, re-install insert basket, then work gasket up further. If difficult, press screen up by hand first.
- Maintenance Tip: Yearly replacement makes it easier, provides better seal, and allows for easier screen removal for cleaning.
- Descaling:
- Process: Running descaling agent (e.g., citric acid) through machine to remove mineral deposits.
- Recommendation: Not necessary if using softened water.
- Warning: Strongly discouraged due to potential problems (foaming, damage to electrical components, chrome plating flaking, blockages). No instructions provided.
- PID Controller Maintenance:
- Buttons not working: If unused for long periods, contacts can oxidize. With machine off, rapidly press up/down arrows for up to a minute to clean contacts.
- Cleaning The Stainless Steel:
- Cleaners: Specialty stainless steel cleaners or glass cleaner. White vinegar for dried water stains.
- Buffing: Use dry lint-free cloth for mirror finish.
Troubleshooting:
- No Steam From Steam Wand:
- Ensure coffee and steam boiler power switches are on for at least 15 minutes.
- Check upper gauge for steam pressure (1.2-1.7 bar). If zero, refer to "Not Heating."
- Check steam tip for blockage (use paper clip).
- Unscrew steam tip, check for dried milk inside tip and white teflon tube.
- Check steam knob: Remove end cap, ensure c-clip is attached.
- No Water From Hot Water Wand:
- Ensure coffee and steam boiler power switches are on for at least 15 minutes.
- Check upper gauge for steam pressure (1.2-1.7 bar). If zero, refer to "Not Heating."
- Check hot water knob: Remove end cap, ensure c-clip is attached.
- Note: If steam gauge shows pressure but drops to zero when opening knobs, then heats normally, it's a vapor lock caused by a sticking vacuum breaker valve.
- Not Heating:
- Verify machine is plugged in and outlet has power.
- Ensure coffee and steam boiler power switches are on.
- Ensure water reservoir is filled, and silicone hoses are not pushing the float down.
- Check resettable hi-limit switch on each boiler: Unplug machine, remove outer shell, firmly press reset button on each boiler.
- PID and Heating Lights Are Not Working:
- Verify machine is plugged in and outlet has power.
- Ensure coffee and steam boiler power switches are on.
- Ensure water reservoir is filled and fully seated.
- Ensure white float is on the left side of reservoir and silicone hoses are not pushing it down.
- Espresso Coming Out Too Slow Or Not At All:
- Check pump pressure: Install backflush disc, lock into grouphead, raise brew lever. Recommended 9.5-10 bar. Adjust if necessary.
- Adjust coffee grind coarser if pump pressure is good.
- Ensure longer silicone water line in reservoir is at the bottom.
- Check screen on end of silicone water line for debris.
- Ensure insert basket is not overfilled and tamping is no more than 30lbs.
- Espresso Coming Out Too Fast:
- Check pump pressure: Install backflush disc, lock into grouphead, raise brew lever. Recommended 9.5-10 bar. Adjust if necessary.
- Adjust coffee grind finer if pump pressure is good.
- Ensure insert basket is filled with proper amount of coffee and tamping is 30lbs.
Warranty:
- 2-year warranty from original purchase date, covering defects in materials or workmanship.
- Warranty void if damaged by abuse, neglect, or modification.
- Detailed policy available at http://www.chriscoffee.com/policy.
Customer Support:
- Contact Chris' Coffee Service for questions via FAQ, phone (518-452-5995), or email (service@chriscoffee.com).
- Important: Save original shipping carton and packing material for returns. Obtain Return Authorization number before shipping. Insure machine and pack securely to prevent damage in transit.