EasyManua.ls Logo

rako RCM070 - User Manual

rako RCM070
2 pages
Print Icon
To Next Page IconTo Next Page
Loading...
Rako RCM070 Wall-Plates: Installation, Programming and Operating Instructions
Flush Fixing a Wallplate to a Back Box
Warning
Rako wall-plates are designed to operate at safety extra low voltages (6V). When fixing the wall-plates to existing back-boxes
there may be mains wiring present, if this is the case then the wiring should be made safe, properly insulated and any metal back-
boxes earthed. Earthing of the back box is essential if a decorative metal front plate is being used. Should there be any doubt in
how to do this contact a qualified electrician.
Rako Controls Ltd accepts no responsibility for any damage or injury caused by incorrect installation of a Rako product.
Surface Mounting a Wallplate using a Pattress (not screwless cover plates)
Checking for correct operation
Rako control panels are supplied with a pullout tab to prevent inadvertent operation and battery deterioration
during transit. Slide the tab out of the battery compartment. The Rako control panel should now be
operational.
To check this press one of the buttons on the front of the Electronics Module and the indicating LED should
illuminate briefly for a single flash. If the LED does not flash or it flashes repeatedly for a short burst (low
battery warning) then you should contact Rako Controls.
Battery replacement
The Rako RCM series of wall-plates are designed to be powered by batteries. The designed battery life is
better than 3 years (based on 30 button presses daily) but the batteries will eventually need replacing. In
normal use the Led on the front panel illuminates momentarily when a button is pressed to indicate that a
(radio) transmission has been made. When the batteries are approaching the end of their useful life the Led
will continue to blink after a button has been pressed. When this starts to happen the batteries should be
replaced as soon as possible.
Always use two CR2016 batteries.
To replace the batteries remove the Wall Plate
from the wall and unclip the Electronics Module from it’s mounting plate, taking care not to damage the aerial
(note that when flush mounted the aerial may be located in a hole outside the back-box). Carefully Slide out
the battery compartment drawer. Replace with new batteries ensuring that the positive (+) terminal makes
contact with the battery clip and the negative (-) terminal with the pad on the circuit board.
To ensure reliable operation always ensure that battery contacts and battery surfaces are kept clean of any
grease, moisture or other contamination.
Warning
Lithium batteries may explode if handled incorrectly. Always dispose of used batteries in accordance with
manufacturer’s recommendations.
General
Rako thanks you for having purchased a Rako product and hopes that you are pleased with your system. Should for
any reason you need to contact us please contact us via our website www.rakocontrols.com or by phoning our
customer help line on 01634 226666.
General
RCM070 Wall-plate electronics module is a wireless 7 button wall mounted control panel providing 4 Scenes
plus Off and Master Raise and Lower. The unit provides full scene programming.
The Rako RCM series of wall-plates are designed to
cope with a number of different installation situations.
These are predominantly:
- Flush fixing into a UK back-box
- Surface mounting with a UK back-box (not screwless)
- Surface mounting with no back-box
- European DIN standard or French box (Euro module).
Fig. 1
Question and Answer IconNeed help?

Do you have a question about the rako RCM070 and is the answer not in the manual?

Overview

The Rako RCM070 Wall-Plate is a wireless, 7-button wall-mounted control panel designed for intuitive control of lighting scenes and levels within a Rako system. This device offers comprehensive scene programming capabilities, allowing users to customize their lighting environments with ease.

Function Description

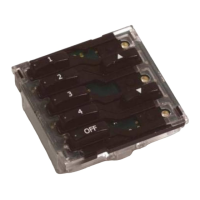
The primary function of the RCM070 is to provide remote control over Rako lighting receivers. It features seven buttons: four dedicated to scene selection, one for "Off," and two for "Master Raise" and "Master Lower." These buttons enable users to activate pre-programmed lighting scenes, turn all lights off, or adjust the overall brightness of the controlled lights. The "Master Raise" and "Master Lower" buttons allow for global adjustment of light levels across all channels within a selected scene or the entire system, providing fine-tuned control over ambiance.

The wall-plate operates at safety extra-low voltages (6V), ensuring safe operation. It communicates wirelessly with Rako receivers, making it suitable for various installation scenarios without the need for extensive wiring. An integrated LED indicator provides visual feedback, confirming button presses and indicating the unit's operational status, including low battery warnings.

Usage Features

The RCM070 is designed for versatility in installation, accommodating several common mounting methods:

  • Flush fixing into a UK back-box: This method provides a seamless, integrated look, with the electronics module fitting neatly into a standard UK back-box.
  • Surface mounting with a UK back-box (not screwless): For installations where flush mounting isn't feasible, the unit can be surface-mounted using a UK back-box.
  • Surface mounting with no back-box: In situations where a back-box is not desired or available, the wall-plate can be surface-mounted directly.
  • European DIN standard or French box (Euro module): The design also supports integration into European standard electrical boxes, offering broader compatibility.

Programming the RCM070 is a straightforward process, allowing users to set specific light levels for each scene. The procedure involves entering a programming mode by pressing and holding specific buttons, then using the "Step up one channel and ident" and "Step down one channel and ident" buttons to cycle through channels and adjust their levels with the "Raise" and "Lower" buttons. An "Ident" button helps confirm the currently selected channel. Once the desired levels are set, a "Save changes" button stores the configuration, and an "Exit programming" button returns the panel to normal operation. If left idle in programming mode for three minutes, the panel will automatically time out and revert to normal mode.

During programming, all receivers controlled by the panel will flash their LEDs, indicating their channel. As each channel is addressed and adjusted, only the LED of that specific channel will flash, providing clear visual confirmation of the channel being programmed. This intuitive feedback system simplifies the setup process, even for complex lighting configurations.

Maintenance Features

The RCM070 is battery-powered, using two CR2016 batteries. These batteries provide a designed life of over three years, based on an average of 30 button presses per day. The LED indicator plays a crucial role in battery maintenance:

  • Normal operation: The LED flashes momentarily with each button press.
  • Low battery warning: When the batteries are nearing the end of their life, the LED will continue to blink after a button press, signaling that replacement is needed soon.

Battery replacement is a simple process:

  1. Remove the wall plate from the wall.
  2. Unclip the electronics module from its mounting plate, taking care not to damage the aerial.
  3. Carefully slide out the battery compartment drawer.
  4. Replace the old batteries with two new CR2016 batteries, ensuring correct polarity (positive terminal contacting the battery clip, negative terminal contacting the circuit board pad).
  5. Slide the drawer back in, reclip the module, and reattach the wall plate.

To ensure reliable operation, it is important to keep battery contacts and surfaces clean and free from grease, moisture, or other contaminants. Lithium batteries, while efficient, must be handled correctly to prevent explosion and should always be disposed of according to manufacturer's recommendations.

The device also includes a pull-out tab that prevents inadvertent operation and battery deterioration during transit, ensuring the unit is ready for use upon installation. Removing this tab activates the device.

rako RCM070 Specifications

General IconGeneral
ManufacturerRako
Product TypeControl Unit
ModelRCM070
Power Supply230V AC
Input Voltage230V AC
Frequency50Hz
Output Channels7
Communication ProtocolRako Wireless
Operating Temperature0°C to 40°C