Chapter 3: Installation 17
Chapter 3: Installation
Before starting the installation procedure, ensure you have read
Chapter 2: System
overviews
and are clear about the data system you are using and how components
will be connected. You should have the following to hand:
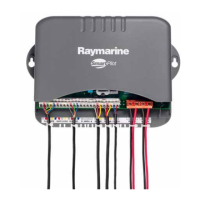
• All components of the autopilot system and related equipment.
• The correct type and length of power and data cabling.
• Schematic diagram detailing autopilot system location and connections, including
connections to existing equipment. Refer to this diagram at each step of the instal-
lation process.
You should also check that existing marine electronics, such as the GPS and
chartplotter, are installed and working.
WARNING: Install at dockside
For safety reasons your boat must be at dockside before commencing installation.
WARNING: Electrical safety
Before you make any electrical connections, ensure the power
supply is switched off and you have read the EMC installation
guidelines (see
page 2
.)
87072-2.book Page 17 Thursday, November 22, 2007 8:43 AM
 Loading...