Care and Maintenance
Advanced Sound Control
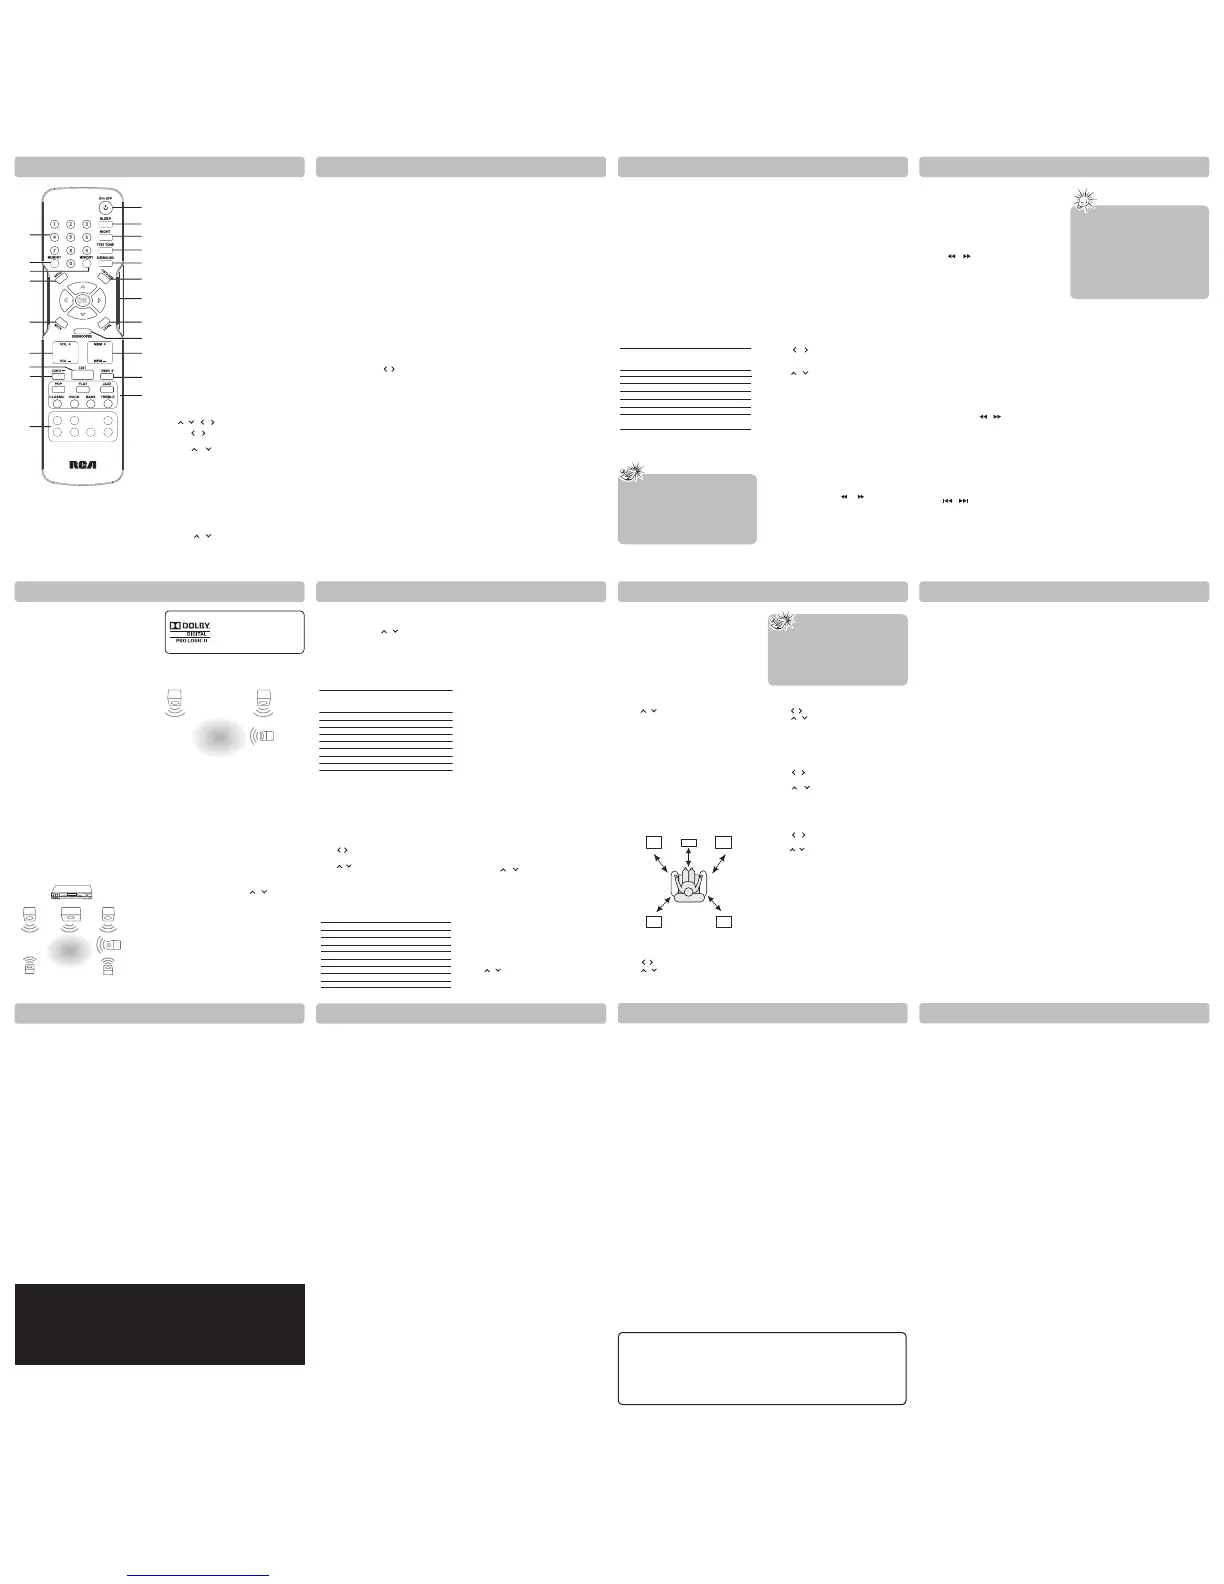
Remote Controls
Remote Controls
Operating Your Unit Operating Your Unit
Advanced Sound Control Advanced Sound Control
Troubleshooting Tips
Technical Specications
Limited Warranty Limited Warranty
Notes:
• CNTR stands for “Center Speaker”
selection while SURR stands for “Surround
Speaker” selection.
•
By default, the Center and Surround Speakers
are set to YES. If you decide not to use them,
set the ones you do not intend to use to NO so
that the sound performance is not aected.
Tips:
• When you tune at a weak FM station
manually, press MONO/ST on remote
control to switch from Stereo to Mono mode.
This will reduce the background noise.
• If there is any interference, change the
antenna’s po sition until id eal sound
reception is obta ined. TV and other
electronic devices could be the cause of
interference, so try to position the antenna
away from them.
In the event your product requires repair after the limited warranty per iod has expired,
please contact our Customer Support Center at
1-877-252-6873, 1-800-506-5746
or
www.RCAav.com
Hours: Monday–Thursday: 9am–7pm, Friday: 9am–5pm, Saturday: 9am–NOON Eastern
time.
Important:
You are responsible for any transportation, shipping or insurance relative to the return of product
to our Product Returns Center.
AVC MULTIMEDIA (“AVC”) makes the following limited warranty. This limited warranty extend to the
original consumer purchaser and is limited to non-commercial use of the product.
One Year Parts & Labor Warranty
AVC products purchased in the United States or Canada are warranted to be free from defects in
materials or workmanship for a period of one year from the date of their original retail purchase. If the
unit fails to conform to this warranty, we will service the product using new or refurbished parts and
products, at AVC ’s sole discretion.
During a period of one year from the eective warranty date, AVC will provide, when needed, service labor
to repair a manufacturing defect at its designated Service Center. To obtain warranty service in the United
States or Canada, you must rst call our Customer Support Center at 1-877-252-6873, during the hours
listed in the box below. The determination of service will be made by AVC Customer Support. PLEASE
DO NOT RETURN YOUR UNIT TO AVC WITHOUT PRIOR AUTHORIZATION. New or remanufactured
replacements for defective parts or products will be used for repairs by AVC at its designated Service Center
for one year from the eective warranty date. Such replacement parts or products are warranted for an
additional one year from the date of repair or replacement. The Customer will be required to ship the unit
to the Service Center indicated at the time Customer Support is contacted to make the necessary repairs.
The customer is responsible for all transportation charges to the service facility.
Packaging and Shipping Instruction
When you send the product to the AV C service facility you must use the original carton box and packing
material or an equivalent as designated by AVC.
LIMITED WARRANTY
Your Responsibility
(1) You must retain the original sale receipt to provide proof of purchase.
(2) These warranties are eective only if the product is purchased and operated in the United States
or Canada.
(3) Warranties extend only to defects in material or workmanship, and do not extend to any product
or parts which have been lost or discarded, or damage to product or parts caused by misuse,
accident, improper operation or maintenance, or use in violation of instructions provided with
the product, or to product which has been altered or modied without authorization of AVC, or
to products or parts thereof which have had the serial number removed or changed.
Out of Warranty
All warranties implied by state law, including the implied warranties of merchantability and tness for
a particular purpose, are expressly limited to the duration of the limited warranties set forth above.
With the exception of any warranties implied by state law as hereby limited, the foregoing warranty
is exclusive and in lieu of all other warranties, guarantees, agreements and similar obligations of
manufacturer or seller with respect to the repair or replacement of any parts. In no event shall AVC be
liable for consequential or incidental damages.
No person, agent, distributor, dealer or company is authorized to change, modify or extend the terms
of these warranties in any manner whatsoever. The time within action must be commenced to enforce
any obligation of AVC arising under the warranty or under any statute, or law of the United States or
Canada or any state thereof, is hereby limited to one year from the date of purchase. This limitation
does not apply to implied warranties arising under state law.
This warranty gives you specic legal rights and you may also have other rights, which may vary, from
state to state. Some states do not allow limitation on how long an implied warranty lasts, when an
action may be brought, or the exclusion or limitation of incidental or consequential damages, so the
above provisions may not apply to you.
For more information on other products and services, please visit our web site at
www.RCAav.com
Important: Also keep your “Bill of Sale” as proof of purchase.
Model no. ............................................................................... Product name .........................................................................
Type of set. .........................................................................................................................................................................................
Serial no. ................................................................................. Invoice no. ...............................................................................
Date purchased .................................................................... Dealer name ...........................................................................
FOR SERVICE AND REPAIR, PLEASE VISIT
www. RCAav.com
Specications and external appearance are subject to change without notice.
Disconnect the audio system from the power source before performing any maintenance.
Cleaning the exterior
Disconnect the system from AC power before cleaning the exterior of the system with a soft dust cloth, or
with a slightly damp leather chamois. Never use strong solvents.
Important Battery Information
• Remove the batteries toavoid leakage if you do not use your remote control for more than one
month.
• Discard leaky batteries immediately as leaking batteries may cause skin burns or other personal
injuries.
• Disposeofbatteriesinthepropermanner,accordingtoprovincialandlocalregulations.
• Anybattery may leak electrolyte if mixed with a dierent battery type,ifinsertedincorrectly,ifall
batteries are not replaced at the same time, if disposed of in re, or if an attempt is made to charge a
battery not intended to be recharged.
Safety Precautions
• Neveropenthecabinetunderanycircumstances.Anyrepairsorinternaladjustmentsshouldbemade
only by a trained technician.
• Neveroperatethisproductwiththecabinetremoved.
• Donottouch theplayerwithwethands. Ifanyliquid enterstheplayer cabinet,takethe playertoa
trained technician for inspection.
• Theapparatusshallnotbeexposedtodrippingandsplashing.
• Noobjectlledwithliquids,suchasvases,shallbeplacedontheapparatus.
• Nonakedamesourcessuchaslightedcandles,shallbeplacedontheapparatus.
Sound Enhancement Systems
This receiver is equipped with several built-in
sound enhancement systems.
Fine Setting of the Components
You can select the surround mode by pressing
SURROUND follow by
/ key to select among
dierent options. (HALL, CHURCH, CLUB, STADIUM,
STUDIO, STEREO, DOLBY PL EMULATION, DOLBY PL
II MUSIC, DOLBY PL II MOVIE)
The default surround modes for dierent
components are listed in the table below. The unit
will keep the last selection in memory.
Speaker Congurations
You can also change the setup of the speakers. Use
a subwoofer to enjoy optimum sound.
For optimum surround experience measure the
distance between the speaker and your favorite
listening position. Press DISTANCE to adjust the
speakers’ distance values.
1. Press the DISTANCE button to show setup
options.
2. Continue to press the DISTANCE button until
the speaker you want to adjust is displayed.
3. Press
/ to change the speaker settings. Your
selection will be stored automatically.
4. Repeat step 2 and 3 to set up the next speaker.
You may adjust the distance within the following
ranges:
• FrontSpeakerdistance(FRNT):0-25ft
• CenterSpeakerdistance(CNTR):0-25ft
• RearSpeakerdistance(SURR):0-20ft
5. When set up is done, wait for ve seconds to
automatically save your settings or press any
buttons to save your selection and set up mode.
Factory Default Speaker Distance Settings
• FrontSpeakers(FRNT):15ft
• CenterSpeaker(CNTR):12ft
• RearSpeakers(SURR):10ft
AM / FM Operation
STEREO indicator is o in FM mode
• Adjust the antenna.
• Press MONO / ST button to insure you are not outputting in mono.
The signal is Mono. Severe hum or noise.
• The signal is too weak. Connect an external antenna.
• Adjustantenna.
• Repositionantennaawayfromanyelectronics.
There is interference to FM reception.
• Turn off other electrical unit (e.g. DVD, BD, CD player) near the unit.
Remote Control Operation
The remote control does not operate the unit.
• No batteries installed (included with your system). Install the batteries before attempting to operate the
remote. Be sure to match the + and - ends of each battery to the symbols shown in the remote battery
compartment.
• The batteries are weak. Replace all batteries.
• The remote is not pointed at the remote control sensor on the main unit or there is an obstacle between
the remote and the main unit.
• The remote control is too far from the main unit, move closer.
General
No audio.
• Make sure the speakers are connected.
• Check the input connections.
• Check the power cord connections.
• Make sure MUTE is off.
• Make sure the digital setting (optical, coaxial or analog) is correct.
• Check that the headphone is not inserted.
No audio from one channel.
• Check the speaker level setting.
• Check the speaker wire or external source cable connections.
Noise occurs when the TV is turned on.
• The TV is too close to the audio system.
Not getting audio from all speakers.
• Check your Surround Mode setting (under Advanced Sound Control section of this book). Your Home
Theater has a number of different SURROUND MODE settings, it defaults to modes most suited to the
type of audio content being played – however you can change these settings. Some of these modes,
(such as DOLBY DIGITAL, and Dolby PROLOGIC II), will cause all speakers to be active, while other modes,
(such as STEREO and 3-STEREO), will cause your rear speakers to be inactive. You can always test your
Home Theater amplifier - and each speaker, by using the built-in TEST TONE generator (press TEST TONE
button on remote control).
Center / Surround Speaker Setup
1. Press the SETUP button on the remote control
or front panel to show setup options.
2. Press
/
until CTR YES or SUR YES is displayed.
3. Press / to select between YES and No.
Home Theater’s Display Dimmer Control
1. Press the SETUP button to show setup options.
2. Press
/
until DIMMER 0 is displayed.
3. Press
/ to select between 0 and 1.
NIGHT Mode Selection
"Night Mode" will limit the volume on loud
passages of movies (such as action sequences)
while still allowing you to hear quiet passages
(such as dialog).
1. Press the SETUP button to show setup options.
2. Press
/
until "DIMMER 0" or "DIMMER 1" is
displayed.
3. Press
/ to select between DIMMER 0 and
DIMMER 1.
4. It is available only during Dolby Digital signal
playback.
SUBWOOFER Mode Selection
1. Press the SETUP button to show setup options.
2. Press
/
until current SUBWOOFER mode is
displayed.
3. Press
/ to select among "BALANCE", "STRONG",
"POWERFUL" or "SOFT " is scrolled once.
Restore To Factory Defaults
If you want to restore all settings to their factory
defaults, please do the following:
Press and hold the SETUP button on the front panel
for 10 seconds, at which time a message will be
displayed indicating that a factory reset is occurring.
You can then stop pressing the SETUP button.
Warning: All factory defaults will be restored except
for your radio station presets.
Many BD-Live compatible discs require content
to be downloaded onto USB ash drive in order
to access the available BD-Live features.
A USB ash drive with free space > 1GB needs
to be inserted prior to inserting the BD-Live
compatible disc.
Fine Setting of the Speakers
All the basic settings have already been preset for
the speakers included in the box.
Also, to make the surround sound more eective
and suit the acoustic conditions in your listening
room, you may need to delay the signal coming
from some of the speakers. Channel delay
compensates for center or surround speakers that
are closer to the listening position than the front
speakers.
Manufactured under license from
Dolby Laboratories.
Dolby, Pro Logic, and the double-D
symbol are trademarks of Dolby
Laboratories.
Dolby Digital
The Dolby Digital mode lets you enjoy full digital
surround from software processed in the Dolby
Digital format. Dolby Digital provides better
sound quality and a more powerful presence
than conventional Dolby Surround. This unit is
equipped with Dolby Digital 5.1-channel so that
you can enjoy enhanced full digital surround
sound. Dierent from Dolby ProLogic in that only
four channels (Front Left, Front Right, Centre and
Rear) are used, the new system provides stereo
separation of the rear speakers (Rear-Right, Rear-
Left). Adding the subwoofer channel to the 5
channels for bass sounds (counted as 0.1 channel)
results in 5.1 channels (or 6 Channels) input Dolby
Digital for that bring you the most sophisticated
sound enjoyment.
Dolby Pro Logic II
The Pro Logic II mode uses the built-in circuit to
steer the Left, Center, Right and Surround left
and right channel audio signals and uses all ve
speakers to play both stereo and Dolby Pro Logic
program source, such as TV and VCR.
Dolby Pro Logic II includes Dolby Pro Logic II
Movie, Dolby Pro Logic II Music and Dolby Pro
Logic Emulation.
You can use this mode with any stereo program
source (such as VCR/TV) to enjoy multi-channel
sound experience.
1. ON•OFF
Turns on/o the unit.
2. SLEEP
Selects sleep time.
3. NIGHT
Selects among night mode options (DRC ON/DRC
OFF/DRC SOFT) which compresses the volume
dierence between normal voices and sounds
such as explosions. (Available only during Dolby
digital signal playback)
The setting is also available in SETUP MENU.
4. TEST TONE
Speaker test tone setting. Refer to “Advanced
Sound Control” for details.
5. SURROUND
Selects among digital surround sound eects.
(HALL, CHURCH, CLUB, STADIUM, STUDIO,
STEREO, DOLBY PL EMULATION, DOLBY PL II
MUSIC, DOLBY PL II MOVIE) depending on input
signal.
6. DISTANCE
Adjusts the speakers’ listening distance.
7.
/ / /
• Press
/ to select among setting items in
Setup mode.
• Press / to adjust the values when the
display shows the setup you want to change.
• PressOK to conrm your selection.
8. LEVEL
Speaker level setting. Refer to “Advanced Sound
Control” for details.
9. SUBWOOFER
Selects among subwoofer sound levels.
(BALANCE, STRONG, POWERFUL or SOFT) by
pressing
/ key after pressing SUBWOOFER.
The setting is also available in SETUP MENU.
Selecting Source
When one of the SOURCE buttons on the front
panel or on the remote control is pressed, the
corresponding input will be activated.
The unit acts as a switching device between all the
sources that are plugged into it.
Example 1:
If you have connected a DVD player to HDMI IN
3 (DVD) jack on the unit, press DVD on the front
panel or on the remote control to receive the
sounds transmitted by the DVD.
Example 2:
If a VCR is connected to the VCR jack of the unit,
press VCR on the front panel or on the remote
control, the sound from the VCR will be selected.
You can connect up to 9 audio sources to this
amplier:
Example: Connecting a Blu-ray Player
1. Connect the HDMI output of Blu-ray player to
HDMI IN 1 jack on the rear panel of the unit.
2. Press ON/STANDBY on the front panel of the
unit or press ON•OFF on the remote control to
switch on the unit.
3. Press BD on the main unit or remote control to
select BD source.
4. Switch ON the Blu-ray player and start playback.
5. Set the SURROUND mode if needed (see
“Advanced Sound Control” for details).
Example: Connecting a TV to a digital
input
1. If TV has an optical digital audio output, connect it
to the OPTICAL jack on the rear panel of the unit.
2. Press ON•OFF on the remote control to switch
on the unit.
3. Press TV button to select TV mode.
4. Press the SETUP button to show setup options.
5. Press
/ unit DIMMER 0/DIMMER 1, CTR
YES/CTR NO, SUR YES/SUR NO or ANALOG are
displayed.
6.
Press
/
to select among
HDMI 1 / HDMI 2 /
HDMI 3 / OPTICAL
/ COAXIAL / ANALOG to match
your connection (OPTICAL). Your selection will be
stored for future use automatically.
7.
Switch on the TV.
RADIO
The unit has a built-in tuner that allows for AM/FM
radio function.
Connect the FM antenna and the AM loop antenna
at the back of the unit. Rotate the AM loop for
better reception.
Automatic Tuning
1. Press AM/FM.
2. Press and hold TUNER+ or TUNER- button on
the remote control or
or button on the
front panel of the unit until the auto searching
starts. Searching stops when the system tunes in
a station. (Once the FM station that broadcasts
Stereo sound is found, STEREO is displayed.)
3. Repeat step 2 to tune to another radio station.
4. To prematurely stop the searching function,
press TUNER+ or TUNER- button on the remote
control.
5.
Adjust the volume by pressing VOL +/ VOL -.
Manual Tuning
Press TUNER+ or TUNER- button on the remote
control or
or button on the front panel of the
unit repeatedly to tune a desired frequency.
Automatic Preset Programming
The unit can preset 30 FM stations and 30 AM
stations. Before tuning, make sure to turn down
the volume.
1. Press AM/FM to enter the AM/FM mode.
2. Press and hold AM/FM for two seconds to start
automatic preset programming.
3. Radio frequencies will be browsed and radio
stations stored automatically. When all the
available radio stations are stored or all 60 preset
stations (30 for AM and 30 for FM) memory
locations are full, the auto preset programming
function will stop.
Manual Preset
1. Press AM/FM to select the desired radio mode.
2. Press and hold TUNER+/TUNER- button on the
remote control or
/ button on the front
panel of the unit until the system tunes in a
station.
3. Press MEMORY. While the Program Preset
number is still ashing, input your desired
preset number using the numeric buttons, then
press MEMORY to store it.
Select Preset Stations
1. Press AM/FM to enter the Tuner mode with
selecting AM or FM band.
2. Press
/ on the main unit repeatedly or
directly press MEM + / MEM - button on the
remote control to search for the preset stations.
Each time you press the button, the system
tunes in one preset station.
GAME
1. Connects audio out jacks of the
TV game to the
GAME jacks on the front panel
of the unit.
2. Press the GAME/LINE-IN button on the front
panel repeatedly to select GAME mode.
LINEIN
1. Connects one end of the 3.5mm stereo cable
(not included) to the LINEIN connector on the
front panel of the unit and the other to the line
out or headphone jack on an external source.
2. Press GAME/LINE-IN on the front panel to
select LINE-IN mode.
SETTING THE SLEEP TIMER
You can set the system to turn o at a preset time,
so you can fall asleep listening to music. You can
preset the time in 30-minutes increments.
1. Press SLEEP button on the remote control.
2. Each time you press SLEEP, the minutes display
(the remaining time) changes by 30 minutes.
3. When you set the sleep timer, "SLEEP" icon will
be shown on the front panel display.
• To change the remaining time, press SLEEP
repeatedly to select the desired time.
• Toclear thepresetsleeptime,presstheSLEEP
button until SLP OFF appears.
Stereo
The Stereo mode uses the two main channel
outputs from the front speakers and subwoofer
speaker. Use this mode if you have connected the
front speakers only.
DSP (Digital Sound Processor)
These digital sound eects resemble sounds in a
real environment such as (HALL, CHURCH, CLUB,
STADIUM, STUDIO, STEREO, DOLBY PL EMULATION,
DOLBY PL II MUSIC, DOLBY PL II MOVIE). DSP
automatically converts analog audio signals to
digital ones which enables you to adjust the sound
without degrading the sound quality. Dierent
modes will give you dierent feels of size and types
of listening environment.
Press SUBWOOFER follow by
/ key to select
the subwoofer eects level according to you
needs. Four settings are available: SOFT, BALANCE,
STRONG and POWERFUL.
 Loading...