User manual
Tap here for Detailed Instructions
More ↓
It's important to read this instruction prior to using your new
product for the rst time.
CONNECTIONS AND SETUP
Need more help?
Please visit online help at http://www.RCAav.com
RTB10220
Connecting to your TV
OVERVIEW OF CONTROLS
Remote Control
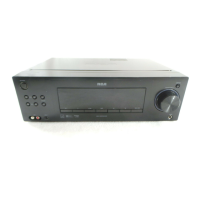
Front Panel Controls
PLAYING A DISC
SPECIAL FUNCTIONS
PLAYING PICTURE FILES
WATCHING MOVIES WITH VUDU
WATCHING MOVIES WITH NETFLIX
WATCHING MOVIES WITH YOUTUBE
ENJOYING MUSIC WITH PANDORA
BROWSING PHOTOS WITH PICASA
THE SETTINGS MENU
TROUBLESHOOTING
AUX/OPTICAL
© 2012 AVC MULTIMEDIA
811-810291W010
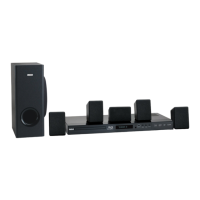
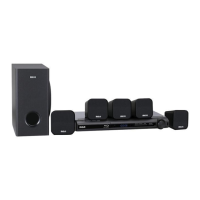
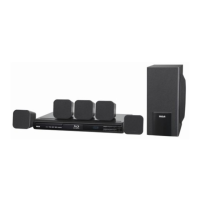
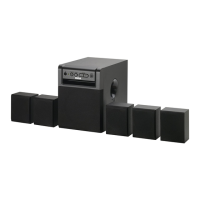
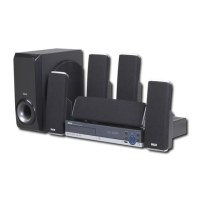
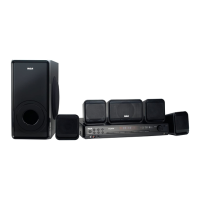
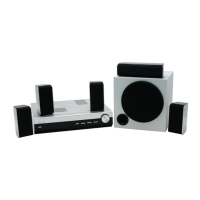
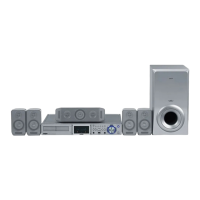
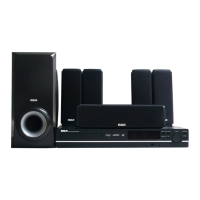
What’s included
SubwooferMain unit (receiver)Remote control and
2 AAA batteries
Center speakerLeft and right front
speakers
Left and right
Surround speakers
Composite
Video Cable
Things to Consider before You Connect
• Ensure that the mains (AC power) supply in your house complies with that indicated on the
identi cation sticker located on the back of your unit.
• Install your unit horizontally, away from any source of heat ( replace) or appliances creating strong
magnetic or electric elds. The components of this unit are sensitive to heat. The maximum ambient
temperature should not exceed 35°C / 95°F.
• Leave enough space around the unit to allow adequate ventilation: 10 cm/4 inches on either side and
above the top, and 5 cm/2 inches at the rear.
• The humidity of the room should not exceed 75%. If you have to use the unit outdoors, do not
expose it to rain or splashing water. The apparatus should not be exposed to dripping or splashing
and no objects lled with liquids, such as vases, should be placed on the apparatus.
• Moving the unit from a cold place to a warm one can cause condensation on some components
inside the unit. Let the condensation disappear on its own before turning the unit on again.
• Before moving the unit, make sure the disc tray is empty.
• Where the mains plug or an appliance coupler is used as a disconnect device, the disconnect device
shall remain readily operable.
• Other important use and cleaning information at the end of the booklet.
To HDMI
input
HDMI cable
(not included)
Notes
• Refer to the owner’s manual of the connected
TV as well.
• HDMI, the HDMI logo and High-De nition
Multimedia Interface are trademarks or
registered trademarks of HDMI licensing LLC.
• If your television is a high de nition television
with an HDMI input, we highly recommend
you use the unit’s HDMI output to get the
highest possible video resolution.
Method 1 (best): HDMI
• Connect the HDMI OUT jack on the rear of the
unit to the HDMI IN jack on your TV using an
HDMI cable (not included).
• You can select the resolution of the player’s
HDMI output signals (Aut
o, 480i, 480p, 720p,
1080i or 1080p) to match your TV’s resolution
capabilities, please see “Displa
y Setting” for
details.
Rear of the unit
Recommended Installation Notice
• If degraded picture quality is observed
while viewing copy-protected pay-per-view
programs, connect the unit directly to the TV
set. Do not connect through a VCR.
• Do not connect the unit through a VCR. Video
signals fed through VCRs may be a ected by
copyright protection systems and the picture
will be distorted on the television.
Method 2 (basic): Composite video jack (yellow)
• This video jack is color-coded yellow.
• Connect the VIDEO OUT jack on the unit to the
VIDEO IN jack on your TV using the video cable
with yellow plugs (supplied).
Rear of the unit
Video Cable
(included)
Getting sound from External
Sources such as TV
Using AUX IN Jacks
Connect the AUX IN jacks from the unit to the
AUDIO OUT jacks on TV, SAT/Cable Box, VCR or
other component. Press SOURCE (or AUX on the
remote control) to select A
UX mode.
Using OPTICAL Jack
Connect the OPTICAL IN jack on the back of the
unit t
o the OPTICAL OUT jack on TV, SAT/Cable
Box, VCR or other component. Press SOURCE
(or OPTICAL on the remote control) to select
OPTIC
AL mode.
Note: An optical connection allo
ws you to
play dolby digital surround sound audio, if the
component you’ve connected is capable of
transmitting dolby digital surround sound audio.
Rear of the unit
Rear of the unit
Optical digital cable
(not included)
Audio cable
(not included)
Connecting your player to a wired
network router
Connect an Ethernet cable (CAT5 or better with
RJ45 connector) to the ETHERNET jack on the
back of your player and to an Ethernet jack on a
network hub or broadband router.
Notes
• Do not connect a modular phone cable to the
ETHERNET jack.
• When plugging or unplugging the cable, hold
the connector on the end of the cable. When
unplugging, do not pull on the cable. Press down
the lock tab and pull the connector out of the
jack.
• Because there are various connection
configurations, follow the instructions from
your Internet service provider.
LAN cable
(not included)
Rear of the unit
Connecting a USB ash drive
You can view JPGs located on a USB Flash Drive
by connecting it to USB port on the back of the
unit.
Note: If you cannot easily insert the USB ash drive,
you may have inserted it incorrectly. Try to turnover
the device and then insert again.
USB fl ash drive
(not included)
Rear of the unit
Connecting the Speakers
Speaker wires are color-coded to match the
terminals. Connect the speaker wire from the
back of each speaker to the corresponding color
terminal at the back of the unit. Press down the
tab to open the terminal and insert the wire.
Release the tab to lock wire in the terminal.
Front SpeakersCenter Speaker
To adjust each speaker volume level for
optimum listening experience.
1. Press LEVEL button on the remote
control to select the speaker FL (front Left
speaker), FR, CT, SL, SR on the unit displa
y
or press SUBWOOFER button to select SW
(Subwoofer).
2. Press
or buttons to adjust the value up
or down (between -3dB and +3dB).
Speaker gains may be set to levels of up to
+3dB, actual max levels may also depend on
your Volume Setting.
Subwoofer
Right
Left
Red
and
Black
White
and
Black
Green
and
Black
Purple and Black
Gray and
Black
Blue
and
Black
Rear Speakers
(Surround Sound)
Insert
Press
Release
Right Left
Note:
When connecting the speakers, make sure
the polarities (“+” speaker wire to “+” on the
receiver) of speaker wires and terminals match.
For example, red wire to red terminal on the
receiver. If the cords are reversed, the sound will
be distorted. Do not let the speaker wires touch
each other, it will damage the system’s ampli er.
Front speakers
Front speakers carry primarily music and sound
e ects.
• Place the left and right speakers to form a
45-degree angle with your favorite viewing
position to duplicate the soundtrack mixer’s
perspective.
• Place the speaker so that their tweeters will be
at the same height as your ear.
• Align the front speakers with the centre speaker
or place them slightly in front of the center
speakers.
Positioning Speakers
Note: Center speaker provided with this unit is
magnetically shielded to protect your TV set. It
is not recommended to place speakers without
magnetic shield near the TV set.
Center speaker
In surround mode, the center speaker carries
most of the dialog as well as music and e ects.
• It should be set between the left and right
speakers.
• It is best to install it at the same height as the
front speakers.
Rear Speakers (Surround Speakers)
The surround speakers’ overall sound balance
should be as close as possible to the front
speakers. Proper placement is vital to establish an
evenly distributed sound eld.
• If possible, place surround speakers to either
side of the listening area, not behind it.
• If space permits, install surround speakers 2-3
feet above viewers. This helps to minimize
localization e ects.
Subwoofer
A subwoofer is designed to reproduce powerful
low bass e ects (explosions, the rumble of
spaceships, etc.).
Test Tone/Channel Balance
Your receiver is equipped with a test signal
generator to help balance the audio level for each
channel (see “Speaker Setting” for details).
Press to open or
close the disc tray.
Start/pause
playback.
Select the input sources.
Press repeatedly to select: BD,
AUX, OPTICAL or MEDIA.
Standby indicator
Illuminates when the
unit is in standby.
Switch the unit
on and o .
Remote Sensor
ON/OFF: Turns on your unit, or put your unit in
standby mode. When your unit is in standby mode,
power is still entering your unit. To disconnect
power, unplug the power cord.
OPEN/CLOSE: Press to open or close the disc
tray.
R(red), G(green), B(blue), Y(yellow): When
playing a Blu-ray Disc that has a Java
application,
press to control playback. For more information,
see the documentation that came with the
Blu-ray Disc.
Numbers: Number entry.
VUDU: Accesses VUDU.
NETFLIX: Accesses NETFLIX.
VOL+/-: Increases or decreases the volume.
MUTE: Mutes / unmutes audio.
POP UP: During Blu-ray Disc playback, press to
open a menu that lets you control Blu-ray Disc
playback.
During DVD playback, press to open the DVD title
menu (if available).
SKIP
/ : Goes to the next or previous chapter
(Blu-ray Disc/DVD) or track (CD).
, , , : Navigates through the menus.
OK: Con rms your selection.
EXIT: Returns to the previous menu.
REV: Fast reverse.
FWD: Fast forward.
SETUP: Enter SETUP menu.
STOP:
Stop playback.
PLAY: Start or resume playback.
STEP/
: Pause playback, frame advance.
LEVEL: Toggles channels for di erent level settings.
Adjusts the value using
or buttons.
INFO: Accesses the Info menu.
PiP: Turn PiP (picture in picture) mode on or o .
This function is only available by Blu-ray discs if
available on disc.
AUDIO: Selects audio language.
SURROUND: While in BD mode, with disc play
stopped, press to show current sound mode
(5.1ch or Stereo). Pressing
button will change
SURROUND mode. We highly recommend you
leave this setting in 5.1 SURROUND state.
SUBWOOFER: Press to display current Subwoofer
setting, then use
or buttons to adjust the value
up or down (between -3dB and +3dB).
MENU: Accesses the disc menu during playback
(on DVD).
SUBTITLE: Selects the subtitle language.
MEDIA: Selects MEDIA mode.
OPTICAL: Selects the OPTICAL INPUT source.
AUX: Selects AUX input source.
BD: Selects the BD mode.
CLEAR: Clears an input.
REPEAT:
Repeats the current title, chapter, track,
or repeat all.
MEM/ANGLE: In pause mode, press to create the
program list for BD/DVD/CD disc. Accesses the
camera angle function for multi-angles BD/DVD
disc if available.
GOTO: Searches for a title, chapter, track or time.
Battery Replacement
When the batteries become weak, the operating
distance of the remote control is greatly reduced
and you will need to replace them.
1. Open the battery cover.
2. Insert two AAA size batteries. Make sure to
match the (+) and (–) ends of the batteries with
the (+) and (–) ends indicated in the battery
compartment. Snap the cover back into place.
To Install Batteries
Basic playback (Blu-ray disc/DVD/CD)
1. Turn on your television set.
2.
Press ON/STANDBY (or ON/OFF on the
remote control).
The HOME list screen appears. If you want
to play BD/DVD, press BD on the remote
control to select BD mode.
3.
Press OPEN/CLOSE to open the disc tray.
4. Place a disc onto the disc tray with the label
side up.
5. Press
OPEN/CLOSE to close the disc
tray. After loading a disc, playback starts
automatically.
• If the disc menu appears, select the Play
option and press OK to begin playback.
Playback: Press
button.
Pause: Press
button. Press to resume normal
playback.
Frame advance: Press STEP
twice. Each time
you press STEP
button, the picture advances
one frame. Press
to resume normal playback.
Note: When you leave the unit in stop mode
for more than 20 minut
es, the screen saver is
activated if you set the Screen Saver to On mode.
A
t the end of 30 minutes without an
y user
interaction, the unit switches o automatically.
Displaying disc information
• Press INFO, your unit displays information
about the disc, such as type of disc, elapsed
time of the current title, title number, chapter
number, audio format.
• Press INFO again to exit.
Locating a desired section
Locating a speci c time
1. Press GOTO and use
/ to select TT (Title)
or CH (Chapter), then press OK.
2. Press
/ to move the cursor to the Hour,
Minute or Second.
• The rst two numbers represent hours.
• The second two numbers represent
minutes.
• The third two numbers represent seconds.
3.
Press / or the corresponding number
buttons (0-9) for the time you want, then press
OK.
4. Playback starts from the selected time.
Locating a speci c chapter
1. Press GOTO and use
/ to move the cursor
to the Chapter, then press OK.
2.
Press / or the corresponding number
buttons (0-9) for the chapter you want, then
press OK.
3. Playback starts from the selected chapter.
Locating a speci c title
1. Press GOTO and use
/ to move the cursor
to the Title, then press OK.
2.
Press / or the corresponding number
buttons (0-9) for the title you want, then press
OK.
3. Playback starts from the selected title.
00 :0 :0002/182/4
BDMV AVC
1/2
TT
2/2English
English DTS-HD MA 5.1
00:01:252/182 /4
BDMV AVC
1/2
TT
2/2English
English DTS-HD MA 5.1
00:01:252 /182/4
BDMV AVC
1/2
TT
2/2English
English DTS-HD MA 5.1
Stop: Press button. The unit stores the point
where playback was interrupted. Press
twice to
stop playback completely.
Accelerated play: P
ress
or to fast forward
or fast reverse. Each time you press one of these
buttons, the fast-forward or fast-reverse speed
increases from 2x, 4x, 8x, 16x to 32x. Press
to
resume normal playback.
Changing chapter/track: Press
to skip to the
start of the current chapter or skip to previous
chapters. Press
to skip to the beginning of the
next chapter.
Note: Some discs allow you to turn PiP on/o
only via the disc menu.
Using P
iP (picture-in-picture) mode
Some Blu-ray Discs ar
e compatible with picture-
in-picture (PiP) mode. In PiP mode, the primary
video is displayed on the full screen, and the
secondary video is displayed in a small window.
• Press PiP to turn P
iP mode on or o .
Primary video
Secondary video
Repeating a title, chapter or CD track
• Press REPEAT one or more times to select a
repeat mode.
Using a disc popup menu
1. During Blu-ray or DVD playback, press POP UP.
The Blu-ray popup menu or the title menu of
DVD disc opens.
2. Press
, , or to select an option, then
press OK.
Selecting a source
Press SOURCE button on the front panel of the
unit repeatedly to select BD, AUX, OPTICAL,
MEDIA.
Selecting the audio mode
Press AUDIO. Your unit displays the disc’s audio
channel information, such as 1/3 English Dolby
Digital 5.1.
Selecting the camera angle
Some discs o er di erent camera angles for
speci c scenes.
1. While you are playing a disc with di erent
angles recorded, press MEM/ANGLE to view
the number of current angles available.
2. Press MEM/ANGLE repeatedly to change the
scene to the next angle in those recorded.
• This function can only be used for discs on
which scenes shot from multiple angles have
been recorded.
Selecting subtitles
You can select a subtitle language from those
included on the BD/DVDs. Press SUBTITLE
repeatedly to select your desired language.
Creating a program list
You can combine your favorite titles, chapters or
tracks and play them in the order you determine.
1. Press MEM/ANGLE on the remote control. The
Program menu appears.
2. The rst spot in the list is highlighted, and
press OK .
3. For DVD disc: The TT (title) item is lighlighted
and press
/ or the corresponding number
buttons on the remote control to enter a title
number, then press
to CH (chapter) item and
enter the chapter number, press OK.
For CD disc: The Track item is lighlighted and
press
/ or the corresponding number
buttons on the remote control to enter a track
number, and press OK.
4. Continue creating the next spot in the list until
you have completed your list.
5. Press PLAY to start memory playback.
• To resume normal playback from memory
playback, pr
ess twice and press PLAY
again.
• When you enter the title/chapter/track
number
, you can clear the number y
ou entered
by pressing CLEAR on the remote control and
enter the new number.
This unit can play picture
les stor
ed on Blu-
ray Disc (BD), USB ash drives, CD-R/CD-RW,
DVD+R/-R or DVD+RW/-RW discs.
Playing picture les (JPGs) from a disc or USB
ash drive
1. Load the disc containing JPG les or insert the
USB drive containing JPG les.
2. Select BD mode (if viewing JPGs from disc), or
Media mode (if viewing JPGs from USB).
A selection menu will appear on the screen.
Notes
• You can press the corresponding number
buttons (0-9) to select the photo you want.
• It does not support USB hard disc mass storage
device, multi-card reader and other USB computer
peripheral.
• Do not disconnect the USB ash drive when you
are playing, it may corrupt the data.
3. Press to select Photo folder and press OK.
4. Press
or to select a le (or a folder) and
press OK or
to start playback.
VUDU is an online service that allows you to rent
or purchase HD movies
. It also provides a wide
range of interesting and useful online apps. To
use the VUDU movie service or access VUDU
Apps, please ensure your unit is successfully
connected to a network with internet access.
(See “Network Setting” section).
Step 1: Creating a VUDU account on your
player
a. In HOME list screen, press
or to select
VUDU (Apps or HD Movies), and then press
OK.
b. Follow the instructions to create an account, it
will ask for an email address.
c. Enter YOUR email address using the keyboard
that appears on the screen. VUDU will then
display a message on the TV “Sending you an
email”.
Step 2: Creating a VUDU account on your PC
a. VUDU will send you an email with a hyper-link;
click on the link.
b.
In the VUDU page that comes up on your PC’s
browser after clicking the link, enter the e-mail
and password of the owner of the account.
c. VUDU will then display a message “Enabling
your device to view movies. The email
message on your TV screen will disappear
when done”.
Step 3: Now that you’ve successfully created a
VUDU account, y
ou can access VUDU simply by
selecting VUDU from the HOME list screen.
Note: To exit VUDU and return to the unit’s Main
Menu, press the BD button on your remote
control.
To use Net ix service, please ensure your unit
is successfully connected to a network with
internet access. (See “Network Setting” section).
Launching Net ix: In HOME list screen, press
,
, , to select Net ix, and then press OK.
Creating Net ix acc
ount: If you are a Net ix
Member: Select “Yes”, and proceed to “Activating
Net ix player”.
If you are not a Net ix Member: Select “no”. Read
the instructions displayed on the TV screen, and
visit http://www.net ix.com from your PC. Sign
up to create your account, then select “I’m now
a member”.
Note: Resolution of video str
eamed from Net ix
varies depending on c
ommunication speed or
bitrate of each content, etc.
Now you can view Net ix streaming video
.
Activating Net ix player: To play streaming
video via Net ix service, Net ix player needs to
be activated. Read the instructions displayed
on the TV screen, and visit http://www.net ix.
com/activate on your PC. Sign in to your Net ix
account, if necessary. Enter the activation code
displayed on the TV screen.
1. In HOME list screen, press , , , to select YouTube, and then press OK.
2. Please enjoy any contents.
Pandora is personalized internet radio that is
designed to help y
ou discover new music you’ll
love mixed in with music you already know.
To use the Pandora service, please ensure your
unit is successfully connected to a network with
internet access. (See “Network Setting” section).
For users that already have a Pandora
account, skip to step 4.
Step 1: Creating an activation code on the
player
a. In HOME list screen, press , , , to
select Pandora, and then press OK.
b. Select “I am new to Pandora” from option list
and press OK.
c. You will be given an activation code, then
use this activation code to generate a new
account on your PC (See Step 2).
Step 2: Creating a new Pandora account on your
PC
a. Go to http://www.pandora.com/rca and
enter the activation code.
b. Follow the instructions to create an new
account.
Step 3: Now that you’ve successfully created a
P
andora acc
ount on your PC, log in using your
player.
Step 4: Using an existing Pandora account
a. In HOME list screen, press
, , , to select
Pandora, and then press OK.
b. Select “I have a Pandora account” from the
option list and press OK.
c. Sign in with your Pandora account.
For users that already have a Picasa account,
Signing in with your account
To display photos in your web album on the screen, you need to sign in with your Picasa account.
1. In HOME list scr
een, press
, , , to select Picasa and press OK.
2. Sign in with your Picasa account.
Your w
eb album is displayed on the screen.
Creating a new Picasa account on your PC
Go to http://picasa.google.com/ to create a new account.
General Setting
1. Press SETUP in full stop mode (in BD mode, with disc playback stopped) or press , , , to
select SETUP icon in HOME list screen, then press OK. The Home M
enu appears.
2. Press or to select General Setting.
3. When nished with your Menu selections, press SETUP to exit Home Menu.
System
1. In the General Setting menu, press or to select System.
2. Press and press or to select an option, then press OK.
3. Press
or to select the desired option, and then press OK.
4. Press to go to the previous menu.
You can change the default settings to customize performance to your preference.
Screen Saver: This Blu-ray disc player has a screen saver feature when your player is inactive. You can
set it to On or O to turn on/o the screen saver.
When you leave the unit in stop mode for more than 20 minutes, the screen saver of the unit
automatically appears if you set the Screen Saver to On mode.
Restore Default Settings: If you choose OK in the prompt message box and press OK, all settings
will be restored to the factory defaults.
Upgrade: This option allows to update your product software via a Disc, USB Drive or Network.
We recommend you periodically check for upgrades.
If upgrading using a Disc or USB Flash Drive, please visit www.RCAav.com to check for and download
upgrade.
Easy Setup
1. In the System menu of General S
ettings, press , then use or to select Easy Setup, and
then press OK.
2. Press OK to perform Easy Setup.
Follow the on-screen instructions to customize the following settings to your preference:
Player Menu Language: English/French/Spanish
HDMI Resolution: Auto, 480i, 480p, 720p, 1080i or 1080p
Aspect Ratio: 16:9 Full, 16:9 Pillarbox, 4:3 Pan & Scan or 4:3 Letterbox
3. After setting, press OK t
o confirm and exit the Easy S
etup.
Note: When turned on for the rst time or after resetting it to the factory default, the Easy Setup menu
will pop up. Please follow above steps to nish the setup.
VUDU: If you choose Yes in the prompt message box and press OK button, you will deac
tivate the
unit’s VUDU registration.
Net ix Info: If you choose Yes in the prompt message box and press OK, you will deactivate the unit’s
NETFLIX registration.
Language
1. In the General Setting menu, press or button to select Language.
2. Press
and press or to select an option, then press OK.
3. Press
or to select the language you want for Player Menus, Disc Menus, Audio and Subtitles,
then press OK.
4. Press
to go to the previous menu.
Notes
• If the selected language is not available on a disc, the disc’s language will be used instead.
• If the language chosen is available, it is automatically selected when you display the subtitles or
press SUBTITLE on the remote control. Otherwise, the subtitle language indicated on the disc is
selected.
Network Settings
1. In the General Setting menu, press or button to select Network.
2. Press to select an option, then press OK.
3. Press
or to select the desired option, and then press OK.
4. Press to go to the previous menu.
Interface
:
Use to select Wired, then press OK.
Some BD-ROMs contains BD-Live features that can be downloaded to the external memory (local
storage) for enjoyment.
In order to access BD-Live functions, the Blu-ray disc player must be properly con gured for BD-Live
internet access, and it must be equipped with additional memory (USB Flash Drive).
1. Insert a USB Flash Drive of at least 1GB capacity (not supplied) into the USB jack on the front panel
of the Blu-ray disc play
er.
The USB device is used as the local storage.
Make sure that the USB device is properly inserted into the Blu-ray disc player.
2. Connect
the Blu-ray disc player to a network.
3. Turn the Blu-ra
y disc player on.
4. Set
“BD-Live Connection” to “Permitted”.
5. Insert a BD-ROM with BD-Live and select the BD-Live selection following the instructions on the
disc menu.
The operation method di ers depending on your BD-ROM. Please refer to the instructions coming
with the disc.
Connection Test: Selecting the Connection T
est will cause the player to attempt to communicate
with your home network, and if successful, with a known internet address. If both attempts are
successful, your network connection should be good. If the player can successfully connect to your
home network, but not to the known internet address, your internet service may be “down”, or your
security rewall may be blocking access of the player to the internet.
BD-Live Connection
Permitted — Allows I
nternet access with valid “BDLive” network access approval.
Prohibited — Never allows BD-Live Internet access.
IP Setting:
Use or to select Auto or Manual, then press OK.
Auto — Automatically obtain an IP address.
Manual — Lets you manually con gure network settings, such as IP Address, Subnet mask, Default
Gateway, DNS1 and DNS2 settings.
Notes
• Do not remo
ve the USB device when using the BD-Live function.
Information:
Displays the Network Connection Information.
IMPORTANT!
Many BD-Live compatible discs require content to be downloaded onto USB ash drive in order to
access the available BD-Live features.
A USB ash drive with at least 1GB of free space needs to be inserted prior to inserting the BD-Live
compatible disc.
TV
1. In the Display Setting menu, press or to select TV.
2. Press
and press or to select an option, then press OK.
3. Press
or to select the desired option, and then press OK.
4. Press
to go to the previous menu.
Display Setting
1. Press SETUP to display the Home Menu while in full stop mode.
2. Press
or to select Display Setting.
3. When nished with your Menu selections, press SETUP to exit Home Menu.
TV Screen
16:9 Full, 16:9 Pillarbox, 4:3 Pan and Scan, and 4:3 Letterbox are available for your choice.
16 : 9 Full: High-de nition 16:9 formatted video will be displayed correctly on a wide-screen TV
(most modern TVs).
16 : 9 Pillarbox: The video will be “squeezed” between two vertical columns on TV screen. This will
cause standar
d-de
nition 4:3 video to be displayed correctly on an wide-screen TV, but will distort
16:9 video.
4 : 3 Pan and Scan: When high-de nition 16:9 video is play
ed, this mode clips the right and left sides
of the video so that it can be viewed with correct aspect ratio on an older analog TV that has 4:3
aspect ratio. This setting will distort video played on a wide-screen TV.
Some wide-screen DVDs that do not permit Pan Scan mode playback are automatically played in
letterbox mode (black bands that appear at the t
op and bottom of the screen).
4 : 3 Letterbox: When high-de nition 16:9 video is play
ed in this mode on an analog 4:3 aspect-ratio
TV, black bands appear at the top and bottom of the screen.
• Depending on your connection environment, it may take time to connect to the Internet or the
Int
ernet may not be connected.
HDMI Resolution
You can de
ne the video output resolution in this option.
Auto: If your TV is a high-de nition TV (HDTV), is connected to the HDMI jack on your player and
you want y
our player to set the output resolution based on information exchanged between
the TV and your player over the HDMI cable.
480i: If your TV is a standard-de nition NTSC (analog) TV.
480p: If your TV is an enhanced-de nition TV (EDTV).
720p: If your TV is a high-de nition TV (HDTV) capable of 720p only.
1080i: If your TV is a high-de nition TV (HDTV) capable of 1080i only.
1080p: If the TV is a high-de nition TV (HDTV) capable of 1080p (any frame rate) connected to the
HDMI jack on your player.
Notes
• Selecting a resolution your TV does not support could result in an unstable picture or loss of the
picture. See the documentation that came with the TV to nd the resolutions the TV supports.
• Only the HDMI output on your unit supports 1080p video output at any frame rate. If the TV is
connected to the component output, the video output is limited to 1080i or lower.
HDMI 1080P 24Hz
Movies ar
e recorded on lm at a rate of 24 pictures (frames) per second. Many of the movies are
recorded to Blu-ray Discs at this frame rate. However, not all TVs can display 24 progressive frames/
second of video. If the TV cannot display this frame rate, you need to turn o HDMI 1080P 24Hz.
This will cause high-de nition 16:9 video to be displayed correctly on a 4:3 screen but will distort
standard-de nition 4:3 video displayed on a 4:3 screen, and will distort video played on a wide-
screen TV.
Notes
• The displayable picture size is preset on the DVD. Therefore the playback picture of some DVDs
may not conform to the picture size selected.
• If your TV is 16:9 wide-screen (most modern TVs are), then choose either “16:9 Full” or “16:9 Pillarbox”.
If your TV is 4:3 (an older analog TV), then choose “4:3 Pan and Scan” or “4:3 Letterbox”.
Audio Setting
1. Press SETUP to display the Home Menu while in full stop mode.
2. Press or to select Audio Setting.
3. When nished with your Menu selections, press SETUP to exit Home Menu.
Audio Output
1. In the Audio Setting menu, press
or to select Audio Output.
2. Press
and press or to select an option (HDMI or Dynamic Range), then press OK.
3. Press or to select the desired option, and then press OK.
4. Press
to go to the previous menu.
HDMI
Raw Disc F
ormat: Disc’s raw (native) audio format will be output over HDMI.
PCM: Select when connected to a multi-channel digital stereo ampli er via HDMI.
Dynamic Range: allows you to make the loud parts of a movie’s audio track quieter than they would
be in the theatre, without mak
ing the dialog of the actors any quieter.
This would be useful, for instance, when you want to watch a movie in the evening when others
might be sleeping.
When Dynamic Range is set to O , movie soundtracks are played with the standard dynamic
range.
When movie soundtracks are played at low volume or from smaller speakers, you can set Dynamic
Range to On. Your player applies appropriate compression to make low-level content more intelligible
and prevent dramatic passages from getting too loud.
Selecting the “Auto” option turns on the Dynamic Range Control for all BD movie soundtracks except
Dolby TruHD.
Speaker Setting
1. In the Audio Setting menu, press or to select Speaker Setting.
2. Press and press or to select an option (Con guration or Test Tone), then press OK.
3. Press
or to select the desired option, and then press OK.
4. Press
to go to the previous menu.
Con guration: This setting will c
on gure your speakers as 5.1 (all speakers will be active), or as Stereo
(only your Front Right, Front Left, and Subwoofer will be active). We recommend you keep this setting
as 5.1.
Test Tone: Allows you to test and adjust the settings for each speaker.
Select the Test Tone and press the OK button. A short noise comes successively from each speaker in
turn.
To set the Delay values for speakers
1. While testing speaker tone, press OK to display the Delay prompt box, then press OK.
2. Press
or to make adjustment.
3. Press EXIT to exit.
Tip:
You can adjust your speaker levels by pressing the LEVEL button on remote control while you’re
in this “Test Tone” menu. Press LEVEL button, then press the
or buttons to adjust the speaker
level for the current speaker indicated on bottom of your TV screen. Press LEVEL button again to go
to next speaker. You can hear the e ects of your speaker levels changes as the Test Tone function
“cycles” through the speakers.
Dolby Pro logic II
Allows you to select a suitable surround sound mode for 2-channel audio (movies or music).
1.
In the A
udio Setting menu, press
or to select Dolby PL II (Dolby Pro logic II).
2. Press
to Dolby PLII Mode, then press OK.
3. Press
or to select the desired option (O , Music or Movie), and then press OK.
4. Press
to go to the previous menu.
System Information
1. Press SETUP to display the Home Menu while in full stop mode.
2. Press or to select System Information.
• Information on the unit’s software version will be displayed.
3. When nished with y
our Menu selections, press SETUP to exit Home Menu.
You can connect Audio or Audio-Video devices such as a TV, Game System, VCR, Satellite or Cable Box
to this unit using the AUX IN jack or OPTICAL jack at the back of the unit. The AUX input provides an
analog audio connection especially suitable for older devices. This unit will take the audio from the
connected device and play the audio through the speakers.
The OPTICAL input provides a digital connection suitable for components that can output dolby
digital surround sound audio.
Connecting auxiliary components
Refer to Connecting sound from External Sources such as TV for details on connecting the
auxiliary components to the unit.
Selecting AUX/OPTICAL mode
Press either SOURCE button on the main unit or AUX button or OPTICAL button on the remote
control to select AUX or OPTICAL mode.
Sound output in AUX/OPTICAL mode
You may change the Surround Sound setting to STEREO mode if you like (see instructions under
Overview of Controls). However, we recommend you leave the system in full surround mode
(5.1 CH).
There is no picture.
• Check that the T
V is operating correctly.
• Check the connections.
• Select the AV input assigned to the unit on the TV.
• Replace the HDMI cable with a better one. A bad HDMI cable can cause loss of video.
The picture is of poor quality (with snow or lines).
Check the connections.
There is no sound or the sound is of poor quality.
• Check the connections.
• Make sure the speakers are connected.
• Make sure the MUTE function is not on.
No surround sound - speakers not working.
Check to see if system is actually in full 5.1 SURROUND mode - if you see a red “2CH” icon on your
unit’s front panel display, the system is in STEREO mode rather than SURROUND mode. If current
setting is Stereo, the surround speakers and center speaker will be inactive. Press SURROUND button
in stop mode (BD mode, with disc playback stopped), then press
UP button to change surround
mode from Stereo to 5.1 SURROUND SOUND.
Note: Not all discs, media les, or audio sources provide surround audio, thus lack of audio to
surround speakers may be due to the actual source being played.
I can’t nd my le in the JPEG listing.
Make sure the le name is valid.
The remote control does not work or works only intermittently.
• Check that batteries are inserted or change them.
• Aim the remote control at the unit. The infrared beam must not be blocked or interrupted.
• Check that the remote control is con gured to control the device you are trying to operate with
it.
The subtitles do not appear.
• Check that the BD/DVD disc provides subtitles.
• Refer to the section on how to display subtitles.
The disc menu language is not the correct one.
• The disc menu language has not been set up.
• The language of your choice is not available on the disc.
I’m using an HDMI cable, but my the video quality doesn’t appear to be very good.
The unit defaults to 480i, in order to have broad compatibility with TVs, please adjust the unit’s video
resolution to that of your TV’s using SETUP Menu (to access, press SETUP button on remote control).
I’m trying to use the analog video output (yellow jack), however I don’t get video on my TV
screen.
Please try the following:
A. Please ensure your TV is set to the appropriate input.
B. If using analog video output, the unit’s display resolution must be set to 480i. Please try connecting
to your TV using an HDMI cable, then adjusting the unit’s display setting back to 480i, then
reconnecting to TV using analog AV cable.
 Loading...