Do you have a question about the Retrolife HQ-KZ006 and is the answer not in the manual?
Install the lid carefully over the hinge prongs.
Set the platter on the spindle and place the belt on the motor pulley.
Software instructions for encoding audio files using Audacity.
Download and install the LAME MP3 encoder for MP3 export.
Remove dust with a damp antistatic cloth; avoid dry cloths.
Insert and secure a new stylus into the headshell.
Fields for recording purchase and dealer information.
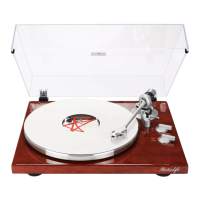
This document describes the Retrolife Belt Drive Turntable System, model HQ-KZ006, a device designed for playing vinyl records and offering various connectivity and recording features.
The Retrolife Belt Drive Turntable System is primarily designed for playing vinyl records. It features a belt-driven platter system, which helps to reduce motor noise and vibrations, ensuring a cleaner audio output. The turntable is equipped with a factory-adjusted cartridge, suitable for cartridges weighing between 3.0-6.0g, and a tonearm with adjustable tracking force.
Beyond basic playback, the turntable offers several connectivity options. It has a built-in phono equalizer function, allowing it to be connected directly to an amplifier or active/powered speakers even if they lack a dedicated phono input. For amplifiers with a phono input, the device can be set to PHONO mode, and for systems without, it can be set to LINE mode, utilizing its RCA PHONO & Line Out Jacks.
A notable feature is its Bluetooth transmitter, enabling wireless audio streaming to a Bluetooth speaker. This allows for flexible placement of the audio output without the need for physical cables.
The turntable also includes a USB-PC Port, which facilitates recording vinyl records onto a computer using software like Audacity. This allows users to digitize their vinyl collection for playback on other devices or for archival purposes.
Initial Setup: Before first use, the turntable requires a few setup steps. The lid needs to be carefully installed over the hinge prongs. The platter is then placed on the spindle, ensuring it is fully seated. The belt, which comes with a red ribbon attached, is placed on the motor pulley, taking care not to twist it.
Tonearm and Cartridge Adjustment: The counterweight is crucial for proper playback. It must be carefully rotated until the tonearm achieves a neutral, level balance, returning to this position if moved up or down. Once balanced, the tonearm is returned and locked to its rest. The tracking force dial is then "zeroed" by holding the counterweight still and gently rotating only the dial until "0" is centered over the black line on the tonearm. Finally, the counterweight is rotated counterclockwise to adjust the tracking force according to the cartridge manufacturer's recommendations. Each mark on the dial represents 0.05g, and for the factory-installed cartridge, a tracking force of 3.5g±0.5g is recommended, which may require more than one full rotation of the dial.
Power and Operation: The power adapter is connected to the DC power jack on the back of the turntable and then plugged into an electrical outlet. The turntable has a power management function that automatically enters standby mode after 20 minutes of inactivity. To resume operation, the power switch is pressed off, then on.
To play a record, the stylus protector is removed. The slip mat is placed on the platter, followed by the record. For 45 RPM records, the 45 RPM adapter is placed on the center spindle first. The Start/Stop dial is turned to the Start position to begin platter rotation. The tonearm clip is unlocked, and the Lift Lever is set to the up position. The tonearm is then positioned over the desired groove on the record. Moving the lift lever down gently lowers the tonearm onto the record. Once playback is complete, the tonearm is raised, returned to its rest, and the Start/Stop dial is turned to Stop.
Connectivity:
Recording to PC (USB Jack): The turntable can record vinyl to a computer via its USB-PC Port. This process typically involves using software like Audacity. The USB cable connects the turntable to the computer. Within Audacity, users need to set their preferences, adjust input/output volumes, and then use the record function to capture the audio. The software also allows for exporting the recorded music files to various formats like WAV, MP3, or Ogg. For MP3 export, an external LAME MP3 encoder needs to be installed and located by Audacity.
General Maintenance and Cleaning: Regular maintenance involves disconnecting the power cable before any cleaning. The turntable body should be dusted with a slightly damp antistatic cloth. Dry cloths are avoided as they can create static electricity and attract more dust. Antistatic cleaning agents can be used sparingly. It is recommended to install the needle cover before cleaning. If the turntable is not used for an extended period, the drive belt should be removed to prevent unequal stretching. The turntable should be placed on a low-resonance surface to minimize structural vibrations.
Stylus Tip Cleaning: For dirt or grime on the stylus tip, it should be cleaned with a commercially-sold brush. For considerably dirty tips, a stylus cleaner (not included) is recommended. The brush should be moved from the rear to the front of the stylus tip.
Replacing the Stylus: The stylus tip wears down over time, affecting sound quality. It is recommended to replace the stylus after 300 to 500 hours of use. Before replacement, the product's power cable must be disconnected. The protector is placed back on the stylus to prevent damage. The wire leads are carefully removed from the original cartridge. The two screws on the headshell securing the cartridge are loosened, and the original cartridge is removed. The new cartridge is then mounted and lightly tightened (not completely). The wire leads are connected to the new cartridge's terminals according to the color codes: white for left channel positive (L+), black for left channel negative (L-), red for right channel positive (R+), and black for right channel negative (R-).
Stylus Holder Replacement: To replace the stylus holder, grasp both sides of the holder and insert the stylus grip into the rear tab of the cartridge. Push up the stylus holder until it clicks and locks into place.
Cartridge Alignment: After replacing the stylus, the cartridge's position needs to be adjusted for precise alignment. This is done using a paper cartridge alignment protractor. The protractor is placed over the turntable spindle, and the tonearm's tip is placed on the marked 130mm and 250mm points. The cartridge is fine-tuned on the headshell until it is perfectly parallel with the reference lines at both points. Once aligned, the screws are tightened. If unfamiliar with this procedure, consulting a professional is recommended.
Troubleshooting: The manual provides a list of common issues and their solutions, such as no power, platter not turning, no signal from one or both channels, strong hum, distorted sound, and Bluetooth connection problems. These troubleshooting tips help users diagnose and resolve minor issues.
Packaging Disposal: The product's packaging is made from environmentally friendly material and can be disposed of at a local recycling plant.
| Type | Belt-Drive Turntable |
|---|---|
| Speeds | 33 1/3, 45, 78 RPM |
| Cartridge Type | Moving Magnet (MM) |
| Platter | Aluminum |
| Connectivity | Bluetooth, RCA |
| Features | Built-in Speakers |
| Output | RCA |